Due to a ransomware attack, the wiki was reverted to a July 2022 version. . We apologize for the lack of a more recent valid backup.
...
$BMV_PY: path to the Mininet custom filebmv2.py$BMV2_EXE: path to thesimple_switchtarget executable to use when running Mininet withbmv2.py$BMV2_JSON: path to the JSON configuration to use when running Mininet with bmv2.py. By default, this variable points to an "empty" dummy program.
...
p4cli: starts the native BMv2 runtime CLIp4log: shows the log of the BMv2 instancep4db: starts the BMv2 debuggerp4nmsg: starts the BMv2 event logger
...
Walkthrough
This walkthrough demonstrates the necessary steps and commands to run a network of BMv2 devices in Mininet, connected to ONOS.
Build and run ONOS. This how-to screencast is a good starting point to build and run ONOS locally on your development machine, for any other information please refer to the ONOS Developer Guide.
Info title Important! Build using Maven We are transitioning our build system from Maven to BUCK. Most of ONOS 1.6 modules can be build using BUCK expect for the bmv2 modules which are built by Maven. Hence, be sure to build ONOS using the command:
Code Block language text $ mvn clean install
Activate the BMv2 drivers. This will activate the whole BMv2 southbound subsystem, including the BMv2 providers, controller, and distributed services. In the ONOS command line type:
Code Block language text onos> app activate org.onosproject.drivers.bmv2
Check that both the BMv2 providers and drivers have been loaded successfully. On the ONOS command line, type:
Code Block language text onos> app -s -a
You should see an output similar to this (depending on your startup apps defined in
$ONOS_APPS)Code Block language text * 8 org.onosproject.bmv2 1.6.1.SNAPSHOT BMv2 Providers * 18 org.onosproject.drivers 1.6.1.SNAPSHOT Default Device Drivers * 19 org.onosproject.drivers.bmv2 1.6.1.SNAPSHOT BMv2 Drivers * 26 org.onosproject.openflow-base 1.6.1.SNAPSHOT OpenFlow Provider * 27 org.onosproject.hostprovider 1.6.1.SNAPSHOT Host Location Provider * 28 org.onosproject.lldpprovider 1.6.1.SNAPSHOT LLDP Link Provider * 29 org.onosproject.openflow 1.6.1.SNAPSHOT OpenFlow Meta App * 41 org.onosproject.fwd 1.6.1.SNAPSHOT Reactive Forwarding App * 80 org.onosproject.proxyarp 1.6.1.SNAPSHOT Proxy ARP/NDP App
Start Mininet using the custom file
bmv2.pyincluded inonos-p4-dev. On your Mininet VM (the same where you have clonedonos-p4-dev) shell, type:Code Block language bash $ sudo -E mn --custom $BMV2_PY --switch onosbmv2 --controller remote,ip=192.168.57.1,port=40123
This will run a simple Mininet topology with 2 hosts connected to a BMv2 switch, to use a different topology please refer to the Mininet guide. The The -E argument E argument in sudo ensures that all environment variables are exported to the root user, including $BMV2_EXE and EXE and $BMV2_JSON. $BMV2_PY is used to point to the location of the Mininet custom file bmv2.py. All these variables are exported automatically by the onosthe onos-p4-dev shell configuration script. In our case, ONOS is running on a machine reachable from the Mininet VM at the IP address 192.168.57.1. Be sure to use the correct IP address of your ONOS instance. 40123 is the default listening port of the BMv2 controller in ONOS. If successful, the output of the previous command should be similar to this:
Code Block language text *** Creating network *** Adding controller *** Adding hosts: h1 h2 *** Adding switches: s1 *** Adding links: (h1, s1) (h2, s1) *** Configuring hosts h1 h2 *** Starting controller c0 *** Starting 1 switches s1 Starting BMv2 target: /home/mininet/p4/onos-bmv2/targets/simple_switch/simple_switch --device-id 1 -i 1@s1-eth1 -i 2@s1-eth2 --thrift-port 38400 --log-console -Lwarn /home/mininet/p4/p4src/build/empty.json -- --controller-ip 192.168.57.1 --controller-port 40123 *** Starting CLI: mininet>
Check that the BMv2 switch is running. On the Mininet VM shell, type:
Code Block language text $ p4log 1 Calling target program-options parser Adding interface s1-eth1 as port 1 Adding interface s1-eth2 as port 2
This command shows the log of the BMv2 instance with device ID 1 (look for
--device-idin the Mininet startup output).Info title Running BMv2 for the first time Be aware that when running BMv2 for the first time after building it, it may take a while (up to 30 seconds) before the software switch process is executed and the log file written.
Another way to check if the switch is running is by using the native BMv2 runtime CLI. In this case, you can use the
p4clicommand to print some switch information:Code Block language text $ echo "switch_info" | p4cli 1 Obtaining JSON from switch... Done Control utility for runtime P4 table manipulation RuntimeCmd: device_id : 1 thrift_port : 38400 notifications_socket : ipc:///tmp/bmv2-1-notifications.ipc elogger_socket : None debugger_socket : None
Check that the BMv2 switch has successfully connected to ONOS. On the ONOS command line, check the output of the following command.
Code Block language text onos> devices id=bmv2:192.168.57.100:45674#1, available=true, role=NONE, type=SWITCH, mfr=p4.org, hw=bmv2, sw=1.0.0, serial=n/a, driver=bmv2-thrift, bmv2JsonConfigMd5=aefbfbd1543efbfbdefbfbdefbfbd121defbfbdefbfbd3468efbfbd76, bmv2ProcessInstanceId=-1811218096, protocol=bmv2-thrift
From the output, we can see that our BMv2 switch is connected (
available=true), along with the MD5 sum of the JSON configuration currently deployed (bmv2JsonConfigMd5)and a unique ID of the BMv2 process instance (bmv2ProcessInstanceId). The latter is assigned automatically at switch boot and is used by ONOS to distinguish between different executions of similar BMv2 instances (i.e. with the same device ID and MD5 sum) and to detect a potential state change of a device (e.g. a reboot after a crash of the BMv2 process), in which case ONOS will promptly re-establish network state (e.g. re-install flow rules).The MD5 sum you see here is the one of the default.json configuration that is deployed on each BMv2 switch when they first connect to ONOS.
You can also use the ONOS web GUI to explore your network. Point your browser to
http://localhost:8181/onos/ui/login.htmland authenticate yourself using usernamekarafand passwordkaraf. You should be able to see something similar to this (click to zoom):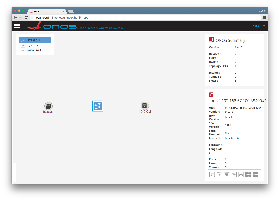
Check that the 2 hosts can ping each other. On the Mininet VM shell, use the
pingallcommand and chek the output:Code Block language text mininet> pingall *** Ping: testing ping reachability h1 -> h2 h2 -> h1 *** Results: 0% dropped (2/2 received)
If the hosts can't ping this is probably due to the fact that the "Reactive Forwarding" application is not running. Refer to the previous step to check the list of active apps, if not running you can do so by typing the following on the ONOS command line:
Code Block language text onos> app activate org.onosproject.fwd
Make sure that also the following applications are running:
hostprovider,lldpprovider, andproxyarp
Using Mininet with bmv2.py and onos.py
bmv2.py can be used in conjunction with onos.py, the latter is a Mininet custom file that allows to start up a complete emulated ONOS network in a single VM - including a an ONOS cluster, modeled control network, and data network. For more information about onos.py please refer to the official guide.
To emulate a network of BMv2 devices controlled by a an ONOS cluster you can use the following command (assuming you have cloned the ONOS repository in your home folder):
...