Due to a ransomware attack, the wiki was reverted to a July 2022 version. . We apologize for the lack of a more recent valid backup.
Welcome to the ONOS tutorial!
In this tutorial, you’ll complete a set of exercises designed to explain the main concepts of ONOS, our distributed network operating system. Soon, you'll understand how to use the basic features of ONOS.
...
indicates that you are in mininet.
Setup ONOS Cluster
Resetting
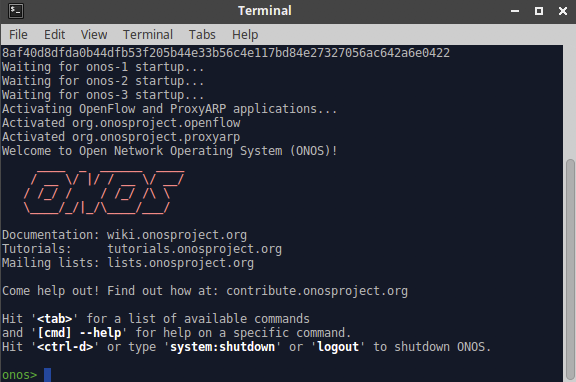
We have provided a simple mechanism which allows you to restart setup (or reset) the tutorial from scratch. Simply, click on the 'Reset' Setup ONOS Cluster icon on your desktop and this will reset ONOS cluster to its initial state. It'll take a few seconds for ONOS to restart and during cluster be formed. During that time you may not be able to launch your ONOS cli. the ONOS CLI. Double click the Setup ONOS Cluster icon now and wait for ONOS to start-up. When ready, you should see the following:
Start Mininet
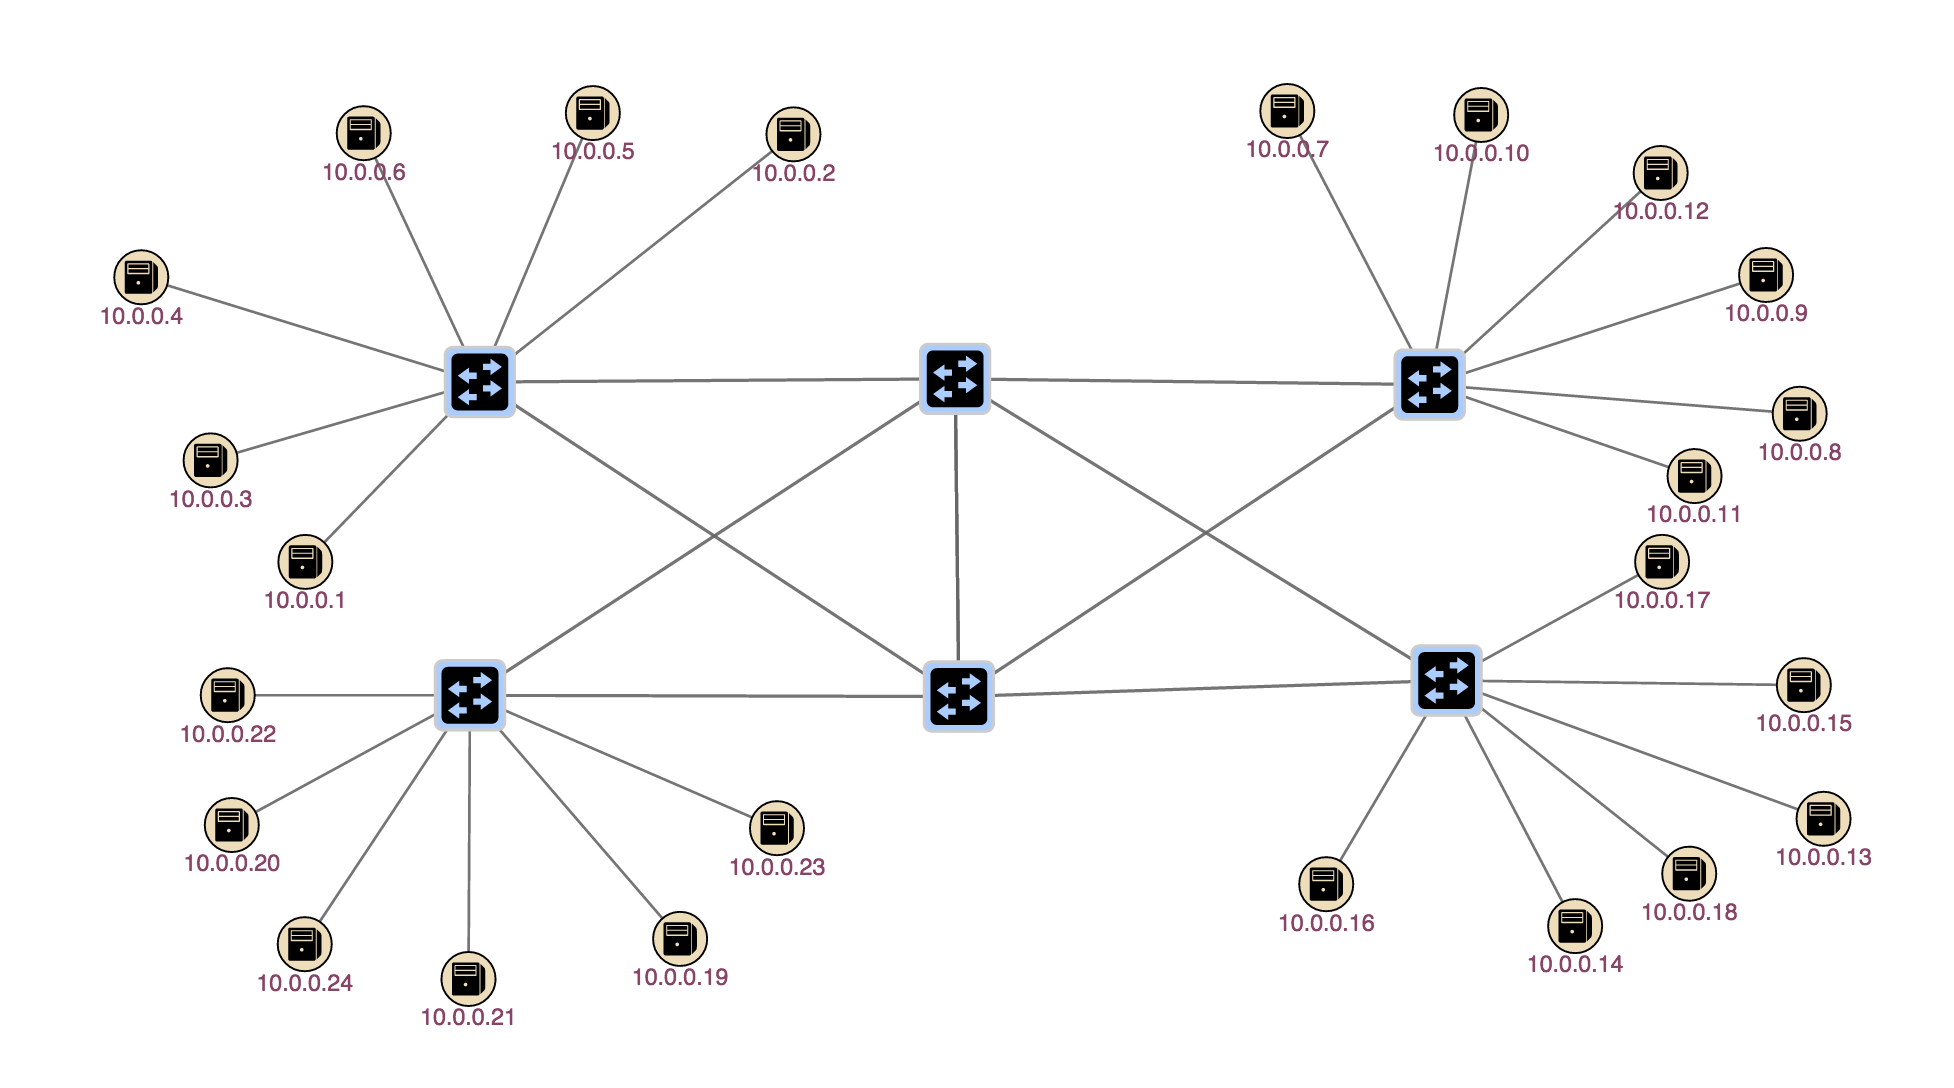
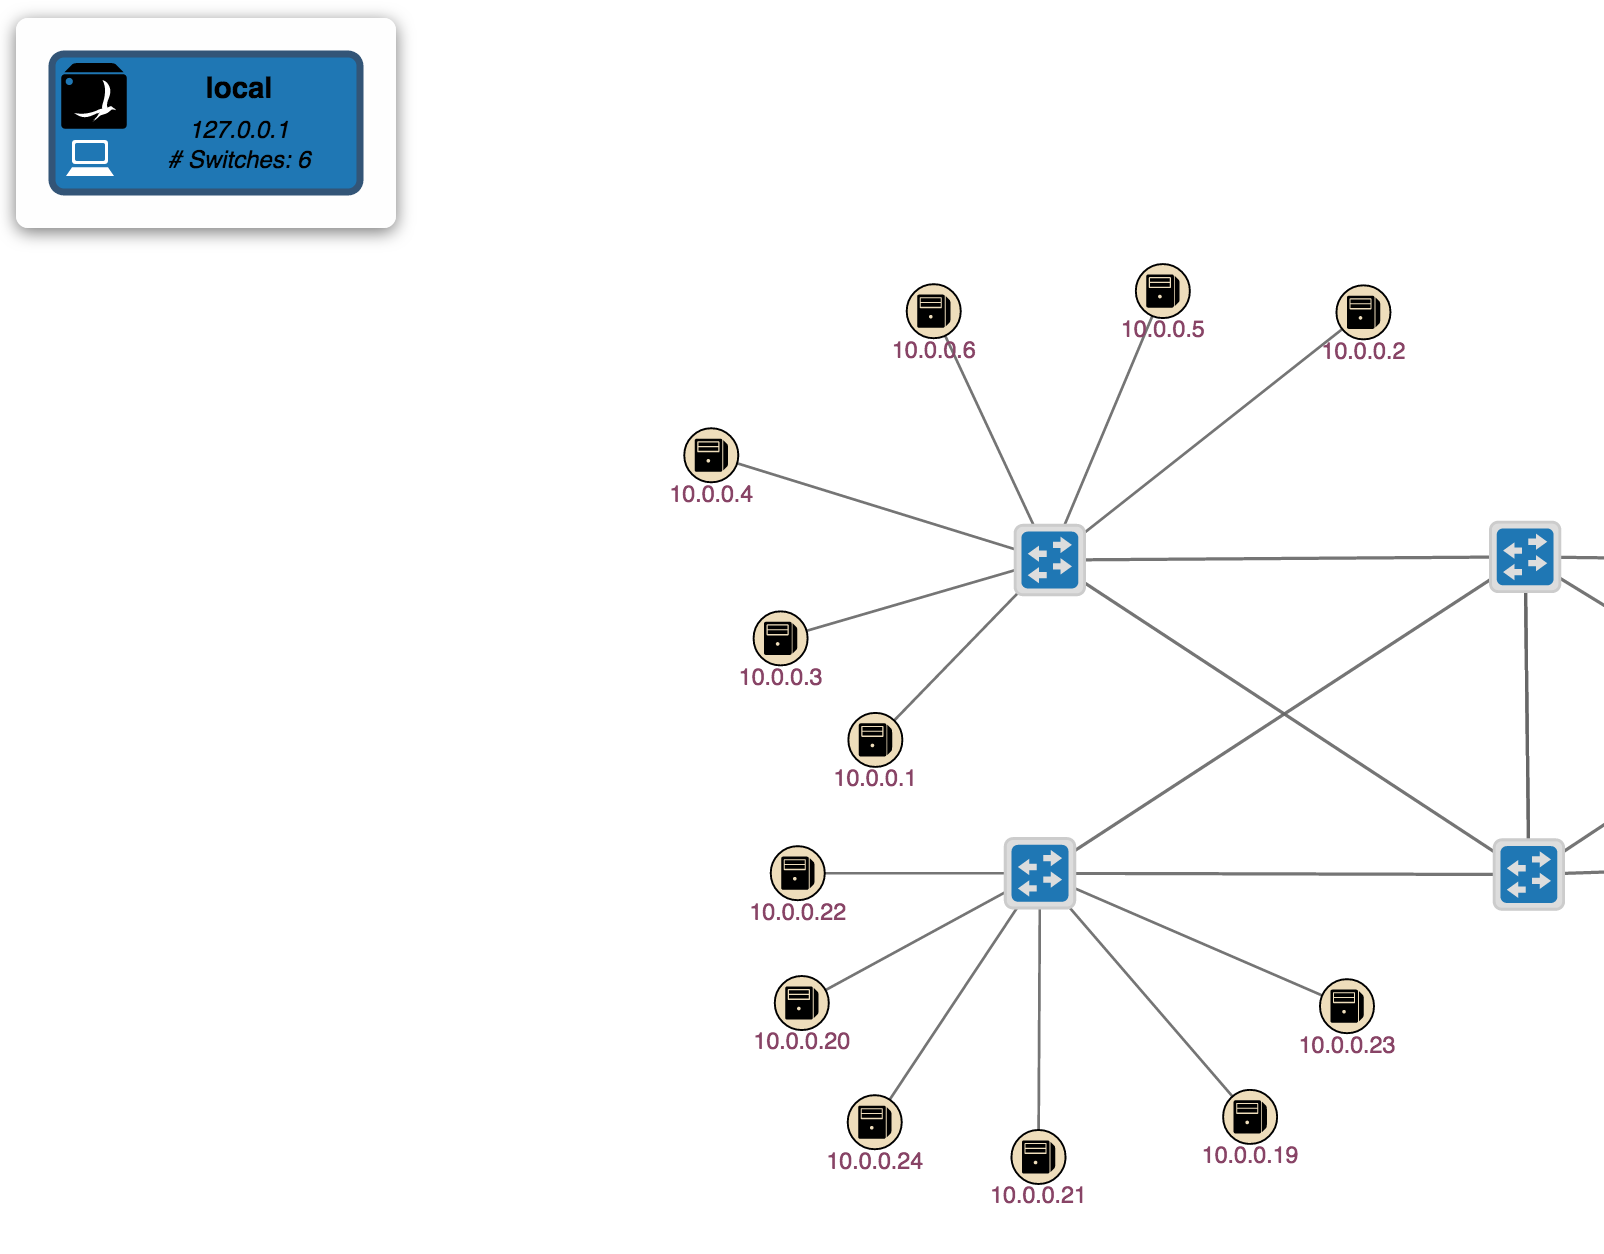
We’ll Though the tutorial VM provides a few sample topologies, we’ll be using the same spine-leaf physical topology for all exercises, so now is a good time to start Mininet. The network is a simple set of six switches where the outer switches are connected to two interconnection switches, which are connected together. The diagram below shows the topology.
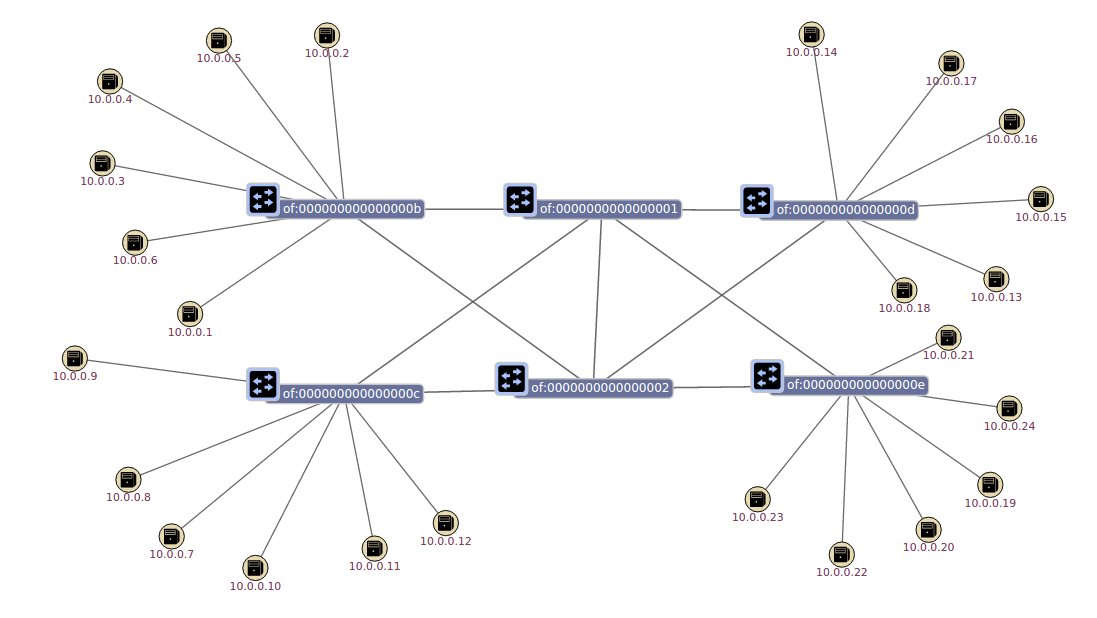
. The network with two spines and four leaves and five hosts per leaf is shown here:
Each of the outer switches has six hosts attached to it. To start mininet with this topology, simply double click on the Mininet Spine Leaf Topology icon on your desktop. To exit mininet, type CTRL-D or exit in the mininet prompt.
Start ONOS
Double-click the "Reset" icon on the desktop now. This will ensure the environment is clean and will start up ONOS.
Reactive Forwarding
Start by opening a console onto ONOS, you can do this by double clicking on the ONOS CLI icon.
No pings? Why?
In this exercise, we are going to run a sample app shipped with ONOS. Reactive Forwarding is a simple application which installs flows for every packet in that arrives at the controller. Go to your mininet prompt and do the following.
| Code Block |
|---|
mininet> h11 ping h41 |
...
You will notice that the ping fails as shown below.
| Code Block | ||
|---|---|---|
| ||
mininet> h11 ping -c3 h41 PING 10.0.0.19 (10.0.0.19) 56(84) bytes of data. From 10.0.0.1 icmp_seq=1 Destination Host Unreachable From 10.0.0.1 icmp_seq=2 Destination Host Unreachable From 10.0.0.1 icmp_seq=3 Destination Host Unreachable --- 10.0.0.19 ping statistics --- 3 packets transmitted, 0 received, +3 errors, 100% packet loss, time 2009ms |
...
So why did the ping fail? Well we didn't load the reactive forwarding application. Indeed, if you list the loaded applications you will see the following:
...
| Code Block |
|---|
onos> app activate org.onosproject.fwd |
...
Then, in a mininet window run the ping again, just this time don't limit the number of pings.
...
| Code Block | ||
|---|---|---|
| ||
onos> intents -i
id=0x2, state=INSTALLED, type=HostToHostIntent, appId=org.onlab.onos.ifwd
    constraints=[LinkTypeConstraint{inclusive=false, types=[OPTICAL]}]
    installable=[
PathIntent{id=0x4, appId=DefaultApplicationId{id=2, name=org.onlab.onos.ifwd},
	selector=DefaultTrafficSelector{criteria=[ETH_SRC{mac=00:00:00:00:00:0D}, ETH_DST{mac=00:00:00:00:00:07}]},
	treatment=DefaultTrafficTreatment{instructions=[]}, constraints=[LinkTypeConstraint{inclusive=false, types=[OPTICAL]}],
	path=DefaultPath{src=ConnectPoint{elementId=00:00:00:00:00:0D/-1, portNumber=0},
						dst=ConnectPoint{elementId=00:00:00:00:00:07/-1, portNumber=0}, type=INDIRECT, state=ACTIVE, durable=false}},
PathIntent{id=0x5, appId=DefaultApplicationId{id=2, name=org.onlab.onos.ifwd},
	selector=DefaultTrafficSelector{criteria=[ETH_SRC{mac=00:00:00:00:00:07}, ETH_DST{mac=00:00:00:00:00:0D}]},
	treatment=DefaultTrafficTreatment{instructions=[]}, constraints=[LinkTypeConstraint{inclusive=false, types=[OPTICAL]}],
	path=DefaultPath{src=ConnectPoint{elementId=00:00:00:00:00:07/-1, portNumber=0},
dst=ConnectPoint{elementId=00:00:00:00:00:0D/-1, portNumber=0}, type=INDIRECT, state=ACTIVE, durable=false}}] |
For example, this host to host intent has been compiled to two path intents with the appropriate traffic selections and actions computed on your behalf.
Intent Reactive Forwarding
Another sample application in ONOS is the intent reactive forwarding application. Rather than pushing flow entries for each packet it sees, the intent reactive forwarding application provisions an intent. In particular, it provisions a host to host intent which is a simple connectivity intent which enables the connectivity between two hosts.
Out with the old, In with the new
First let's start by removing the old reactive forwarding application and load the intent reactive forwarding application.
| Code Block |
|---|
onos> app deactivate org.onosproject.fwd
onos> app activate org.onosproject.ifwd |
NB: Notice the different bundle names: onos-app-fwd vs. onos-app-ifwd (Hint: there is an extra 'i' ![]() )
)
Ok let's just make sure it is loaded correctly:
| Code Block | ||
|---|---|---|
| ||
onos> apps -s -a
*   5 org.onosproject.drivers          1.2.1    Builtin device drivers
*  10 org.onosproject.ifwd             1.2.1    Reactive forwarding application using intent service (experimental)
*  30 org.onosproject.openflow         1.2.1    OpenFlow protocol southbound providers
|
So we can see that the intent forwarding application is correctly active. The appId for the Reactive Forwarding application remains, so if you reload that application it will get the same appId it had previously.
Intentionally React
Alright so let's forward some traffic.
| Code Block | ||
|---|---|---|
| ||
mininet> h21 ping h31
PING 10.0.0.13 (10.0.0.13) 56(84) bytes of data.
64 bytes from 10.0.0.13: icmp_seq=1 ttl=64 time=25.7 ms
64 bytes from 10.0.0.13: icmp_seq=2 ttl=64 time=1.73 ms
64 bytes from 10.0.0.13: icmp_seq=3 ttl=64 time=0.191 ms
64 bytes from 10.0.0.13: icmp_seq=4 ttl=64 time=0.079 ms
^C
--- 10.0.0.13 ping statistics ---
4 packets transmitted, 4 received, 0% packet loss, time 3005ms
rtt min/avg/max/mdev = 0.079/6.926/25.700/10.859 ms |
So by using the flows command you can list the flows (by running the flows command) that the intent installed. So how is this different than the other application? Well the end result is the same but the process by which it was obtained it radically different. The intent reactive forwarding application has installed an intent between h21 and h31, as you can see by running the intents command:
| Code Block | ||
|---|---|---|
| ||
onos> intents -i
id=0x0, state=INSTALLED, type=HostToHostIntent, appId=org.onlab.onos.ifwd
    constraints=[LinkTypeConstraint{inclusive=false, types=[OPTICAL]}]
    installable=[
PathIntent{id=0x1, appId=DefaultApplicationId{id=2, name=org.onlab.onos.ifwd},
	selector=DefaultTrafficSelector{criteria=[ETH_SRC{mac=00:00:00:00:00:0D}, ETH_DST{mac=00:00:00:00:00:07}]},
	treatment=DefaultTrafficTreatment{instructions=[]}, constraints=[LinkTypeConstraint{inclusive=false, types=[OPTICAL]}],
	path=DefaultPath{src=ConnectPoint{elementId=00:00:00:00:00:0D/-1, portNumber=0},
						dst=ConnectPoint{elementId=00:00:00:00:00:07/-1, portNumber=0}, type=INDIRECT, state=ACTIVE, durable=false}},
PathIntent{id=0x2, appId=DefaultApplicationId{id=2, name=org.onlab.onos.ifwd},
	selector=DefaultTrafficSelector{criteria=[ETH_SRC{mac=00:00:00:00:00:07}, ETH_DST{mac=00:00:00:00:00:0D}]},
	treatment=DefaultTrafficTreatment{instructions=[]}, constraints=[LinkTypeConstraint{inclusive=false, types=[OPTICAL]}],
	path=DefaultPath{src=ConnectPoint{elementId=00:00:00:00:00:07/-1, portNumber=0},
dst=ConnectPoint{elementId=00:00:00:00:00:0D/-1, portNumber=0}, type=INDIRECT, state=ACTIVE, durable=false}}] |
So the intent forwarding app has pushed the intent you see above as evidenced by the appId field. The intent is a host to host intent which details the path along which the flows have been installed. If you would like to know more about intents or the intent framework in general have a look at this page.
Before we continue, let's remove the intent you just installed so that it doesn't get in the way of the intent gymnastics we are going to do in the next section.
| Code Block |
|---|
onos> remove-intent org.onosproject.ifwd <TAB>
onos> purge-intents |
The <tab> key will autocomplete the id that was associated the intent we just pushed. You should now see that there are no intents in the system.
| Code Block |
|---|
onos> intents |
This command will return nothing as there are no intents in the systemhost to host intent has been compiled to two path intents with the appropriate traffic selections and actions computed on your behalf.
State your intentions
One major advantage of using intents over simply using flow entries to program your network is that intents track the state of the network and reconfigure themselves in order to satisfy your intention. For example, if link were to go down the intent framework would reroute your intent (ie. your flows) onto an alternative path. But, what if there are no alternative path? Well, in this case the intent would enter the failed state and remain there until a path becomes available. Pretty cool, eh? Let's check this out in action.
...
| Code Block | ||
|---|---|---|
| ||
onos> hosts id=00:00:00:00:00:01/-1, mac=00:00:00:00:00:01, location=of:000000000000000b/3, vlan=-1, ip(s)=[10.0.0.1] id=00:00:00:00:00:07/-1, mac=00:00:00:00:00:07, location=of:000000000000000c/3, vlan=-1, ip(s)=[10.0.0.7] id=00:00:00:00:00:0D/-1, mac=00:00:00:00:00:0D, location=of:000000000000000d/3, vlan=-1, ip(s)=[10.0.0.13] id=00:00:00:00:00:13/-1, mac=00:00:00:00:00:13, location=of:000000000000000e/3, vlan=-1, ip(s)=[10.0.0.19] |
...
Pick any any of these two hosts and install a host to host intent for them.
...
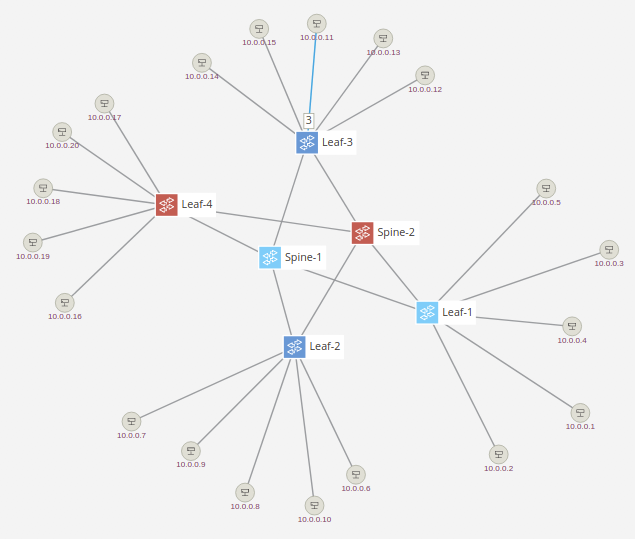
We can see that the traffic flows between dpid 00:00:00:00:00:00:00:01 (s1) and 00:00:00:00:00:00:00:0b (s11). If you have trouble seeing this, refer to the topology diagram in the beginning of this tutorial.
Ok so let's teardown the link between s1 and s11, you may have to teardown the link between s2 and s11 so pay attention to the flows command output. This can be done in mininet by running:
...
ONOS Graphical User Interface
First , lets reload our reactive forwarding application.
...
...
onos> app deactivate org.onosproject.ifwd
onos> app activate org.onosproject.fwd
ONOS comes with a GUI. The GUI allows you to manipulate your network in a simple way.
...
The hosts will not appear initially, simply type 'h' in your browser window and they will appear. At this point you should see something roughly similar to the image below.
GUI Features
GUI Cheat Sheet
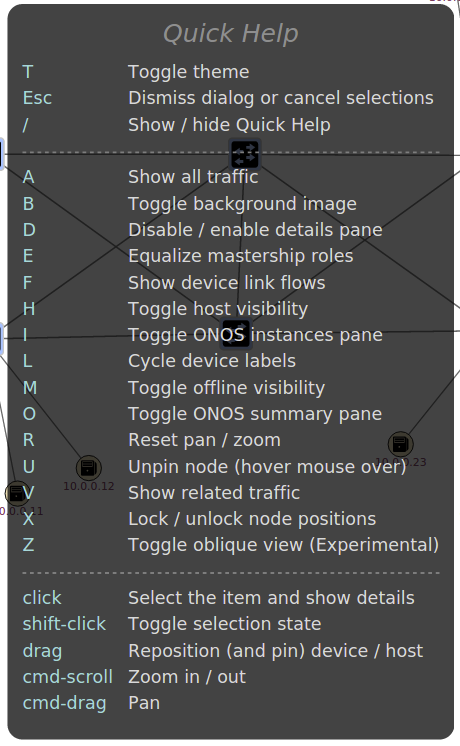
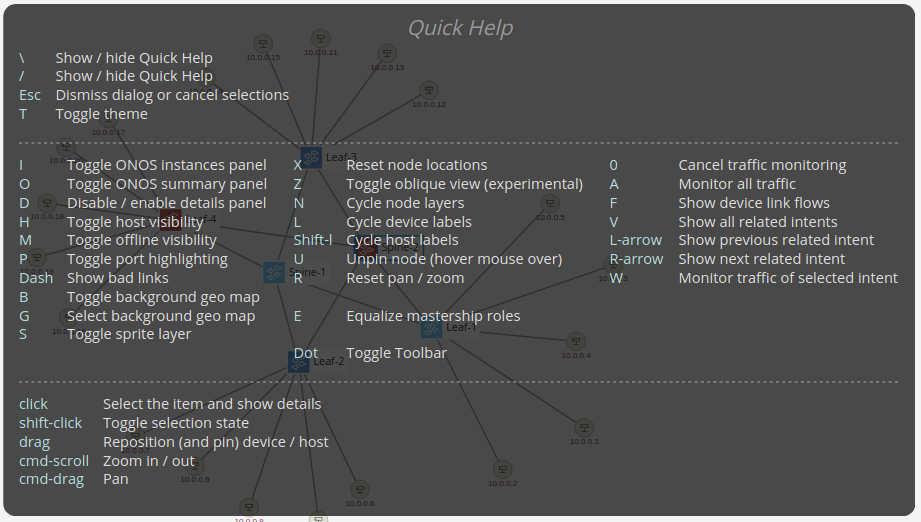
At anytime you can pull up the GUI's cheat sheet by typing '/' (which is '?' without the pesky shift ![]() ) and you will get a pane that looks like below.
) and you will get a pane that looks like below.
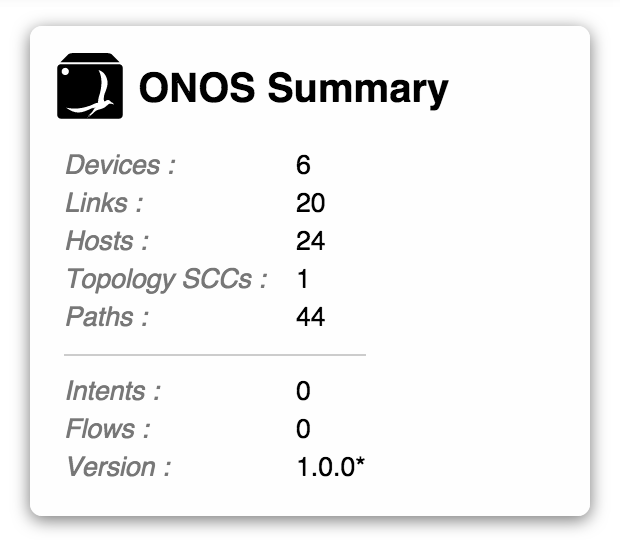
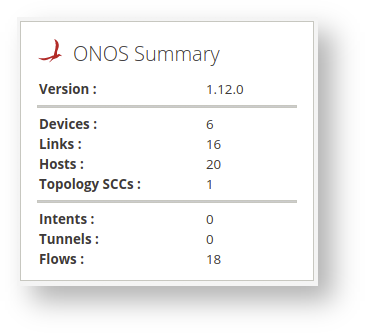
Summary pane
The GUI comes with a very useful summary pane. It shows you a summary of what is going on at this ONOS cluster.
Switch details
When you click on a switch a pane appears on the right hand side. This pane gives information about the switch as shown in the image below.
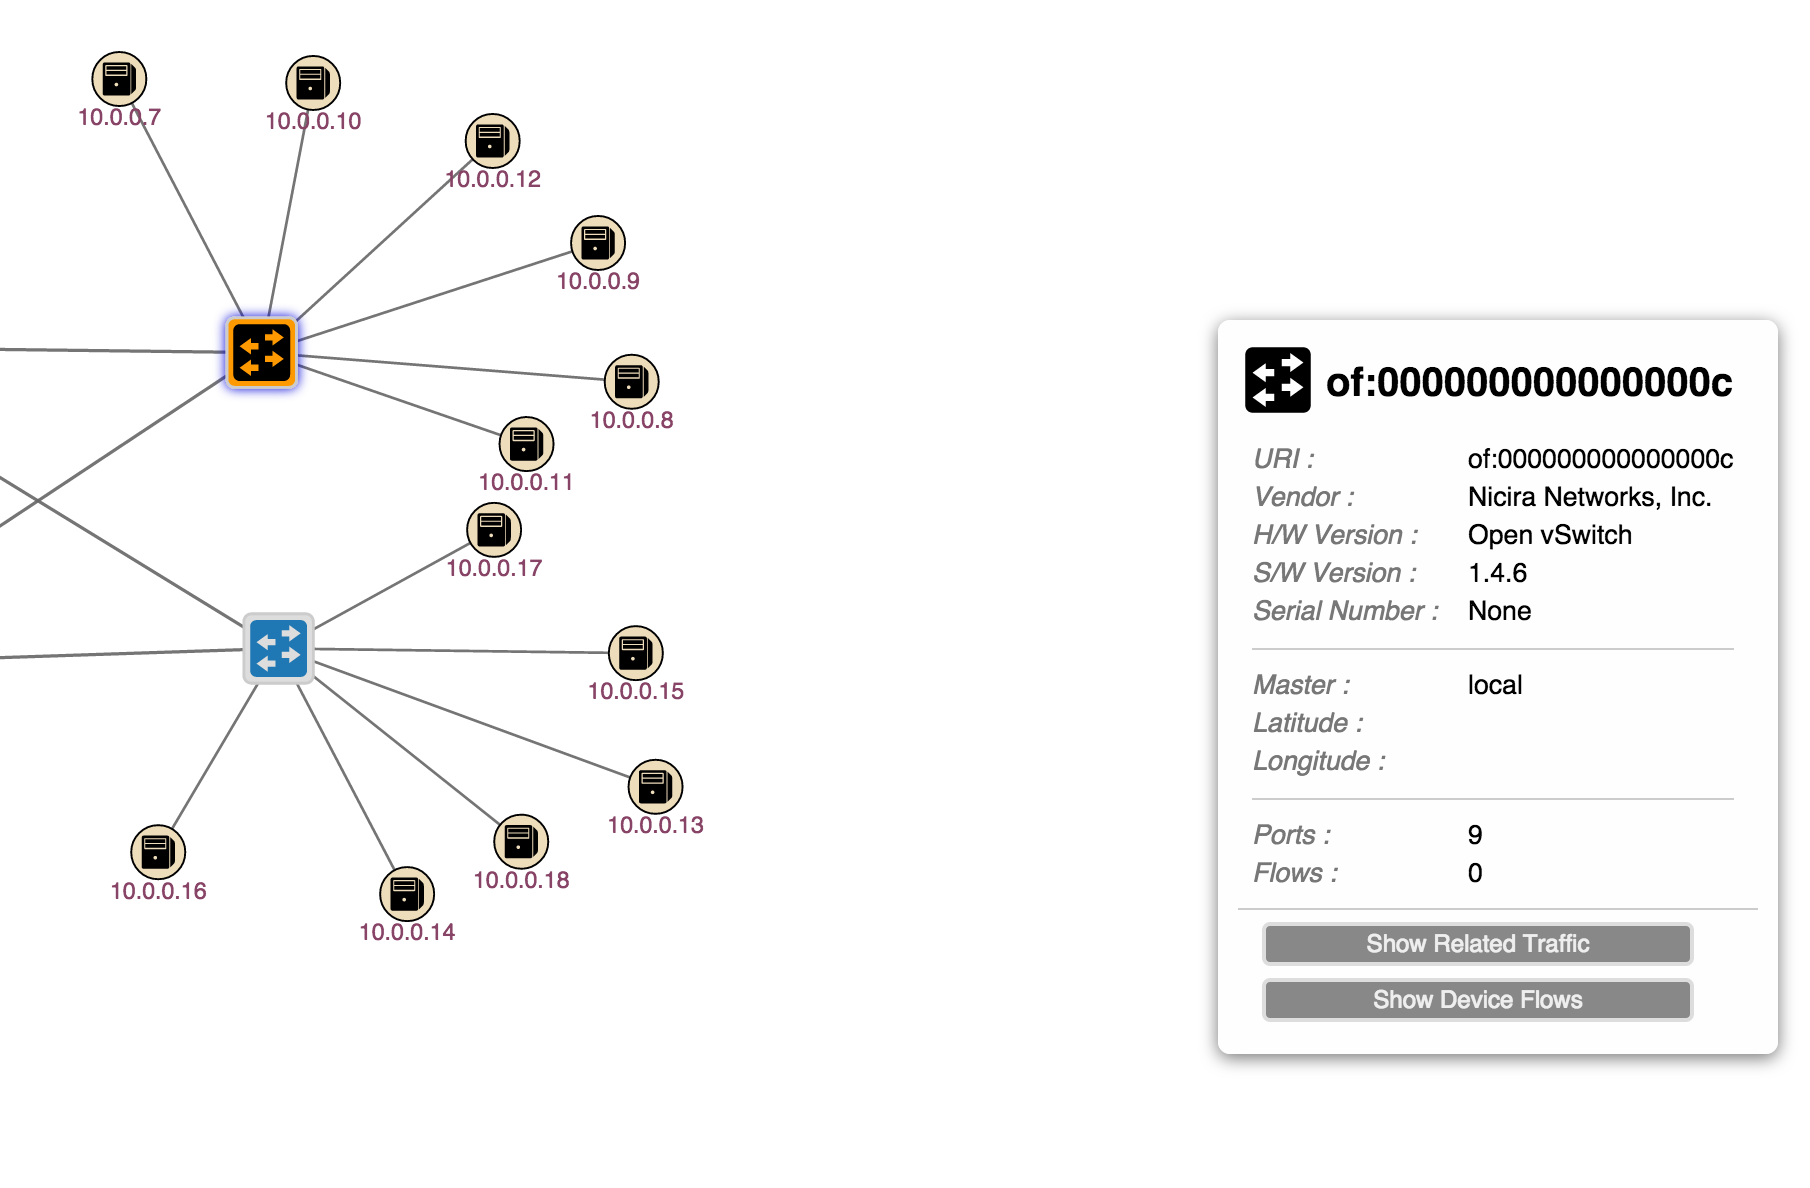

You my notice that the UI reports nine ports but you can only see eight, this is because OpenFlow switches have virtual ports that are hard to show on a UI.
...
The GUI has the ability to show which ONOS instances are active. By hitting the 'i' key (it will be open by default) you will see a pane show up on the left hand side as shown below.
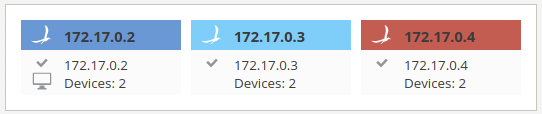
Notice that the glyphs for the switches changes color, this indicates which switches are controlled by which instance. This is useful to see at a glance which switches are controlled by which ONOS instance.
...
| Code Block |
|---|
mininet> h42 ping h23 |
...
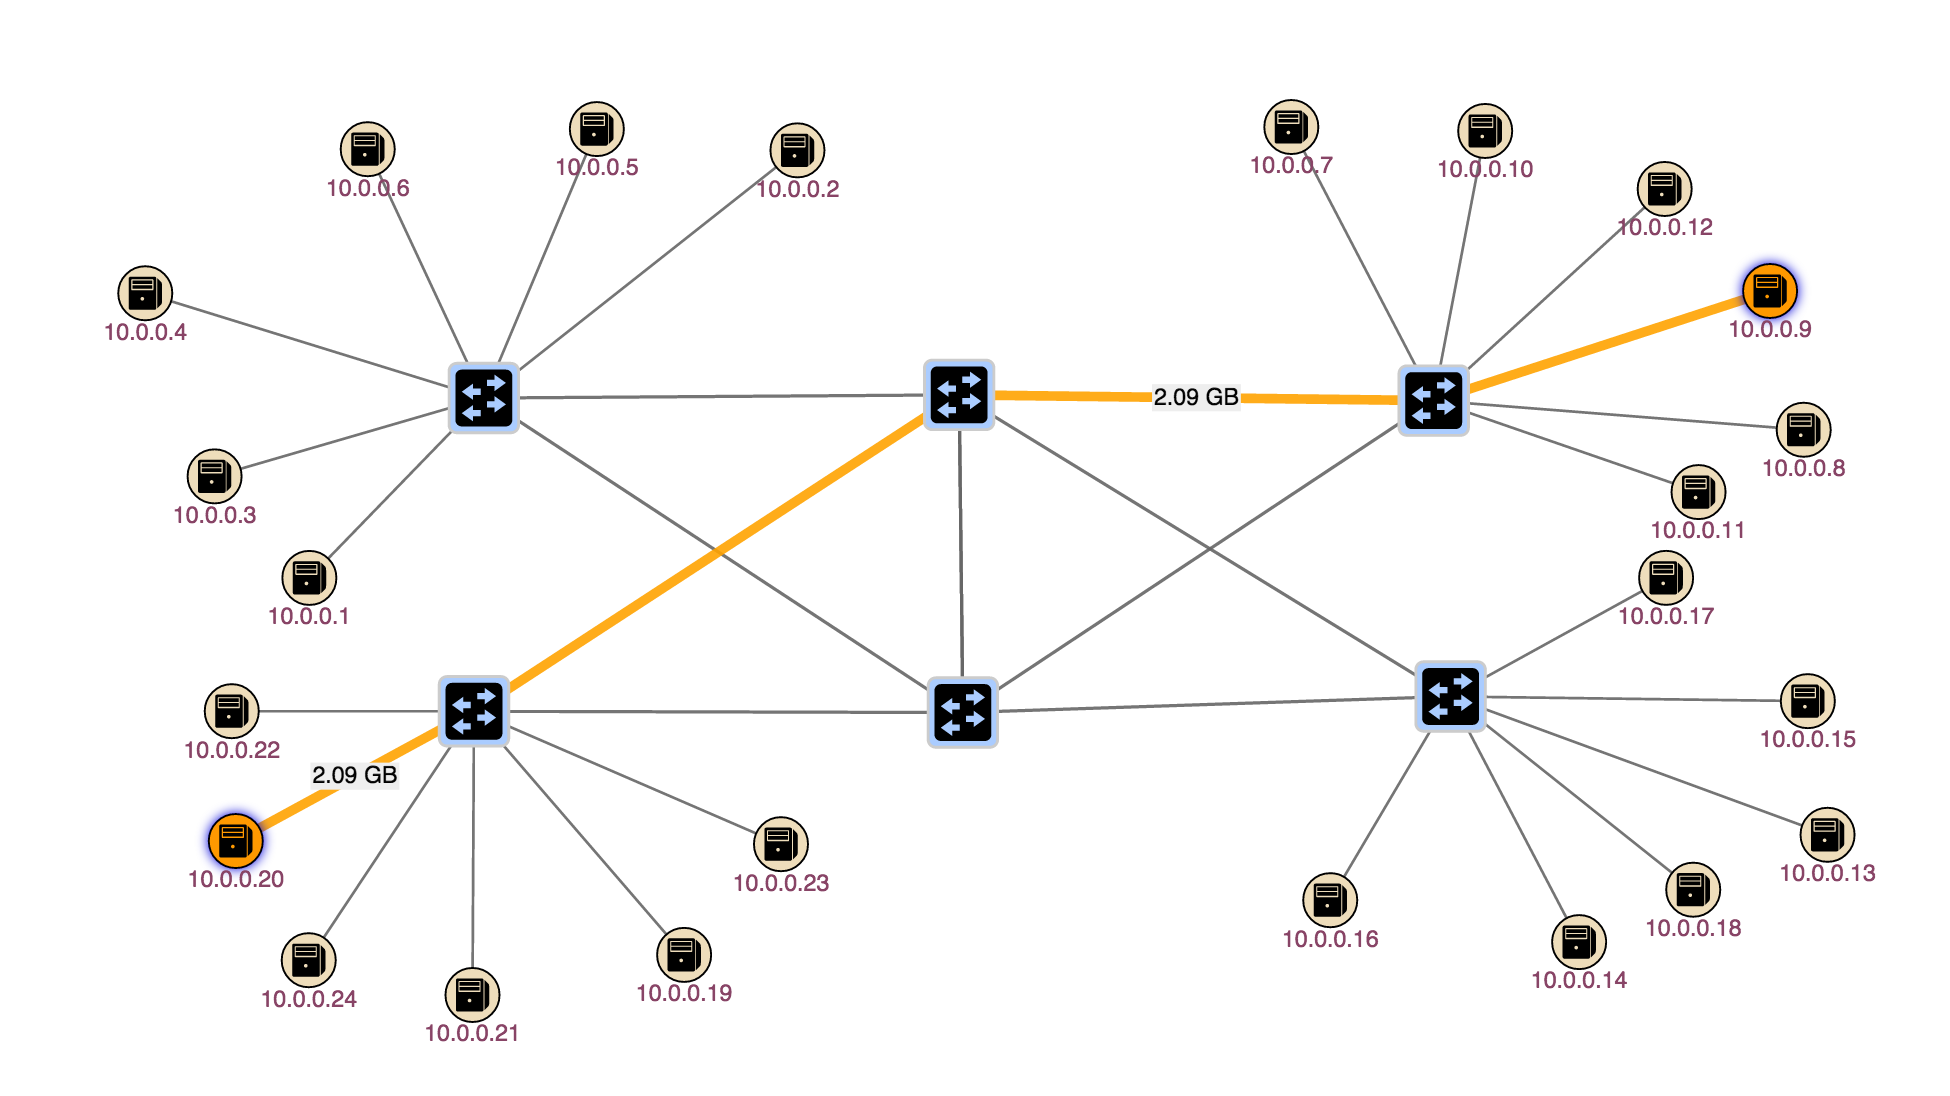
Show all traffic
Another thing you can do is activate the 'All Traffic' mode in the UI. This will show you any traffic that is running on the network. Activate this command by hitting 'a'.
...
Return To : Tutorials and Walkthroughs
...
...