Due to a ransomware attack, the wiki was reverted to a July 2022 version. . We apologize for the lack of a more recent valid backup.
...
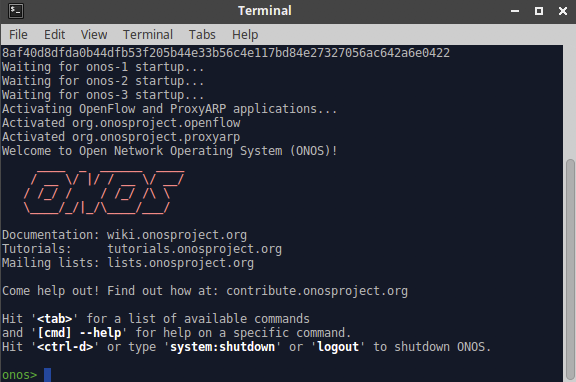
We have provided a simple mechanism which allows you to setup (or reset) the tutorial from scratch. Simply, click on the Setup ONOS Cluster icon on your desktop and this will reset ONOS cluster to its initial state. It'll take a few seconds for ONOS cluster be formed. During that time you may not be able to launch the ONOS CLI. Double click the Setup ONOS Cluster icon now and wait for ONOS to start-up. When ready, you should see the following:
Launch ONOS GUI
ONOS has a web-based GUI which you can launch by clicking the provided ONOS GUI icon. Login as user onos with password rocks
Start Mininet
Though the tutorial VM provides a few sample topologies, we’ll be using the same spine-leaf physical topology for all exercises. The network with two spines and four leaves and five hosts per leaf is shown here:
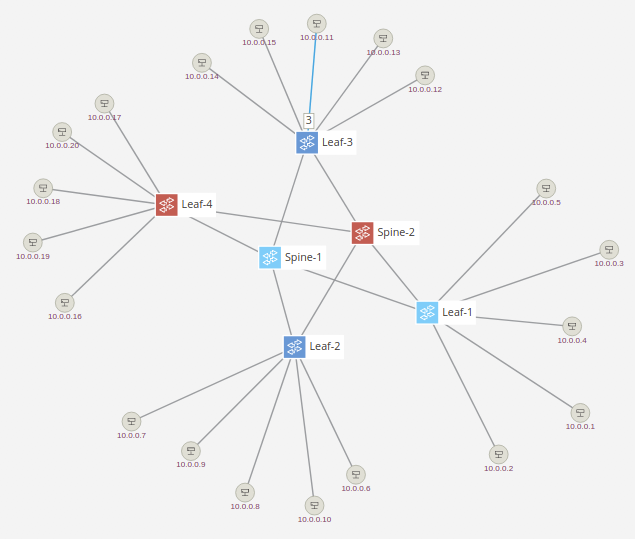
is comprised of two spine switches and four leaf switches with five hosts connected to each leaf. To start mininet with this topology, simply double click on the Spine Leaf Topology icon on your desktop. To When ready to exit mininet, not now however, type CTRL Ctrl-D or exit in the mininet prompt.
Reactive Forwarding
Start by opening a console onto ONOS, you can do this by double clicking on the ONOS CLI icon.
No pings? Why?
In this exercise, we are going to run a sample app shipped with ONOS. Reactive Forwarding is a simple application which installs flows for every packet in that arrives at the controller. Go to your mininet prompt and do the following.
| Code Block |
|---|
mininet> h11 ping h41 |
You will notice that the ping fails as shown below.
The ONOS GUI should now show the switches with the display looking similar to the following:
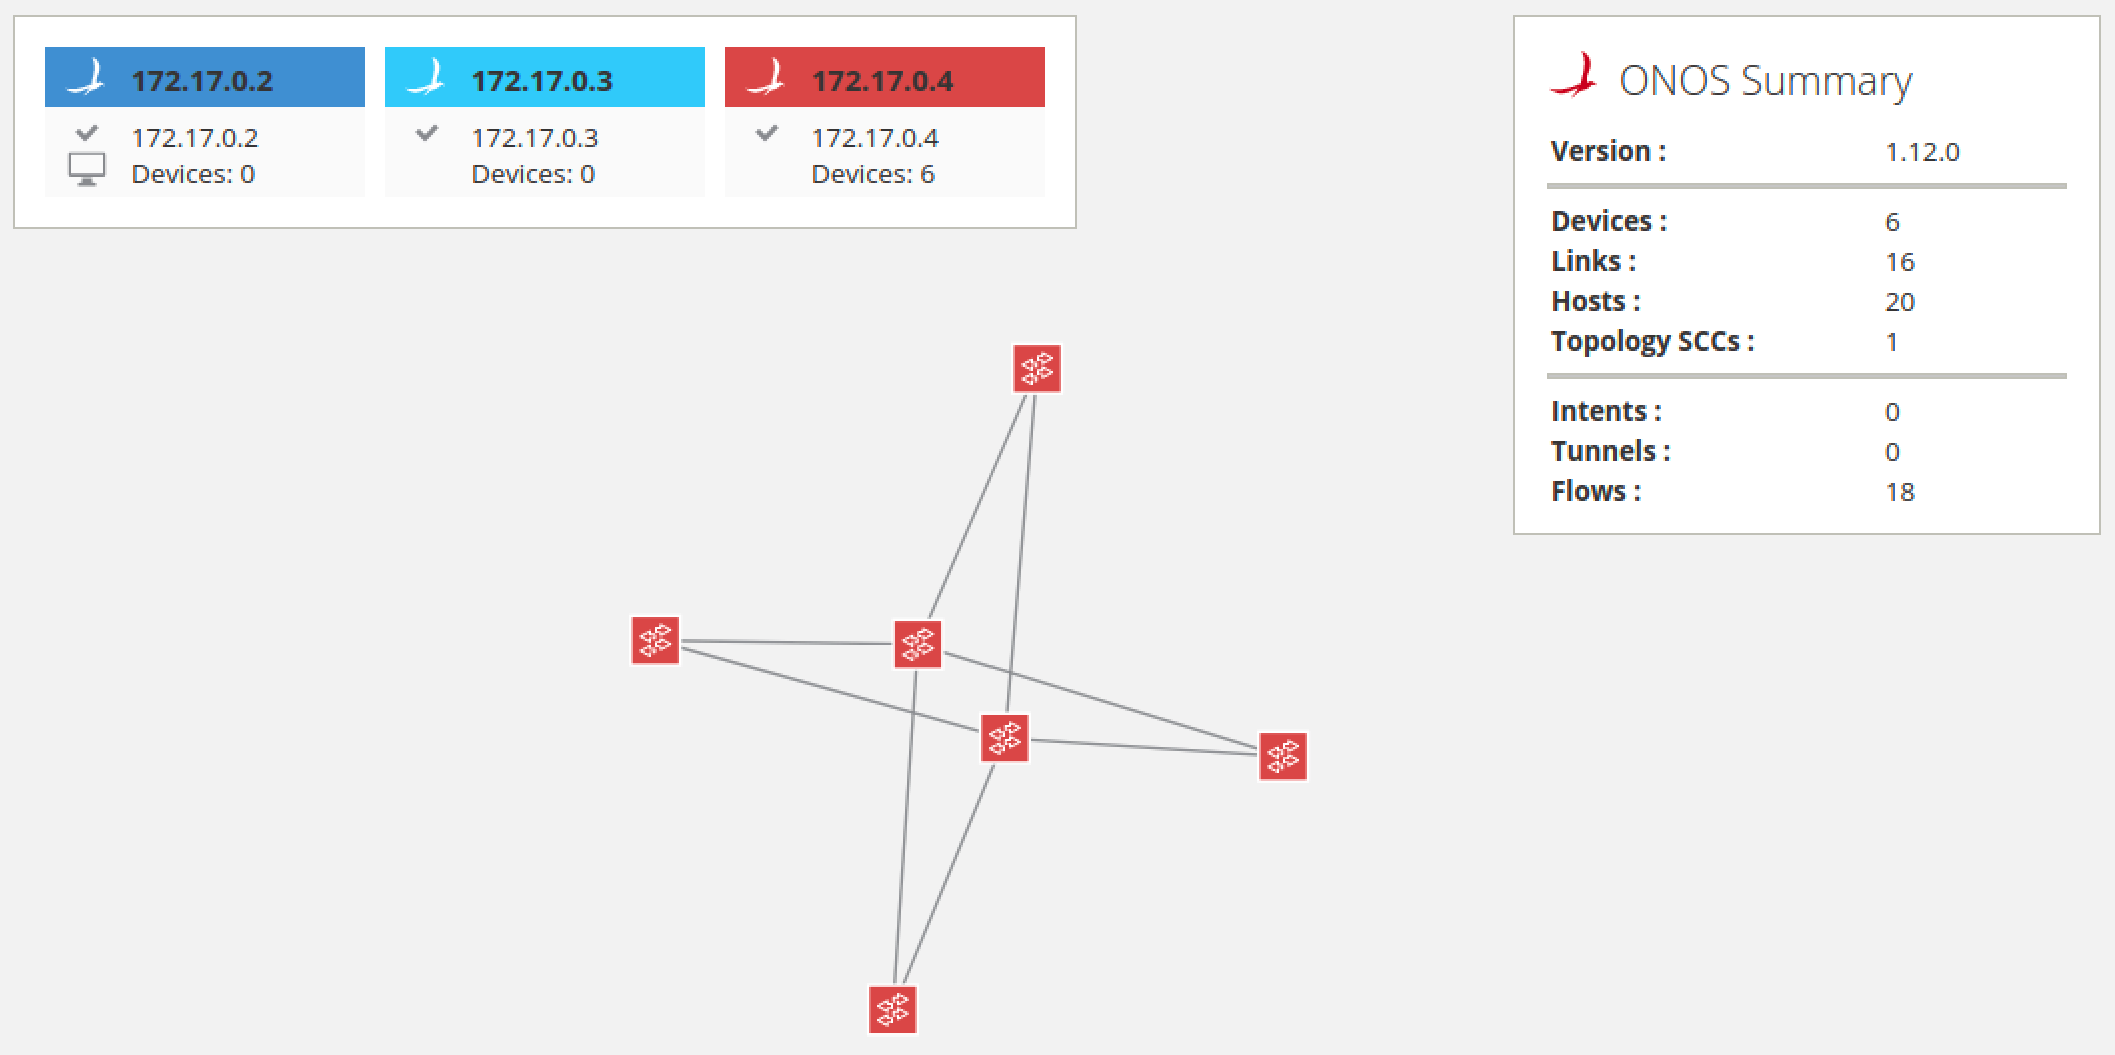
In order to display the node labels, press the L key to cycle between friendly lables, device ids and no labels. To toggle between showing and hiding hosts, you can press the H key. Press both L and H now.
Note that in the image above, all switches are now assigned mastership to the 3rd ONOS node (172.17.0.4), while the 1st and 2dn ONOS nodes have no devices for which they are the master. The ONOS GUI (as well as CLI) allow the user to force mastership re-balancing where the network devices will be roughly equally divided between all nodes in the ONOS cluster. To do this from the GUI, press the E key.
After toggling on host display, friendly labels and re-balancing, the display will look similar to the following:

Reactive Forwarding
In this exercise, we are going to use a sample app called Reactive Forwarding. It is shipped with ONOS and is a simple application that installs flows in response to every miss packet in that arrives at the controller.
Start by opening the ONOS CLI console by double clicking on the ONOS CLI icon.
No pings? Why?
First, let's see whether two hosts can reach each other via ICMP ping. Go to your mininet prompt and type the following:
| Code Block |
|---|
mininet> h11 ping -c3 h41 |
You will notice that the ping fails as shown below.
| Code Block | ||
|---|---|---|
| ||
mininet> h11 ping -c3 h41
PING 10.0.0.19 (10.0.0.19) 56(84) bytes of data.
From 10.0.0.1 icmp_seq=1 Destination Host Unreachable
From 10.0.0.1 icmp_seq=2 Destination Host Unreachable
From 10.0.0. | ||
| Code Block | ||
| ||
mininet> h11 ping -c3 h41
PING 10.0.0.19 (10.0.0.19) 56(84) bytes of data.
From 10.0.0.1 icmp_seq=1 Destination Host Unreachable
From 10.0.0.1 icmp_seq=2 Destination Host Unreachable
From 10.0.0.1 icmp_seq=3 Destination Host Unreachable
--- 10.0.0.19 ping statistics ---
3 packets transmitted, 0 received, +3 errors, 100% packet loss, time 2009ms |
...
So why did the ping fail? Well we didn't load the reactive forwarding application. Indeed, if you list the loaded applications , there are no flows installed on the data-plane, which forward the traffic appropriately. ONOS comes with a simple Reactive Forwarding app that installs forwarding flows on demand, but this application is not activated by default. To see apps that are presently active type the apps -a -s command and you will see the following output:
| Code Block | ||
|---|---|---|
| ||
onos> apps -a -s * 336 org.onosproject.drivers optical-model 1.2.2.SNAPSHOT Builtin device drivers12.0 Optical Network Model * 2440 org.onosproject.openflow -base 1.2.2.SNAPSHOT12.0 OpenFlow Base protocolProvider * southbound providers |
As you can see above, there is no reactive forwarding application loaded. Let's see how we load it.
Make it so, Number one
In your ONOS window, do
| Code Block |
|---|
onos> app activate 41 org.onosproject.fwd |
Then, in a mininet window run the ping again, just this time don't limit the number of pings.
| Code Block |
|---|
mininet> h11 ping h41 |
This time the ping is flowing:
| Code Block | ||
|---|---|---|
| ||
mininet> h11 ping h41
PING 10.0.0.19 (10.0.0.19) 56(84) bytes of data.
64 bytes from 10.0.0.19: icmp_req=1 ttl=64 time=9.12 ms
64 bytes from 10.0.0.19: icmp_req=2 ttl=64 time=0.892 ms
64 bytes from 10.0.0.19: icmp_req=3 ttl=64 time=0.075 ms
64 bytes from 10.0.0.19: icmp_req=4 ttl=64 time=0.068 ms |
Start stop start stop....
You have now seen that you can load applications into ONOS dynamically. Actually you can also interrupt applications while they are running so, for example, let's stop the reactive forwarding application.
| Code Block |
|---|
onos> app deactivate org.onosproject.fwd |
lldpprovider         1.12.0   LLDP Link Provider
*  44 org.onosproject.hostprovider         1.12.0   Host Location Provider
*  47 org.onosproject.drivers              1.12.0   Default Drivers
* 104 org.onosproject.openflow             1.12.0   OpenFlow Provider Suite
* 288 org.onosproject.proxyarp 1.12.0 Proxy ARP/NDP |
As you can see above, there is no reactive forwarding application loaded. Let's see how we load it.
Make it so, Number one
In the same ONOS CLI window, type the following to active the Reactive Forwarding app:Observe that the ping has now stopped. This is because when the reactive forwarding application is unloaded, it cleans up after itself by removing the rules that it has pushed. We'll talk more about this in the next section. For now, let's restart the reactive forwarding application.
| Code Block |
|---|
onos> app activate org.onosproject.fwd Activated org. |
...
ONOS CLI commands
ONOS has many CLI commands. In this section, we will go through some of the most useful commands. This section may also serve as a CLI reference for you during this tutorial. While we will explain some of the ONOS CLI commands here you can find an exhaustive list by running:
| Code Block |
|---|
onos> help onos |
or more information about an individual command adding --help to any command. Also most commands have autocompletion to help you find the parameters quickly and easily.
Devices command
An SDN Controller would be nothing without devices to control. Luckily, ONOS has a convenient command to list the device currently known in the system. Running
| Code Block |
|---|
onos> devices |
will return the following information,
onosproject.fwd |
Then, in a mininet window run the ping again, just this time don't limit the number of pings.
| Code Block |
|---|
mininet> h11 ping h41 |
This time the ping is flowing:
| Code Block | ||
|---|---|---|
| ||
mininet> h11 ping h41
PING 10.0.0.16 (10.0.0.16) 56(84) bytes of data.
64 bytes from 10.0.0.16: icmp_seq=1 ttl=64 time=39.6 ms
64 bytes from 10.0.0.16: icmp_seq=2 ttl=64 time=0.263 ms
64 bytes from 10.0.0.16: icmp_seq=3 ttl=64 time=0.058 ms
64 bytes from 10.0.0.16: icmp_seq=4 ttl=64 time=0.061 ms
64 bytes from 10.0.0.16: icmp_seq=5 ttl=64 time=0.065 ms |
Start stop start stop....
You have now seen that you can activate applications into ONOS dynamically. Actually you can also deactivate applications while they are running so, for example, let's do this. Note that you can ommit the org.onosproject prefix and use fwd for short.
| Code Block |
|---|
onos> app deactivate fwd |
Observe that the ping has now stopped. This is because when the reactive forwarding application has withdrawn any flows it has installed before it stopped. We'll talk more about this in the next section. For now, let's activate the app again.
| Code Block |
|---|
onos> app activate fwd |
...and the ping restarts ![]()
ONOS CLI commands
ONOS has many CLI commands. In this section, we will go through some of the most useful commands. This section may also serve as a CLI reference for you during this tutorial. While we will explain some of the ONOS CLI commands here you can find an exhaustive list by running:
| Code Block |
|---|
onos> help onos |
or more information about an individual command adding --help to any command. Also most commands have autocompletion to help you find the parameters quickly and easily.
Devices command
An SDN Controller would be nothing without devices to control. Luckily, ONOS has a convenient command to list the device currently known in the system. Running
| Code Block |
|---|
onos> devices |
will return the following information,
| Code Block | ||
|---|---|---|
| ||
onos> devices
id=of:0000000000000001, available=true, role=MASTER, type=SWITCH, mfr=Nicira, Inc., hw=Open vSwitch, sw=2.1.3, serial=None, protocol=OF_10
id=of:0000000000000002, available=true, role=MASTER, type=SWITCH, mfr=Nicira, Inc., hw=Open vSwitch, sw=2.1.3, serial=None, protocol=OF_10
id=of:000000000000000b, available=true, role=MASTER, type=SWITCH, mfr=Nicira, Inc., hw=Open vSwitch, sw=2.1.3, serial=None, protocol=OF_10
id=of:000000000000000c, available=true, role=MASTER, type=SWITCH, mfr=Nicira, Inc., hw=Open vSwitch, sw=2.1.3, serial=None, protocol=OF_10
id=of:000000000000000d, available=true, role=MASTER, type=SWITCH, mfr=Nicira, Inc., hw=Open vSwitch, sw=2.1.3, serial=None, protocol=OF_10
id=of:000000000000000e, available=true, role=MASTER, type=SWITCH, mfr=Nicira, Inc., hw=Open vSwitch, sw=2.1.3, serial=None, protocol=OF_10 |
which consists of a device id, and a boolean value which indicates whether this devices is currently up. You also get the type of device and well as it's role relationship with this ONOS instance.
Links command
The links command is used to list the links detected by ONOS. At the ONOS prompt run
| Code Block |
|---|
onos> links |
and you should get the following
| Code Block | ||
|---|---|---|
| ||
onos> devices
id=of:0000000000000001, available=true, role=MASTER, type=SWITCH, mfr=Nicira, Inc., hw=Open vSwitch, sw=2.1.3, serial=None, protocol=OF_10
id=of:0000000000000002, available=true, role=MASTER, type=SWITCH, mfr=Nicira, Inc., hw=Open vSwitch, sw=2.1.3, serial=None, protocol=OF_10
id=of:000000000000000b, available=true, role=MASTER, type=SWITCH, mfr=Nicira, Inc., hw=Open vSwitch, sw=2.1.3, serial=None, protocol=OF_10
id=of:000000000000000c, available=true, role=MASTER, type=SWITCH, mfr=Nicira, Inc., hw=Open vSwitch, sw=2.1.3, serial=None, protocol=OF_10
id=of:000000000000000d, available=true, role=MASTER, type=SWITCH, mfr=Nicira, Inc., hw=Open vSwitch, sw=2.1.3, serial=None, protocol=OF_10
id=of:000000000000000e, available=true, role=MASTER, type=SWITCH, mfr=Nicira, Inc., hw=Open vSwitch, sw=2.1.3, serial=None, protocol=OF_10 |
which consists of a device id, and a boolean value which indicates whether this devices is currently up. You also get the type of device and well as it's role relationship with this ONOS instance.
Links command
The links command is used to list the links detected by ONOS. At the ONOS prompt run
| Code Block |
|---|
onos> links |
and you should get the following output:
| Code Block | ||
|---|---|---|
| ||
onos> links
src=of:000000000000000e/1, dst=of:0000000000000001/5, type=DIRECT, state=ACTIVE
src=of:000000000000000d/1, dst=of:0000000000000001/4, type=DIRECT, state=ACTIVE
src=of:000000000000000e/2, dst=of:0000000000000002/5, type=DIRECT, state=ACTIVE
src=of:000000000000000c/1, dst=of:0000000000000001/3, type=DIRECT, state=ACTIVE
src=of:000000000000000d/2, dst=of:0000000000000002/4, type=DIRECT, state=ACTIVE
src=of:000000000000000b/1, dst=of:0000000000000001/2, type=DIRECT, state=ACTIVE
src=of:000000000000000c/2, dst=of:0000000000000002/3, type=DIRECT, state=ACTIVE
src=of:000000000000000b/2, dst=of:0000000000000002/2, type=DIRECT, state=ACTIVE
src=of:0000000000000002/2, dst=of:000000000000000b/2, type=DIRECT, state=ACTIVE
src=of:0000000000000001/2, dst=of:000000000000000b/1, type=DIRECT, state=ACTIVE
src=of:0000000000000002/3, dst=of:000000000000000c/2, type=DIRECT, state=ACTIVE
src=of:0000000000000001/3, dst=of:000000000000000c/1, type=DIRECT, state=ACTIVE
src=of:0000000000000002/4, dst=of:000000000000000d/2, type=DIRECT, state=ACTIVE
src=of:0000000000000001/4, dst=of:000000000000000d/1, type=DIRECT, state=ACTIVE
src=of:0000000000000002/5, dst=of:000000000000000e/2, type=DIRECT, state=ACTIVE
src=of:0000000000000001/5, dst=of:000000000000000e/1, type=DIRECT, state=ACTIVE
src=of:0000000000000002/1, dst=of:0000000000000001/1, type=DIRECT, state=ACTIVE
src=of:0000000000000001/1, dst=of:0000000000000002/1, type=DIRECT, state=ACTIVE |
The output shows you the list of discovered links. Reported links are formatted by source device-port pair to destination device-port pair. The 'type' field indicates whether the link is a direct connection between two devices or not.
Hosts command
A network without hosts is a little like a city without bars, it would be a ridiculously boring place. Fortunately, ONOS has the ability to list the hosts (as opposed to bars, although that would be a great feature) currently in the system.
| Code Block |
|---|
onos> hosts |
with this output:
| Code Block | ||
|---|---|---|
| ||
onos> hostslinks idsrc=00:00:00:00:00:01/-1, mac=00:00:00:00:00:01, locationof:000000000000000e/1, dst=of:000000000000000b0000000000000001/35, vlantype=-1DIRECT, ip(s)=[10.0.0.1] id=00:00:00:00:00:13/-1, mac=00:00:00:00:00:13, location=of:000000000000000e/3, vlan=-1, ip(s)=[10.0.0.19] |
Which displays the hosts' id as well as its mac address and where in the network it is connected. The '-1' in the id field is used to display the vlan information, in this case there is no vlan ![]() .
.
Flows command
The flows command allows you to observe which flow entries are currently registered in the system. Flow entries may be in several states:
- PENDING_ADD - The flow has been submitted and forwarded to the switch.
- ADDED - The flow has been added to the switch.
- PENDING_REMOVE - The request to remove the flow has been submitted and forwarded to the switch.
- REMOVED - The rule has been removed.
So let's start some traffic by going to the mininet window and running
| Code Block |
|---|
mininet> h11 ping h41 |
then in the ONOS window let's run the flows command
| Code Block |
|---|
onos> flows |
you should see the following output
state=ACTIVE
src=of:000000000000000d/1, dst=of:0000000000000001/4, type=DIRECT, state=ACTIVE
src=of:000000000000000e/2, dst=of:0000000000000002/5, type=DIRECT, state=ACTIVE
src=of:000000000000000c/1, dst=of:0000000000000001/3, type=DIRECT, state=ACTIVE
src=of:000000000000000d/2, dst=of:0000000000000002/4, type=DIRECT, state=ACTIVE
src=of:000000000000000b/1, dst=of:0000000000000001/2, type=DIRECT, state=ACTIVE
src=of:000000000000000c/2, dst=of:0000000000000002/3, type=DIRECT, state=ACTIVE
src=of:000000000000000b/2, dst=of:0000000000000002/2, type=DIRECT, state=ACTIVE
src=of:0000000000000002/2, dst=of:000000000000000b/2, type=DIRECT, state=ACTIVE
src=of:0000000000000001/2, dst=of:000000000000000b/1, type=DIRECT, state=ACTIVE
src=of:0000000000000002/3, dst=of:000000000000000c/2, type=DIRECT, state=ACTIVE
src=of:0000000000000001/3, dst=of:000000000000000c/1, type=DIRECT, state=ACTIVE
src=of:0000000000000002/4, dst=of:000000000000000d/2, type=DIRECT, state=ACTIVE
src=of:0000000000000001/4, dst=of:000000000000000d/1, type=DIRECT, state=ACTIVE
src=of:0000000000000002/5, dst=of:000000000000000e/2, type=DIRECT, state=ACTIVE
src=of:0000000000000001/5, dst=of:000000000000000e/1, type=DIRECT, state=ACTIVE
src=of:0000000000000002/1, dst=of:0000000000000001/1, type=DIRECT, state=ACTIVE
src=of:0000000000000001/1, dst=of:0000000000000002/1, type=DIRECT, state=ACTIVE |
The output shows you the list of discovered links. Reported links are formatted by source device-port pair to destination device-port pair. The 'type' field indicates whether the link is a direct connection between two devices or not.
Hosts command
A network without hosts is a little like a city without bars, it would be a ridiculously boring place. Fortunately, ONOS has the ability to list the hosts (as opposed to bars, although that would be a great feature) currently in the system.
| Code Block |
|---|
onos> hosts |
with this output:
| Code Block | ||
|---|---|---|
| ||
onos> hosts
id | ||
| Code Block | ||
| ||
deviceId=of:0000000000000001, flowRuleCount=1 id=30000b889cb32, state=ADDED, bytes=8722, packets=89, duration=89, priority=10, appId=org.onlab.onos.fwd selector=[ETH_TYPE{ethType=800}, ETH_SRC{mac=00:00:00:00:00:01}, ETH_DST{mac=00:00:00:00:00:13}, IN_PORT{port=2}] treatment=[OUTPUT{port=5}] deviceId=of:0000000000000002, flowRuleCount=1 id=30000b889cf4d, state=ADDED, bytes=8624, packets=88, duration=88, priority=10, appId=org.onlab.onos.fwd selector=[ETH_TYPE{ethType=800}, ETH_SRC{mac=00:00:00:00:00:13}, ETH_DST{mac=00:00:00:00:00:01}, IN_PORT{port=5}] treatment=[OUTPUT{port=2}] deviceId=of:000000000000000b, flowRuleCount=2 id=30000b88a8321, state=ADDED, bytes=8722, packets=89, duration=89, priority=10, appId=org.onlab.onos.fwd selector=[ETH_TYPE{ethType=800}, ETH_SRC{mac=00:00:00:00:00:13}, ETH_DST{mac=00:00:00:00:00:01}/-1, IN_PORT{port=2}] treatment=[OUTPUT{port=3}] id=30000b88a833e, state=ADDED, bytes=8722, packets=89, duration=89, priority=10, appId=org.onlab.onos.fwd selector=[ETH_TYPE{ethType=800}, ETH_SRC{macmac=00:00:00:00:00:01, location=of:000000000000000b/3, vlan=-1, ip(s)=[10.0.0.1] id=00:00:00:00:00:01}13/-1, ETH_DST{mac=00:00:00:00:00:13}, location=of:000000000000000e/3, vlan=-1, ip(s)=[10.0.0.19] |
Which displays the hosts' id as well as its mac address and where in the network it is connected. The '-1' in the id field is used to display the vlan information, in this case there is no vlan ![]() .
.
Flows command
The flows command allows you to observe which flow entries are currently registered in the system. Flow entries may be in several states:
- PENDING_ADD - The flow has been submitted and forwarded to the switch.
- ADDED - The flow has been added to the switch.
- PENDING_REMOVE - The request to remove the flow has been submitted and forwarded to the switch.
- REMOVED - The rule has been removed.
So let's start some traffic by going to the mininet window and running
| Code Block |
|---|
mininet> h11 ping h41 |
then in the ONOS window let's run the flows command
| Code Block |
|---|
onos> flows |
you should see the following output
| Code Block | ||
|---|---|---|
| ||
deviceId=of:0000000000000001, flowRuleCount=1 id=30000b889cb32, state=ADDED, bytes=8722, packets=89, duration=89, priority=10, appId=org.onlab.onos.fwd selectorIN_PORT{port=3}] treatment=[OUTPUT{port=1}] deviceId=of:000000000000000c, flowRuleCount=0 deviceId=of:000000000000000d, flowRuleCount=0 deviceId=of:000000000000000e, flowRuleCount=2 id=30000b88a8e45, state=ADDED, bytes=8722, packets=89, duration=89, priority=10, appId=org.onlab.onos.fwd selector=[ETH_TYPE{ethType=800}, ETH_SRC{mac=00:00:00:00:00:01}, ETH_DST{mac=00:00:00:00:00:13}, IN_PORT{port=1}] treatment=[OUTPUT{port=3}] id=30000b88a8e82, state=ADDED, bytes=8722, packets=89, duration=89, priority=10, appId=org.onlab.onos.fwd selector=[ETH_TYPE{ethType=800}, ETH_SRC{mac=00:00:00:00:00:1301}, ETH_DST{mac=00:00:00:00:00:0113}, IN_PORT{port=32}] treatment=[OUTPUT{port=2}] |
As you can see from the above output, ONOS provides many details about he the flows at the switches. For example each flow entry defines a selector and treatment which is the set of traffic matched by the the flow entry and how this traffic should be handled. Notice as well that each flow entry it tagged by an appId (application id), this appId identifies which application installed this flow entry. This is a useful feature because it can help an admin identify which application may be misbehaving or consuming many resources.
Paths command
Given a network topology, ONOS computes all the shortest paths between any two nodes. This is especially useful for your applications to obtain path information for either flow installation or some other use. The paths command takes two arguments, both of them are devices. To make things easy for you ONOS provides CLI autocompletion by simply hitting the <TAB> key.
| Code Block | ||
|---|---|---|
| ||
onos> paths <TAB>
of:0000000000000001   of:0000000000000002   of:000000000000000b
of:000000000000000c of:000000000000000d of:000000000000000e |
ONOS lists device options for you, thereby making it easier to find the devices you would like. For example, the output of the command below shows two paths of equal costs.
| Code Block | ||
|---|---|---|
| ||
onos> paths of:000000000000000b of:000000000000000e
of:000000000000000b/1-of:0000000000000001/2==>of:0000000000000001/5-of:000000000000000e/1; cost=2.0
of:000000000000000b/2-of:0000000000000002/2==>of:0000000000000002/5-of:000000000000000e/2; cost=2.0 |
Intent Command
The intent command allows one to see what intents are stored in the system. Intents can be in several states:
- SUBMITTED - The intent has been submitted and will be processed soon.
- COMPILING - The intent is being compiled. This is a transient state.
- INSTALLING - The intent is in the process of being installed.
- INSTALLED - The intent has been installed.
- RECOMPILING - The intent is being recompiled after a failure.
- WITHDRAWING - The intent is being withdrawn.
- WITHDRAWN - The intent has been removed.
- FAILED - The intent is in a failed state because it cannot be satisfied.
For more information about Intents go here.
| Code Block | ||
|---|---|---|
| ||
onos> intents
id=0x0, state=INSTALLED, type=HostToHostIntent, appId=org.onlab.onos.gui
	constraints=[LinkTypeConstraint{inclusive=false, types=[OPTICAL]}]
id=0x1, state=WITHDRAWN, type=HostToHostIntent, appId=org.onlab.onos.cli
constraints=[LinkTypeConstraint{inclusive=false, types=[OPTICAL]}] |
Note: You will not see any intents until some have been added. In the next section of the tutorial, you will load the intent reactive forwarding application, which automatically adds intents as needed.
The command can also tell you what type of sub-intents the intent has been compiled to:
| Code Block | ||
|---|---|---|
| ||
onos> intents -i id=0x2, state=INSTALLED, type=HostToHostIntent, appId=org.onlab.onos.ifwd constraints=[LinkTypeConstraint{inclusive=false, types=[OPTICAL]}] installable=[ PathIntent{id=0x4, appId=DefaultApplicationId{id=2, name=org.onlab.onos.ifwd}, selector=DefaultTrafficSelector{criteria=[5}] deviceId=of:0000000000000002, flowRuleCount=1 id=30000b889cf4d, state=ADDED, bytes=8624, packets=88, duration=88, priority=10, appId=org.onlab.onos.fwd selector=[ETH_TYPE{ethType=800}, ETH_SRC{mac=00:00:00:00:00:13}, ETH_DST{mac=00:00:00:00:00:01}, IN_PORT{port=5}] treatment=[OUTPUT{port=2}] deviceId=of:000000000000000b, flowRuleCount=2 id=30000b88a8321, state=ADDED, bytes=8722, packets=89, duration=89, priority=10, appId=org.onlab.onos.fwd selector=[ETH_TYPE{ethType=800}, ETH_SRC{mac=00:00:00:00:00:13}, ETH_DST{mac=00:00:00:00:00:01}, IN_PORT{port=2}] treatment=[OUTPUT{port=3}] id=30000b88a833e, state=ADDED, bytes=8722, packets=89, duration=89, priority=10, appId=org.onlab.onos.fwd selector=[ETH_TYPE{ethType=800}, ETH_SRC{mac=00:00:00:00:00:01}, ETH_DST{mac=00:00:00:00:00:13}, IN_PORT{port=3}] treatment=[OUTPUT{port=1}] deviceId=of:000000000000000c, flowRuleCount=0 deviceId=of:000000000000000d, flowRuleCount=0 deviceId=of:000000000000000e, flowRuleCount=2 id=30000b88a8e45, state=ADDED, bytes=8722, packets=89, duration=89, priority=10, appId=org.onlab.onos.fwd selector=[ETH_TYPE{ethType=800}, ETH_SRC{mac=00:00:00:00:00:01}, ETH_DST{mac=00:00:00:00:00:13}, IN_PORT{port=1}] treatment=[OUTPUT{port=3}] id=30000b88a8e82, state=ADDED, bytes=8722, packets=89, duration=89, priority=10, appId=org.onlab.onos.fwd selector=[ETH_TYPE{ethType=800}, ETH_SRC{mac=00:00:00:00:00:0D13}, ETH_DST{mac=00:00:00:00:00:07}]01}, treatment=DefaultTrafficTreatment{instructions=[]}, constraints=[LinkTypeConstraint{inclusive=false, types=[OPTICAL]}], path=DefaultPath{src=ConnectPoint{elementId=00:00:00:00:00:0D/-1, portNumber=0}, dst=ConnectPoint{elementId=00:00:00:00:00:07/-1, portNumber=0}, type=INDIRECT, state=ACTIVE, durable=false}}, PathIntent{id=0x5, appId=DefaultApplicationId{id=2, name=org.onlab.onos.ifwd}, selector=DefaultTrafficSelector{criteria=[ETH_SRC{mac=00:00:00:00:00:07}, ETH_DST{mac=00:00:00:00:00:0D}]}, treatment=DefaultTrafficTreatment{instructions=[]}, constraints=[LinkTypeConstraint{inclusive=false, types=[OPTICAL]}], path=DefaultPath{src=ConnectPoint{elementId=00:00:00:00:00:07/-1, portNumber=0}, dst=ConnectPoint{elementId=00:00:00:00:00:0D/-1, portNumber=0}, type=INDIRECT, state=ACTIVE, durable=false}}] |
For example, this host to host intent has been compiled to two path intents with the appropriate traffic selections and actions computed on your behalf.
State your intentions
One major advantage of using intents over simply using flow entries to program your network is that intents track the state of the network and reconfigure themselves in order to satisfy your intention. For example, if link were to go down the intent framework would reroute your intent (ie. your flows) onto an alternative path. But, what if there are no alternative path? Well, in this case the intent would enter the failed state and remain there until a path becomes available. Pretty cool, eh? Let's check this out in action.
 IN_PORT{port=3}]
treatment=[OUTPUT{port=2}] |
As you can see from the above output, ONOS provides many details about he the flows at the switches. For example each flow entry defines a selector and treatment which is the set of traffic matched by the the flow entry and how this traffic should be handled. Notice as well that each flow entry it tagged by an appId (application id), this appId identifies which application installed this flow entry. This is a useful feature because it can help an admin identify which application may be misbehaving or consuming many resources.
Paths command
Given a network topology, ONOS computes all the shortest paths between any two nodes. This is especially useful for your applications to obtain path information for either flow installation or some other use. The paths command takes two arguments, both of them are devices. To make things easy for you ONOS provides CLI autocompletion by simply hitting the <TAB> key.
| Code Block | ||
|---|---|---|
| ||
onos> paths <TAB>
of:0000000000000001   of:0000000000000002   of:000000000000000b
of:000000000000000c of:000000000000000d of:000000000000000e |
ONOS lists device options for you, thereby making it easier to find the devices you would like. For example, the output of the command below shows two paths of equal costs.
| Code Block | ||
|---|---|---|
| ||
onos> paths of:000000000000000b of:000000000000000e
of:000000000000000b/1-of:0000000000000001/2==>of:0000000000000001/5-of:000000000000000e/1; cost=2.0
of:000000000000000b/2-of:0000000000000002/2==>of:0000000000000002/5-of:000000000000000e/2; cost=2.0 |
Intent Command
The intent command allows one to see what intents are stored in the system. Intents can be in several states:
- SUBMITTED - The intent has been submitted and will be processed soon.
- COMPILING - The intent is being compiled. This is a transient state.
- INSTALLING - The intent is in the process of being installed.
- INSTALLED - The intent has been installed.
- RECOMPILING - The intent is being recompiled after a failure.
- WITHDRAWING - The intent is being withdrawn.
- WITHDRAWN - The intent has been removed.
- FAILED - The intent is in a failed state because it cannot be satisfied.
For more information about Intents go here.Let's start by looking at the set of hosts know to ONOS. If you ran through this tutorial exactly there should be four hosts
| Code Block | ||
|---|---|---|
| ||
onos> hostsintents id=00:00:00:00:00:01/-10x0, mac=00:00:00:00:00:01state=INSTALLED, location=of:000000000000000b/3, vlan=-1, ip(s)=[10.0.0.1] id=00:00:00:00:00:07/-1, mac=00:00:00:00:00:07, location=of:000000000000000c/3, vlan=-1, ip(s)=[10.0.0.7] id=00:00:00:00:00:0D/-1, mac=00:00:00:00:00:0D, location=of:000000000000000d/3, vlan=-1, ip(s)=[10.0.0.13] id=00:00:00:00:00:13/-1, mac=00:00:00:00:00:13, location=of:000000000000000e/3, vlan=-1, ip(s)=[10.0.0.19] |
Pick any any of these two hosts and install a host to host intent for them.
| Code Block | ||
|---|---|---|
| ||
onos> add-host-intent 00:00:00:00:00:01/-1 00:00:00:00:00:13/-1 |
This command will provision a path between 10.0.0.1 (h11) and 10.0.0.19 (h41) and you can see that the intent is installed.
| Code Block | ||
|---|---|---|
| ||
onos> intents
id=0x9, state=INSTALLED, type=HostToHostIntent, appId=org.onlab.onos.cli
constraints=[LinkTypeConstraint{inclusive=false, types=[OPTICAL]}] |
So now that the intent is installed let's have a look what path it is using. Be careful here as the output from the tutorial and what you see may vary slightly as all alternate paths here have equal cost and therefore ONOS is free to pick either one.
type=HostToHostIntent, appId=org.onlab.onos.gui
	constraints=[LinkTypeConstraint{inclusive=false, types=[OPTICAL]}]
id=0x1, state=WITHDRAWN, type=HostToHostIntent, appId=org.onlab.onos.cli
constraints=[LinkTypeConstraint{inclusive=false, types=[OPTICAL]}] |
Note: You will not see any intents until some have been added. In the next section of the tutorial, you will load the intent reactive forwarding application, which automatically adds intents as needed.
The command can also tell you what type of sub-intents the intent has been compiled to:
| Code Block | ||
|---|---|---|
| ||
onos> intents -i
id=0x2, state=INSTALLED, type=HostToHostIntent, appId=org.onlab.onos.ifwd
    constraints=[LinkTypeConstraint{inclusive=false, types=[OPTICAL]}]
    installable=[
PathIntent{id=0x4, appId=DefaultApplicationId{id=2, name=org.onlab.onos.ifwd},
	selector=DefaultTrafficSelector{criteria=[ETH_SRC{mac=00:00:00:00:00:0D}, ETH_DST{mac=00:00:00:00:00:07}]},
	treatment=DefaultTrafficTreatment{instructions=[]}, constraints=[LinkTypeConstraint{inclusive=false, types=[OPTICAL]}],
	path=DefaultPath{src=ConnectPoint{elementId=00:00:00:00:00:0D/-1, portNumber=0},
						dst=ConnectPoint{elementId=00:00:00:00:00:07/-1, portNumber=0}, type=INDIRECT, state=ACTIVE, durable=false}},
PathIntent{id=0x5, appId=DefaultApplicationId{id=2, name=org.onlab.onos.ifwd},
selector=DefaultTrafficSelector{criteria=[ | ||
| Code Block | ||
| ||
onos> flows deviceId=of:0000000000000001, flowRuleCount=2 id=10000c364dd58, state=ADDED, bytes=0, packets=0, duration=1781, priority=123, appId=org.onlab.onos.net.intent selector=[IN_PORT{port=2}, ETH_SRC{mac=00:00:00:00:00:0107}, ETH_DST{mac=00:00:00:00:00:130D}] }, treatment=[OUTPUTDefaultTrafficTreatment{portinstructions=5}] id=10000c364ddb2[]}, state=ADDED, bytes=0, packets=0, duration=1781, priority=123, appId=org.onlab.onos.net.intent selector=[IN_PORT{port=5}, ETH_SRC{macconstraints=[LinkTypeConstraint{inclusive=false, types=[OPTICAL]}], path=DefaultPath{src=ConnectPoint{elementId=00:00:00:00:00:13}, ETH_DST{mac07/-1, portNumber=0}, dst=ConnectPoint{elementId=00:00:00:00:00:01}] treatment=[OUTPUT{port=2}] deviceId=of:0000000000000002, flowRuleCount=0 deviceId=of:000000000000000b, flowRuleCount=2 id=10000c3659528, state=ADDED, bytes=0, packets=0, duration=1781, priority=123, appId=org.onlab.onos.net.intent selector=[IN_PORT{port=1}, ETH_SRC{mac0D/-1, portNumber=0}, type=INDIRECT, state=ACTIVE, durable=false}}] |
For example, this host to host intent has been compiled to two path intents with the appropriate traffic selections and actions computed on your behalf.
State your intentions
One major advantage of using intents over simply using flow entries to program your network is that intents track the state of the network and reconfigure themselves in order to satisfy your intention. For example, if link were to go down the intent framework would reroute your intent (ie. your flows) onto an alternative path. But, what if there are no alternative path? Well, in this case the intent would enter the failed state and remain there until a path becomes available. Pretty cool, eh? Let's check this out in action.
Let's start by looking at the set of hosts know to ONOS. If you ran through this tutorial exactly there should be four hosts
| Code Block | ||
|---|---|---|
| ||
onos> hosts id=00:00:00:00:00:13}01/-1, ETH_DST{mac=00:00:00:00:00:01}] treatment=[OUTPUT{port=3}] id=10000c3659564, state=ADDED, bytes=0, packets=0, duration=1781, priority=123, appId=org.onlab.onos.net.intent selector=[IN_PORT{port=3}, ETH_SRC{mac, location=of:000000000000000b/3, vlan=-1, ip(s)=[10.0.0.1] id=00:00:00:00:00:01}07/-1, ETH_DST{mac=00:00:00:00:00:13}] treatment=[OUTPUT{port=1}] deviceId07, location=of:000000000000000c/3, flowRuleCount=0 deviceId=of:000000000000000d, flowRuleCount=0 deviceId=of:000000000000000e, flowRuleCount=2 id=10000c365a06b, state=ADDED, bytes=0, packets=0, duration=1781, priority=123, appId=org.onlab.onos.net.intent selector=[IN_PORT{port=1}, ETH_SRC{macvlan=-1, ip(s)=[10.0.0.7] id=00:00:00:00:00:0D/-1, mac=00:00:00:00:00:0D, location=of:000000000000000d/3, vlan=-1, ip(s)=[10.0.0.13] id=00:00:00:00:00:01}13/-1, ETH_DST{mac=00:00:00:00:00:13}] treatment=[OUTPUT{port=3}] id=10000c365a0a7, state=ADDED, bytes=0, packets=0, duration=1781, priority=123, appId=org.onlab.onos.net.intent selector=[IN_PORT{port=3}, ETH_SRC{mac=00, location=of:000000000000000e/3, vlan=-1, ip(s)=[10.0.0.19] |
Pick any any of these two hosts and install a host to host intent for them.
| Code Block | ||
|---|---|---|
| ||
onos> add-host-intent 00:00:00:00:00:01/-1 00:00:00:00:00:13}, ETH_DST{mac=00:00:00:00:00:01}] treatment=[OUTPUT{port=1}] |
We can see that the traffic flows between dpid 00:00:00:00:00:00:00:01 (s1) and 00:00:00:00:00:00:00:0b (s11). If you have trouble seeing this, refer to the topology diagram in the beginning of this tutorial.
Ok so let's teardown the link between s1 and s11, you may have to teardown the link between s2 and s11 so pay attention to the flows command output. This can be done in mininet by running:
| Code Block |
|---|
mininet> link s1 s11 down |
and let's have a look at the flows again.
/-1 |
This command will provision a path between 10.0.0.1 (h11) and 10.0.0.19 (h41) and you can see that the intent is installed.
| Code Block | ||
|---|---|---|
| ||
onos> intents
id=0x9, state=INSTALLED, type=HostToHostIntent, appId=org.onlab.onos.cli
constraints=[LinkTypeConstraint{inclusive=false, types=[OPTICAL]}] |
So now that the intent is installed let's have a look what path it is using. Be careful here as the output from the tutorial and what you see may vary slightly as all alternate paths here have equal cost and therefore ONOS is free to pick either one.
| Code Block | ||
|---|---|---|
| ||
| Code Block | ||
| ||
onos> flows deviceId=of:0000000000000001, flowRuleCount=0 deviceId=of:0000000000000002, flowRuleCount=2 id=10000c364e11910000c364dd58, state=ADDED, bytes=0, packets=0, duration=11781, priority=123, appId=org.onlab.onos.net.intent selector=[IN_PORT{port=2}, ETH_SRC{mac=00:00:00:00:00:01}, ETH_DST{mac=00:00:00:00:00:13}] treatment=[OUTPUT{port=5}] id=10000c364e17310000c364ddb2, state=ADDED, bytes=0, packets=0, duration=11781, priority=123, appId=org.onlab.onos.net.intent selector=[IN_PORT{port=5}, ETH_SRC{mac=00:00:00:00:00:13}, ETH_DST{mac=00:00:00:00:00:01}] treatment=[OUTPUT{port=2}] deviceId=of:0000000000000002, flowRuleCount=0 deviceId=of:000000000000000b, flowRuleCount=2 id=10000c365954710000c3659528, state=ADDED, bytes=0, packets=0, duration=11781, priority=123, appId=org.onlab.onos.net.intent selector=[IN_PORT{port=21}, ETH_SRC{mac=00:00:00:00:00:13}, ETH_DST{mac=00:00:00:00:00:01}] treatment=[OUTPUT{port=3}] id=10000c365956510000c3659564, state=ADDED, bytes=0, packets=0, duration=11781, priority=123, appId=org.onlab.onos.net.intent selector=[IN_PORT{port=3}, ETH_SRC{mac=00:00:00:00:00:01}, ETH_DST{mac=00:00:00:00:00:13}] treatment=[OUTPUT{port=21}] deviceId=of:000000000000000c, flowRuleCount=0 deviceId=of:000000000000000d, flowRuleCount=0 deviceId=of:000000000000000e, flowRuleCount=2 id=10000c365a08a10000c365a06b, state=ADDED, bytes=0, packets=0, duration=11781, priority=123, appId=org.onlab.onos.net.intent selector=[IN_PORT{port=21}, ETH_SRC{mac=00:00:00:00:00:01}, ETH_DST{mac=00:00:00:00:00:13}] treatment=[OUTPUT{port=3}] id=10000c365a0a810000c365a0a7, state=ADDED, bytes=0, packets=0, duration=11781, priority=123, appId=org.onlab.onos.net.intent selector=[IN_PORT{port=3}, ETH_SRC{mac=00:00:00:00:00:13}, ETH_DST{mac=00:00:00:00:00:01}] treatment=[OUTPUT{port=21}] |
Observe We can see that the traffic flows moved from 00between dpid 00:00:00:00:00:00:00:01 to 00(s1) and 00:00:00:00:00:00:00:02 0b (s2) and the remaining flows remained untouched. How did this happen? Well when we tore down s11). If you have trouble seeing this, refer to the topology diagram in the beginning of this tutorial.
Ok so let's teardown the link between s1 and s11, ONOS detected this change and informed all people interested by this event that the link went down. Therefore the intent service receives this information and realises that one of its intents is affected by this change and thus it recompiles the intent in light of this change which causes the intent to be installed on a different path.
This simple example shows that using intents is more powerful than simply installing flows. Intents maintain your intention (hence the name!) while retaining the ability to install them as is possible or most efficient.
Up down up down
If you wish you can take down more links and see what happens. Obviously, if you partition the network then no flows will be installed, sadly ONOS doesn't grow links between switches yet. You can bring up links in mininet by:
| Code Block |
|---|
mininet> link s1 s11 up |
Have fun!
ONOS Graphical User Interface
ONOS comes with a GUI. The GUI allows you to manipulate your network in a simple way.
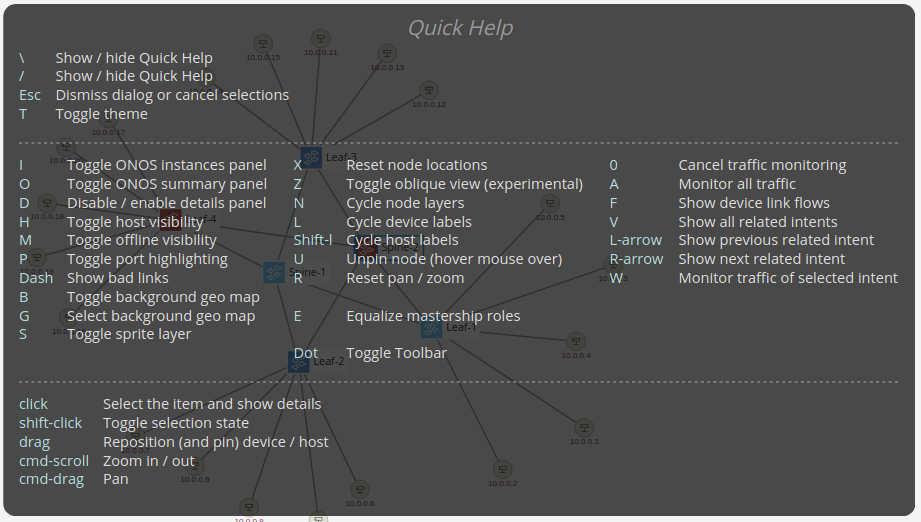
To open the UI simply click on the 'ONOS GUI' icon. Initially, when the UI loads up you will see your network's topology over a map of the US. You can remove the map by hitting 'b'. In fact, the UI has a cheat sheet which can be toggled by hitting '/' which is easy to remember because it's the question mark key except you don't need to hit shift.
Ok let's make all the hosts appear in the UI, we can do this by making the hosts talk on the network. The best way to do this is to run the pingall command at mininet.
| Code Block |
|---|
mininet> pingall
*** Ping: testing ping reachability
h11 -> h12 h13 h14 h15 h16 h21 h22 h23 h24 h25 h26 h31 h32 h33 h34 h35 h36 h41 h42 h43 h44 h45 h46
h12 -> h11 h13 h14 h15 h16 h21 h22 h23 h24 h25 h26 h31 h32 h33 h34 h35 h36 h41 h42 h43 h44 h45 h46
h13 -> h11 h12 h14 h15 h16 h21 h22 h23 h24 h25 h26 h31 h32 h33 h34 h35 h36 h41 h42 h43 h44 h45 h46
h14 -> h11 h12 h13 h15 h16 h21 h22 h23 h24 h25 h26 h31 h32 h33 h34 h35 h36 h41 h42 h43 h44 h45 h46
h15 -> h11 h12 h13 h14 h16 h21 h22 h23 h24 h25 h26 h31 h32 h33 h34 h35 h36 h41 h42 h43 h44 h45 h46
h16 -> h11 h12 h13 h14 h15 h21 h22 h23 h24 h25 h26 h31 h32 h33 h34 h35 h36 h41 h42 h43 h44 h45 h46
h21 -> h11 h12 h13 h14 h15 h16 h22 h23 h24 h25 h26 h31 h32 h33 h34 h35 h36 h41 h42 h43 h44 h45 h46
h22 -> h11 h12 h13 h14 h15 h16 h21 h23 h24 h25 h26 h31 h32 h33 h34 h35 h36 h41 h42 h43 h44 h45 h46
..... |
The hosts will not appear initially, simply type 'h' in your browser window and they will appear. At this point you should see something roughly similar to the image below.
GUI Features
GUI Cheat Sheet
At anytime you can pull up the GUI's cheat sheet by typing '/' (which is '?' without the pesky shift ![]() ) and you will get a pane that looks like below.
) and you will get a pane that looks like below.
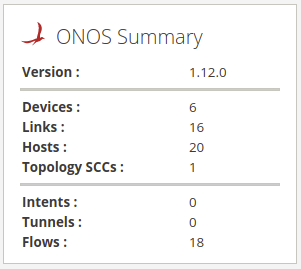
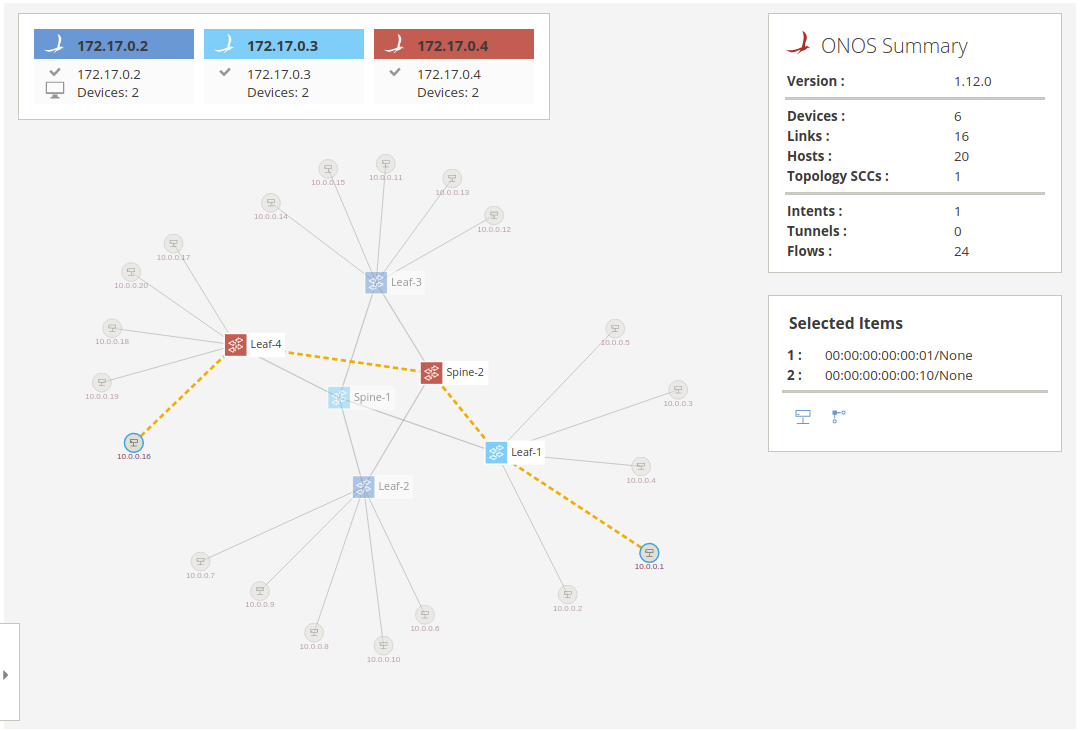
Summary pane
The GUI comes with a very useful summary pane. It shows you a summary of what is going on at this ONOS cluster.
Switch details
When you click on a switch a pane appears on the right hand side. This pane gives information about the switch as shown in the image below.

You my notice that the UI reports nine ports but you can only see eight, this is because OpenFlow switches have virtual ports that are hard to show on a UI.
Shift click will unselect the switch and remove the pane
Instances
The GUI has the ability to show which ONOS instances are active. By hitting the 'i' key (it will be open by default) you will see a pane show up on the left hand side as shown below.
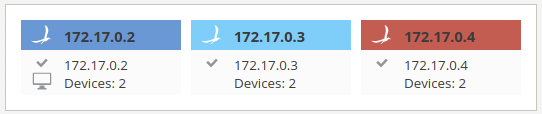
Notice that the glyphs for the switches changes color, this indicates which switches are controlled by which instance. This is useful to see at a glance which switches are controlled by which ONOS instance.
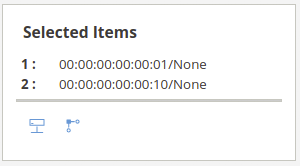
Install Intent
Ok let's install an intent using the UI. First select two hosts by clicking on one host then shift-click on another. Let's pick 10.0.0.20 and 10.0.0.9. Now a pane will appear on the right and side of the screen as here:
Now click on 'Create Host-to-host Flow', this actually provisions a host to host intent and lights up the path used by the intent.
You can check that the intent was installed via the ONOS cli
| Code Block | ||
|---|---|---|
| ||
onos> intents
	id=0x223838ca, state=INSTALLED, type=HostToHostIntent, appId=org.onlab.onos.gui
[LinkTypeConstraint{inclusive=false, types=[OPTICAL]}] |
Now let's send some traffic on that intent. This will animate the link to show traffic and display how much traffic (counter value) is flowing through that link
| Code Block |
|---|
mininet> h42 ping h23 |
Show all traffic
Another thing you can do is to visually monitor the network traffic in the UI. You can cycle between different modes, e.g. port stats in bits/s or packets/s and flow stats in bits/s or packets/s, by pressing the A key.
Play on
Now you know the main features of the UI. We encourage you to play around with it to find out what other features you can use and who knows may find a few bugs.
Exploring Further
Here we just scratched the surface of what ONOS can do in terms of controlling a network. We highly encourage you to continue using ONOS and perhaps start developing your own applications. Find out how to get started in this tutorial.
you may have to teardown the link between s2 and s11 so pay attention to the flows command output. This can be done in mininet by running:
| Code Block |
|---|
mininet> link s1 s11 down |
and let's have a look at the flows again.
| Code Block | ||
|---|---|---|
| ||
onos> flows
deviceId=of:0000000000000001, flowRuleCount=0
deviceId=of:0000000000000002, flowRuleCount=2
   id=10000c364e119, state=ADDED, bytes=0, packets=0, duration=1, priority=123, appId=org.onlab.onos.net.intent
      selector=[IN_PORT{port=2}, ETH_SRC{mac=00:00:00:00:00:01}, ETH_DST{mac=00:00:00:00:00:13}]
      treatment=[OUTPUT{port=5}]
   id=10000c364e173, state=ADDED, bytes=0, packets=0, duration=1, priority=123, appId=org.onlab.onos.net.intent
      selector=[IN_PORT{port=5}, ETH_SRC{mac=00:00:00:00:00:13}, ETH_DST{mac=00:00:00:00:00:01}]
      treatment=[OUTPUT{port=2}]
deviceId=of:000000000000000b, flowRuleCount=2
   id=10000c3659547, state=ADDED, bytes=0, packets=0, duration=1, priority=123, appId=org.onlab.onos.net.intent
      selector=[IN_PORT{port=2}, ETH_SRC{mac=00:00:00:00:00:13}, ETH_DST{mac=00:00:00:00:00:01}]
      treatment=[OUTPUT{port=3}]
   id=10000c3659565, state=ADDED, bytes=0, packets=0, duration=1, priority=123, appId=org.onlab.onos.net.intent
      selector=[IN_PORT{port=3}, ETH_SRC{mac=00:00:00:00:00:01}, ETH_DST{mac=00:00:00:00:00:13}]
      treatment=[OUTPUT{port=2}]
deviceId=of:000000000000000c, flowRuleCount=0
deviceId=of:000000000000000d, flowRuleCount=0
deviceId=of:000000000000000e, flowRuleCount=2
   id=10000c365a08a, state=ADDED, bytes=0, packets=0, duration=1, priority=123, appId=org.onlab.onos.net.intent
      selector=[IN_PORT{port=2}, ETH_SRC{mac=00:00:00:00:00:01}, ETH_DST{mac=00:00:00:00:00:13}]
      treatment=[OUTPUT{port=3}]
   id=10000c365a0a8, state=ADDED, bytes=0, packets=0, duration=1, priority=123, appId=org.onlab.onos.net.intent
      selector=[IN_PORT{port=3}, ETH_SRC{mac=00:00:00:00:00:13}, ETH_DST{mac=00:00:00:00:00:01}]
      treatment=[OUTPUT{port=2}]
|
Observe that the flows moved from 00:00:00:00:00:00:00:01 to 00:00:00:00:00:00:00:02 (s2) and the remaining flows remained untouched. How did this happen? Well when we tore down the link between s1 and s11, ONOS detected this change and informed all people interested by this event that the link went down. Therefore the intent service receives this information and realises that one of its intents is affected by this change and thus it recompiles the intent in light of this change which causes the intent to be installed on a different path.
This simple example shows that using intents is more powerful than simply installing flows. Intents maintain your intention (hence the name!) while retaining the ability to install them as is possible or most efficient.
Up down up down
If you wish you can take down more links and see what happens. Obviously, if you partition the network then no flows will be installed, sadly ONOS doesn't grow links between switches yet. You can bring up links in mininet by:
| Code Block |
|---|
mininet> link s1 s11 up |
Have fun!
ONOS Graphical User Interface
ONOS comes with a GUI. The GUI allows you to manipulate your network in a simple way.
To open the UI simply click on the 'ONOS GUI' icon. Initially, when the UI loads up you will see your network's topology over a map of the US. You can remove the map by hitting 'b'. In fact, the UI has a cheat sheet which can be toggled by hitting '/' which is easy to remember because it's the question mark key except you don't need to hit shift.
Ok let's make all the hosts appear in the UI, we can do this by making the hosts talk on the network. The best way to do this is to run the pingall command at mininet.
| Code Block |
|---|
mininet> pingall
*** Ping: testing ping reachability
h11 -> h12 h13 h14 h15 h16 h21 h22 h23 h24 h25 h26 h31 h32 h33 h34 h35 h36 h41 h42 h43 h44 h45 h46
h12 -> h11 h13 h14 h15 h16 h21 h22 h23 h24 h25 h26 h31 h32 h33 h34 h35 h36 h41 h42 h43 h44 h45 h46
h13 -> h11 h12 h14 h15 h16 h21 h22 h23 h24 h25 h26 h31 h32 h33 h34 h35 h36 h41 h42 h43 h44 h45 h46
h14 -> h11 h12 h13 h15 h16 h21 h22 h23 h24 h25 h26 h31 h32 h33 h34 h35 h36 h41 h42 h43 h44 h45 h46
h15 -> h11 h12 h13 h14 h16 h21 h22 h23 h24 h25 h26 h31 h32 h33 h34 h35 h36 h41 h42 h43 h44 h45 h46
h16 -> h11 h12 h13 h14 h15 h21 h22 h23 h24 h25 h26 h31 h32 h33 h34 h35 h36 h41 h42 h43 h44 h45 h46
h21 -> h11 h12 h13 h14 h15 h16 h22 h23 h24 h25 h26 h31 h32 h33 h34 h35 h36 h41 h42 h43 h44 h45 h46
h22 -> h11 h12 h13 h14 h15 h16 h21 h23 h24 h25 h26 h31 h32 h33 h34 h35 h36 h41 h42 h43 h44 h45 h46
..... |
The hosts will not appear initially, simply type 'h' in your browser window and they will appear. At this point you should see something roughly similar to the image below.
GUI Features
GUI Cheat Sheet
At anytime you can pull up the GUI's cheat sheet by typing '/' (which is '?' without the pesky shift ![]() ) and you will get a pane that looks like below.
) and you will get a pane that looks like below.
Summary pane
The GUI comes with a very useful summary pane. It shows you a summary of what is going on at this ONOS cluster.
Switch details
When you click on a switch a pane appears on the right hand side. This pane gives information about the switch as shown in the image below.
You my notice that the UI reports nine ports but you can only see eight, this is because OpenFlow switches have virtual ports that are hard to show on a UI.
Shift click will unselect the switch and remove the pane
Instances
The GUI has the ability to show which ONOS instances are active. By hitting the 'i' key (it will be open by default) you will see a pane show up on the left hand side as shown below.
Notice that the glyphs for the switches changes color, this indicates which switches are controlled by which instance. This is useful to see at a glance which switches are controlled by which ONOS instance.
Install Intent
Ok let's install an intent using the UI. First select two hosts by clicking on one host then shift-click on another. Let's pick 10.0.0.20 and 10.0.0.9. Now a pane will appear on the right and side of the screen as here:
Now click on 'Create Host-to-host Flow', this actually provisions a host to host intent and lights up the path used by the intent.
You can check that the intent was installed via the ONOS cli
| Code Block | ||
|---|---|---|
| ||
onos> intents
	id=0x223838ca, state=INSTALLED, type=HostToHostIntent, appId=org.onlab.onos.gui
[LinkTypeConstraint{inclusive=false, types=[OPTICAL]}] |
Now let's send some traffic on that intent. This will animate the link to show traffic and display how much traffic (counter value) is flowing through that link
| Code Block |
|---|
mininet> h42 ping h23 |
Show all traffic
Another thing you can do is to visually monitor the network traffic in the UI. You can cycle between different modes, e.g. port stats in bits/s or packets/s and flow stats in bits/s or packets/s, by pressing the A key.
Play on
Now you know the main features of the UI. We encourage you to play around with it to find out what other features you can use and who knows may find a few bugs.
Exploring Further
Here we just scratched the surface of what ONOS can do in terms of controlling a network. We highly encourage you to continue using ONOS and perhaps start developing your own applications. Find out how to get started in this tutorial.
...
Return To : Tutorials and Walkthroughs
...
mininet> h11 ping -c3 h41
PING 10.0.0.16 (10.0.0.16) 56(84) bytes of data.
--- 10.0.0.16 ping statistics ---
3 packets transmitted, 0 received, 100% packet loss, time 2010ms
mininet>
onos> apps -a -s
* 36 org.onosproject.optical-model 1.12.0 Optical Network Model
* 40 org.onosproject.openflow-base 1.12.0 OpenFlow Base Provider
* 41 org.onosproject.lldpprovider 1.12.0 LLDP Link Provider
* 44 org.onosproject.hostprovider 1.12.0 Host Location Provider
* 47 org.onosproject.drivers 1.12.0 Default Drivers
* 104 org.onosproject.openflow 1.12.0 OpenFlow Provider Suite
* 288 org.onosproject.proxyarp 1.12.0 Proxy ARP/NDP
onos>
mininet> h11 ping h41
PING 10.0.0.16 (10.0.0.16) 56(84) bytes of data.
64 bytes from 10.0.0.16: icmp_seq=1 ttl=64 time=39.6 ms
64 bytes from 10.0.0.16: icmp_seq=2 ttl=64 time=0.263 ms
64 bytes from 10.0.0.16: icmp_seq=3 ttl=64 time=0.058 ms
64 bytes from 10.0.0.16: icmp_seq=4 ttl=64 time=0.061 ms
64 bytes from 10.0.0.16: icmp_seq=5 ttl=64 time=0.065 ms
^C
--- 10.0.0.16 ping statistics ---
5 packets transmitted, 5 received, 0% packet loss, time 4002ms
rtt min/avg/max/mdev = 0.058/8.011/39.612/15.800 ms
mininet>
...