Due to a ransomware attack, the wiki was reverted to a July 2022 version. . We apologize for the lack of a more recent valid backup.
...
| Code Block |
|---|
$ mkdir meow $ cd meow |
We also assume that your environment has sourced in the ONOS tools (scripts), as described here.
Application Set Up
The quickest way to get started is to use the maven archetypes to create the application source directory structure and fill it with template code. You can get more details here, but to summarize(More details can be found here). We are going to create a sample application, which we will call, unsurprisingly, "sample":
(0) Create a working directory
| Code Block |
|---|
$ mkdir customsample $ cd customsample |
(1) Create the main application
| Code Block |
|---|
$ onos-create-app app org.meowster.app.customsample meowster-customsample |
When asked for the version, accept the suggested default: 1.0-SNAPSHOT, and press enter.
...
| Code Block | ||
|---|---|---|
| ||
groupId: org.meowster.app.customsample artifactId: meowster-customsample version: 1.0-SNAPSHOT package: org.meowster.app.custom |
sample |
This archetype has laid the base application code down, in a directory named meowster-sample. Next we will fold in UI components from an overlay archetype...
((2) Overlay the UI additional components
Note, the only difference between this command and the last is changing the app keyword to ui...
| Code Block |
|---|
$ onos-create-app ui org.meowster.app.customsample meowster-customsample |
When asked for the version, accept the suggested default: 1.0-SNAPSHOT, and press enter.
...
(3) Modify the pom.xml file to mark the module as an ONOS appcorrectly label our ONOS application:
| Code Block |
|---|
$ cd meowster-customsample $ vi pom.xml |
(3a) Change the description:
| Code Block |
|---|
<description>Meowster Sample ONOS Custom-View App<App</description> |
(3b) In the <properties> section (just below the description), change the app name and origin:
| Code Block |
|---|
<onos.app.name>org.meowster.app.custom<sample</onos.app.name> <onos.app.origin>Meowster, Inc.</onos.app.origin> |
...
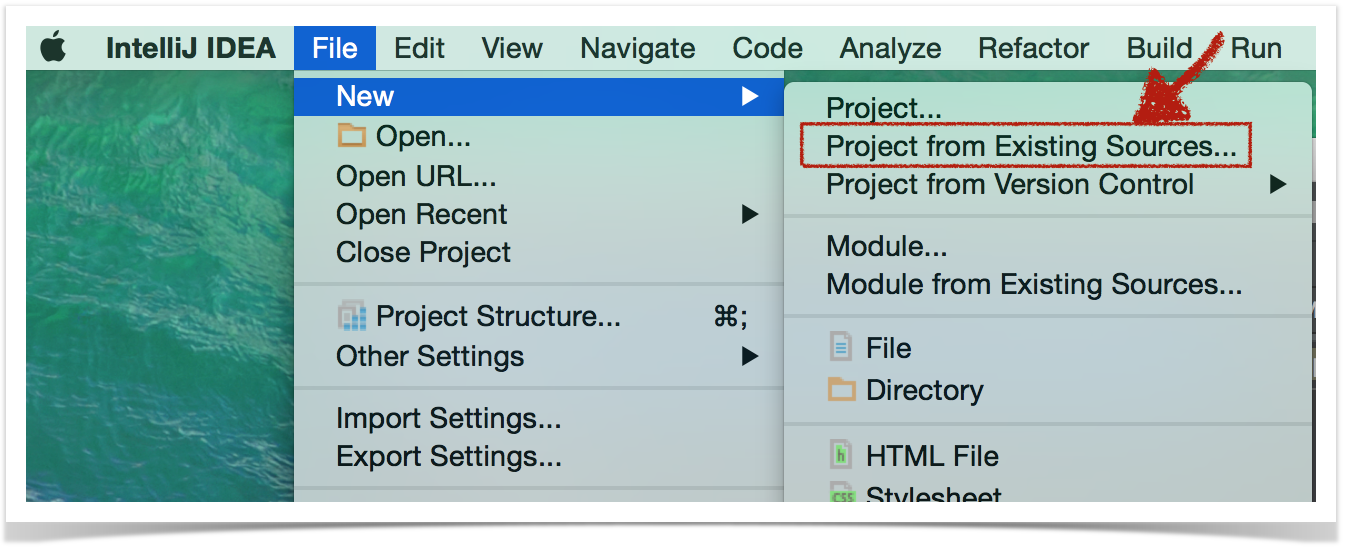
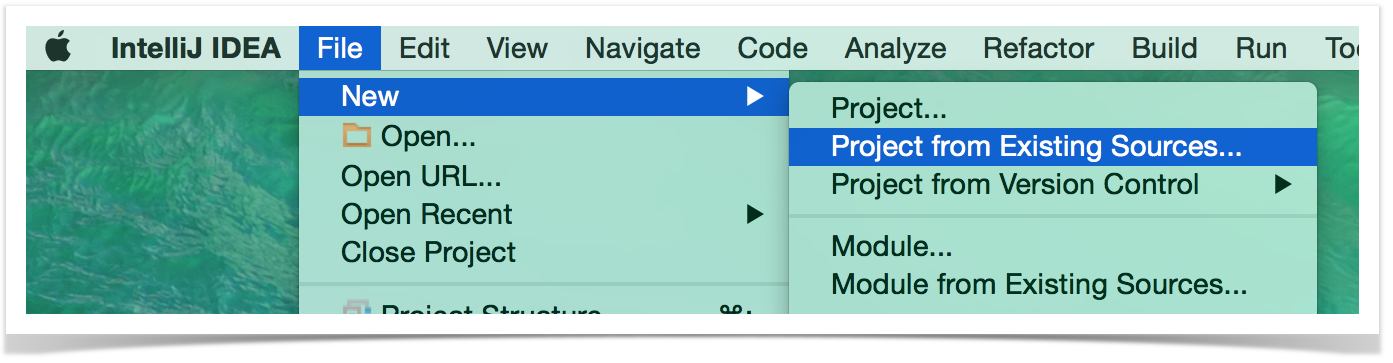
Start by selecting File --> New --> Project from Existing Sources...
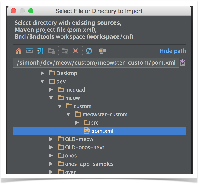
Then navigate to the top level pom.xml file and press OK:

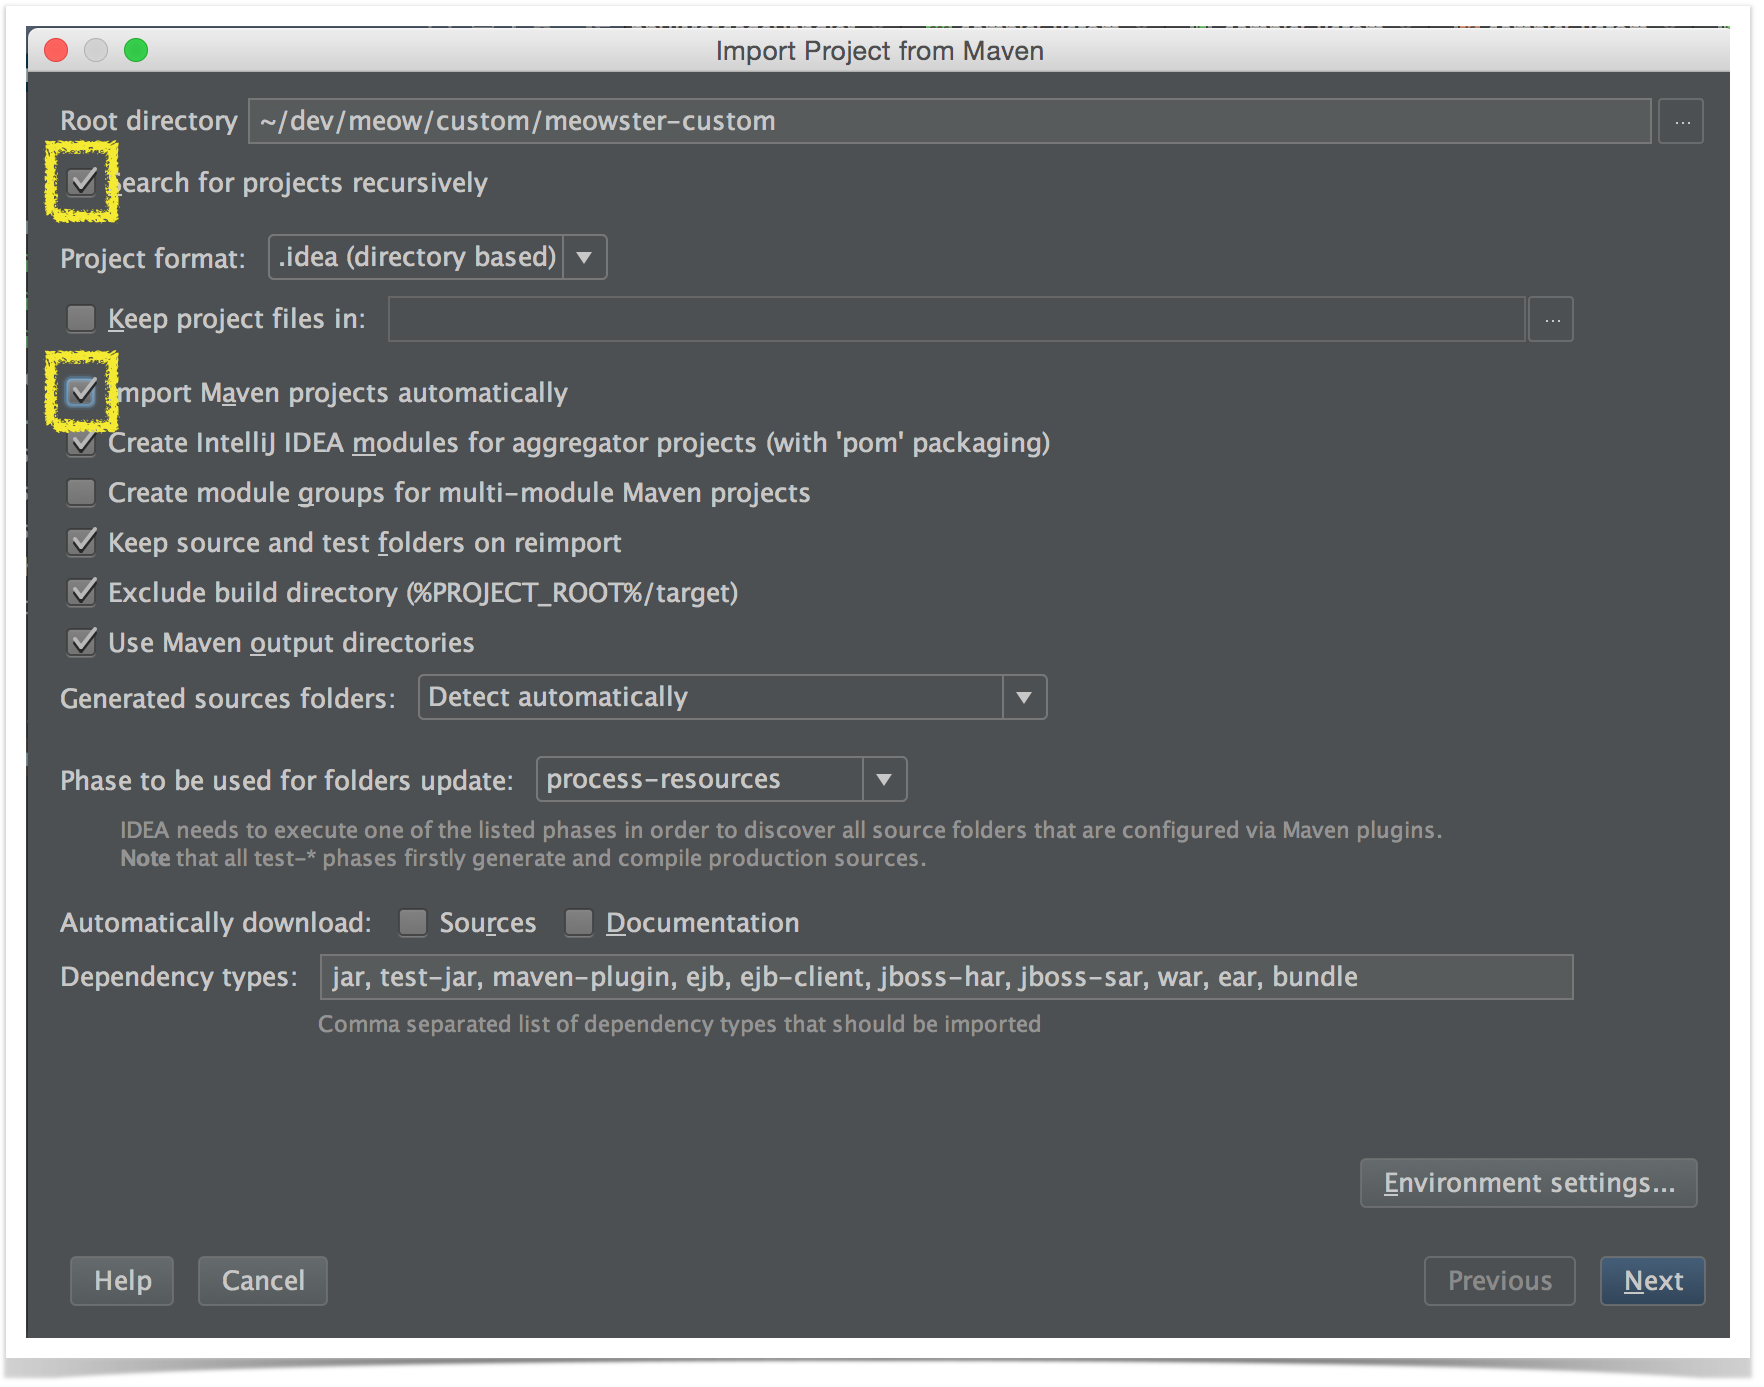
On the next screen, you might wish to checkmark the following two items:
...
...since they are not selected by default.
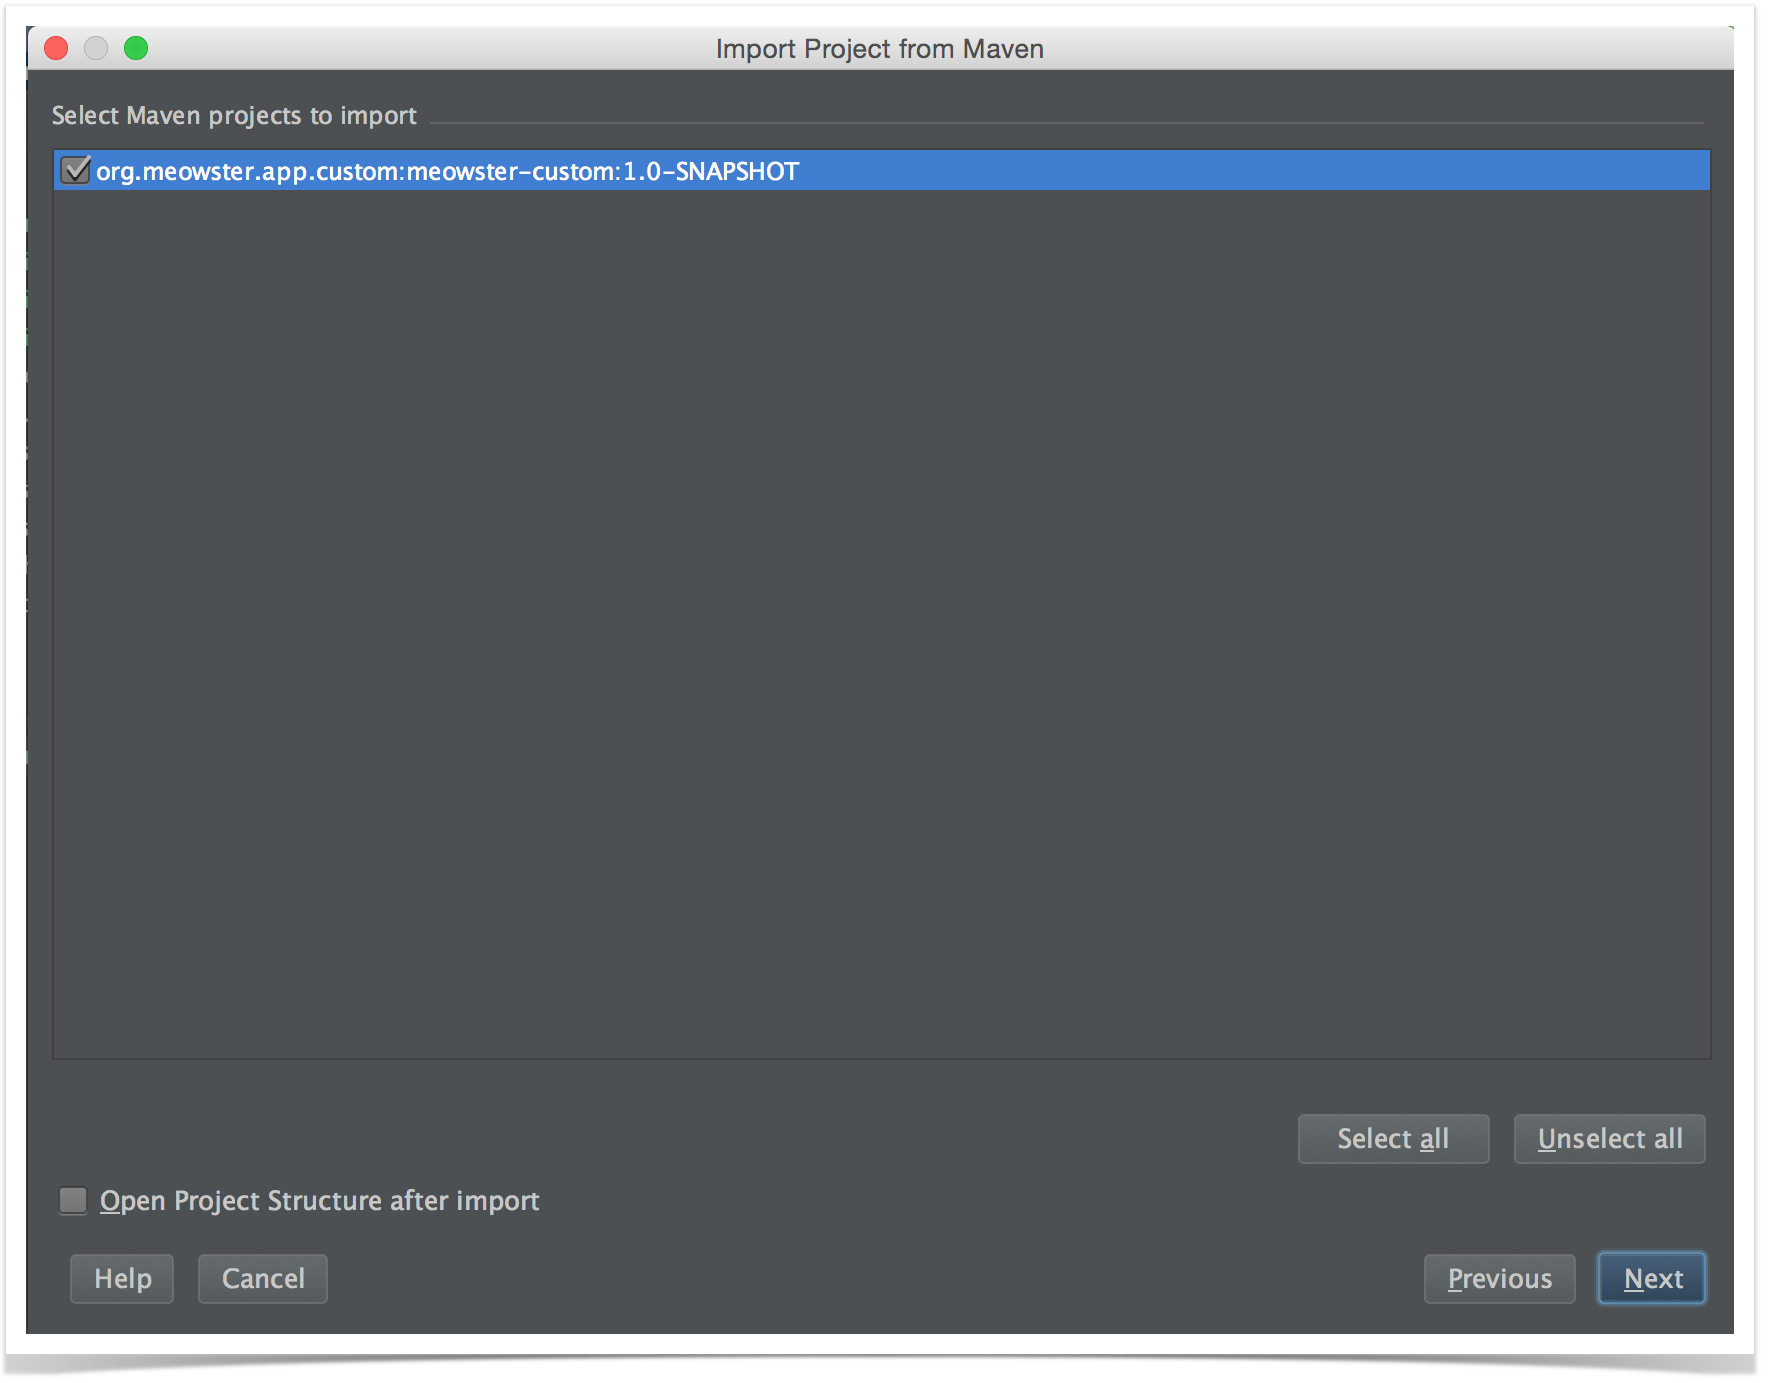
IntelliJ should find the 1.0-SNAPSHOT:
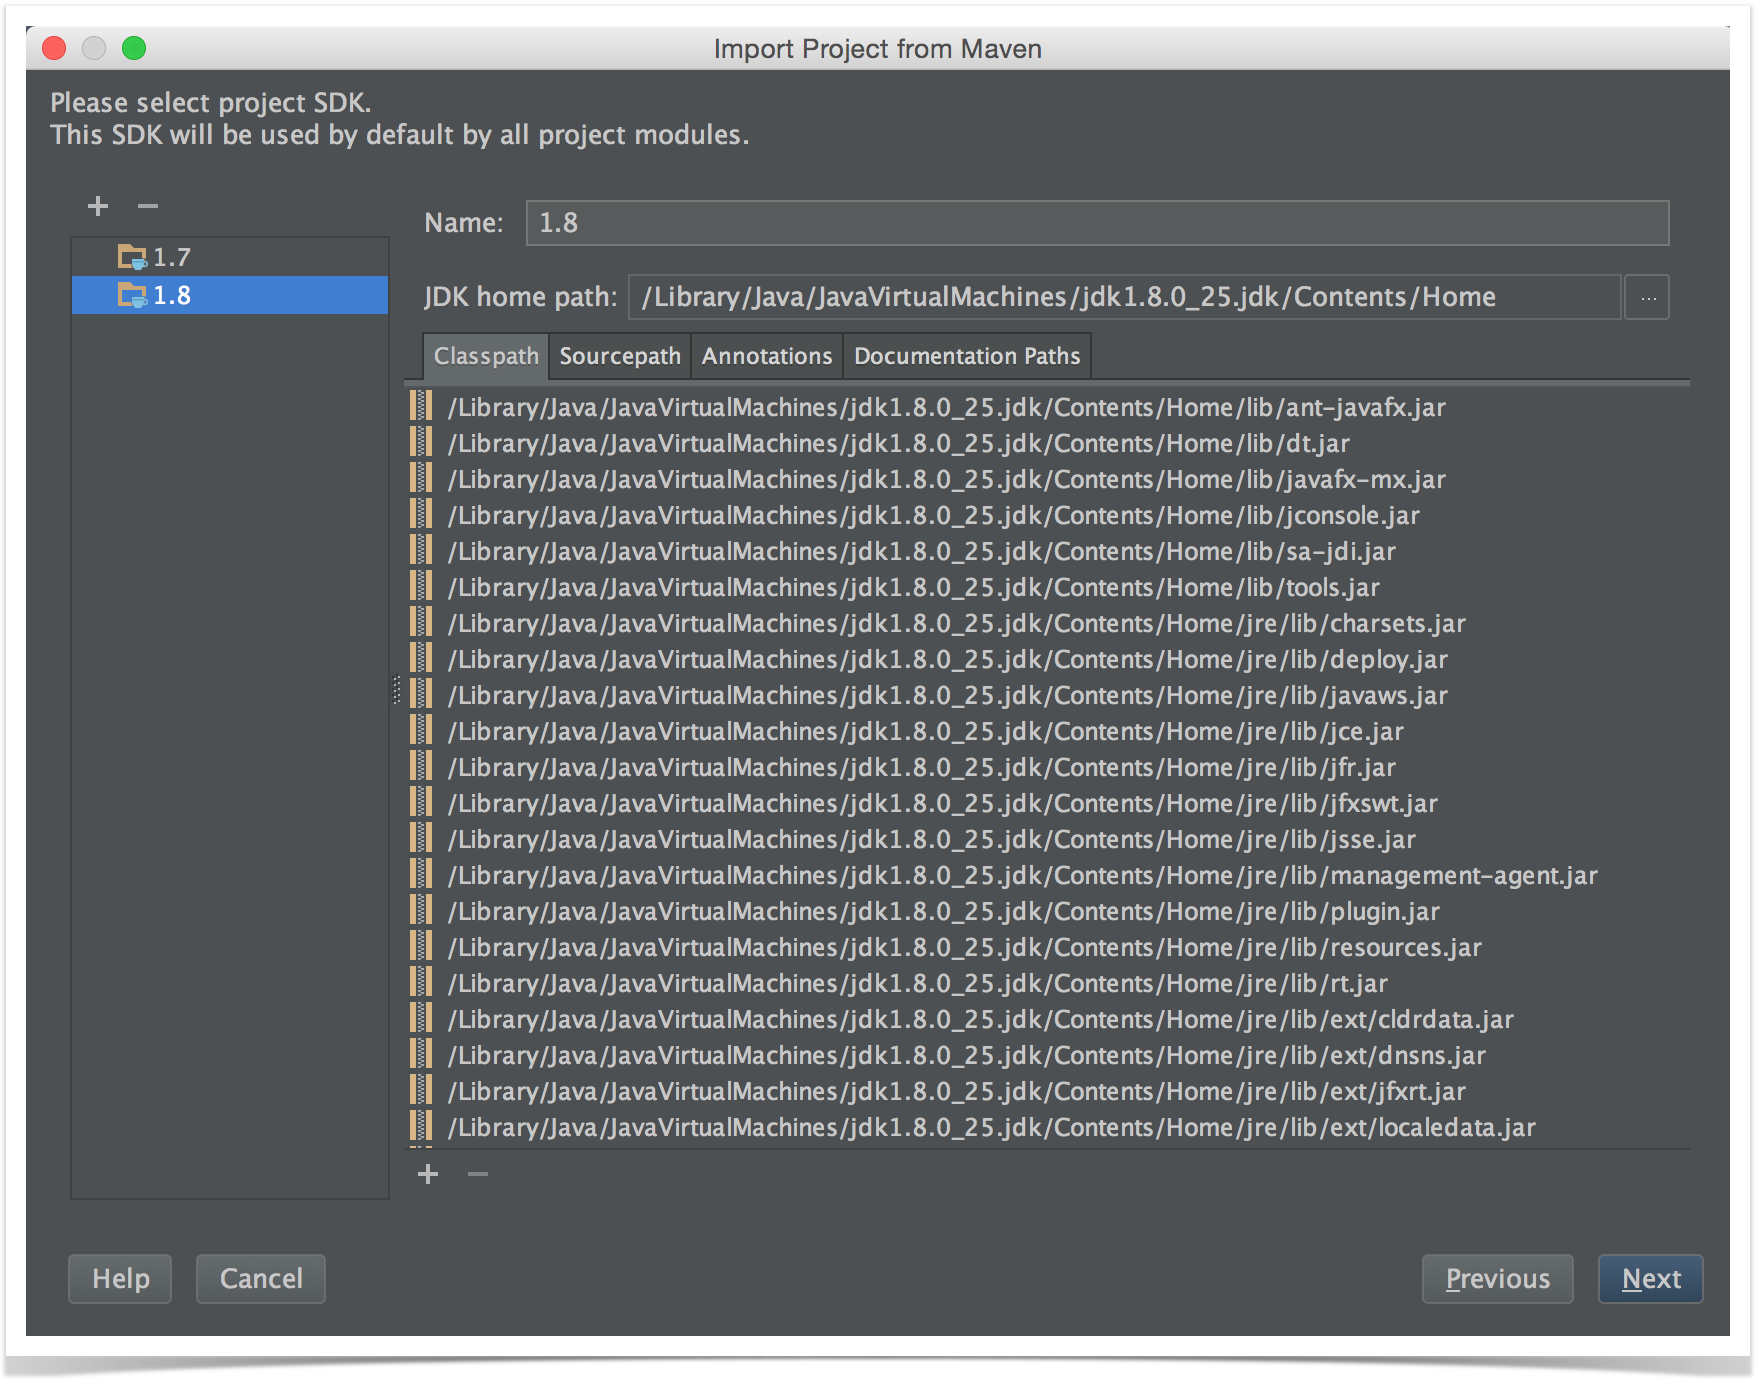
If presented with a choice of Java versions, select 1.8:
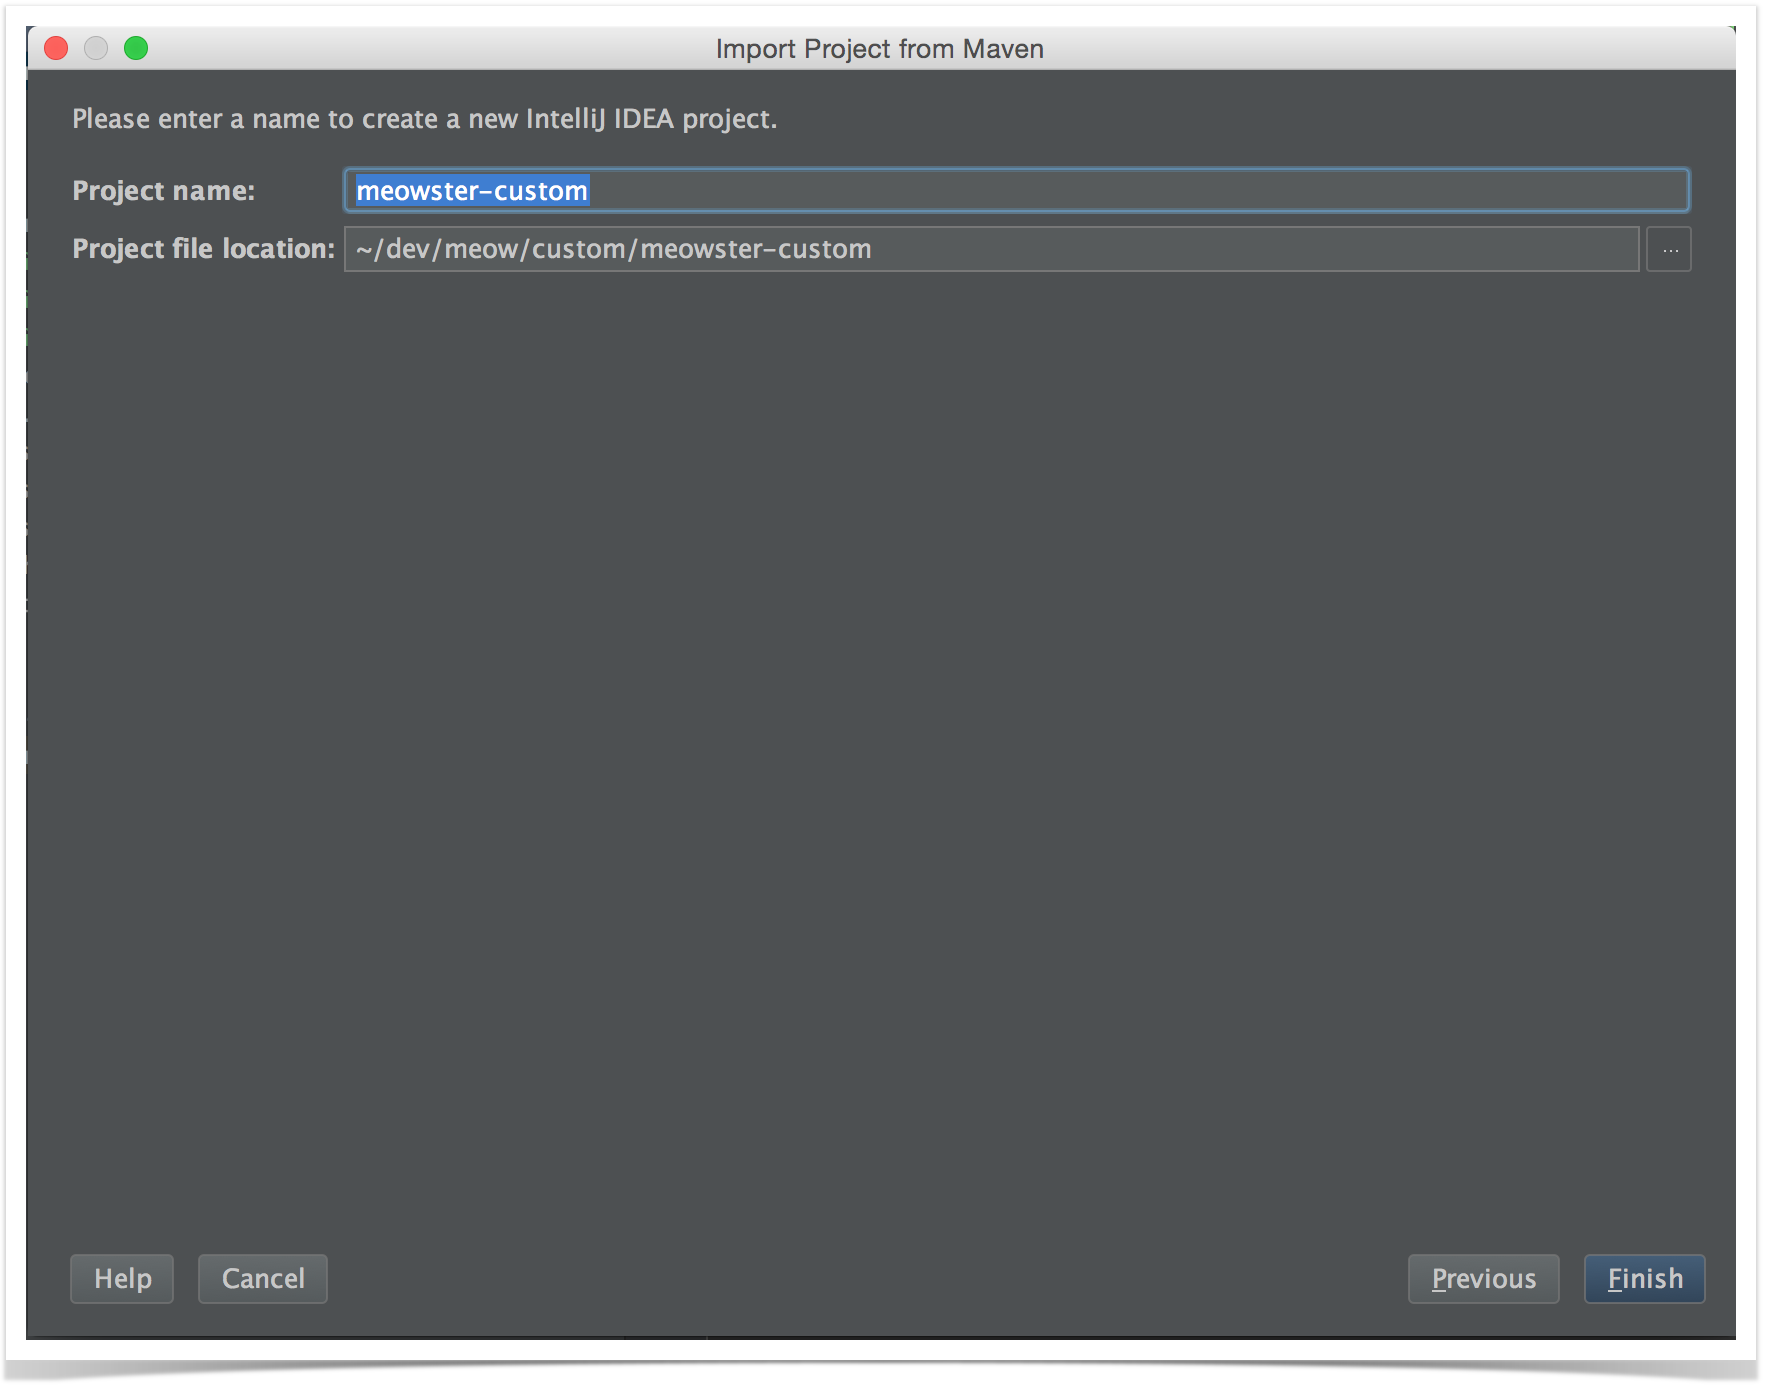
Finally, finish with the name of the project:
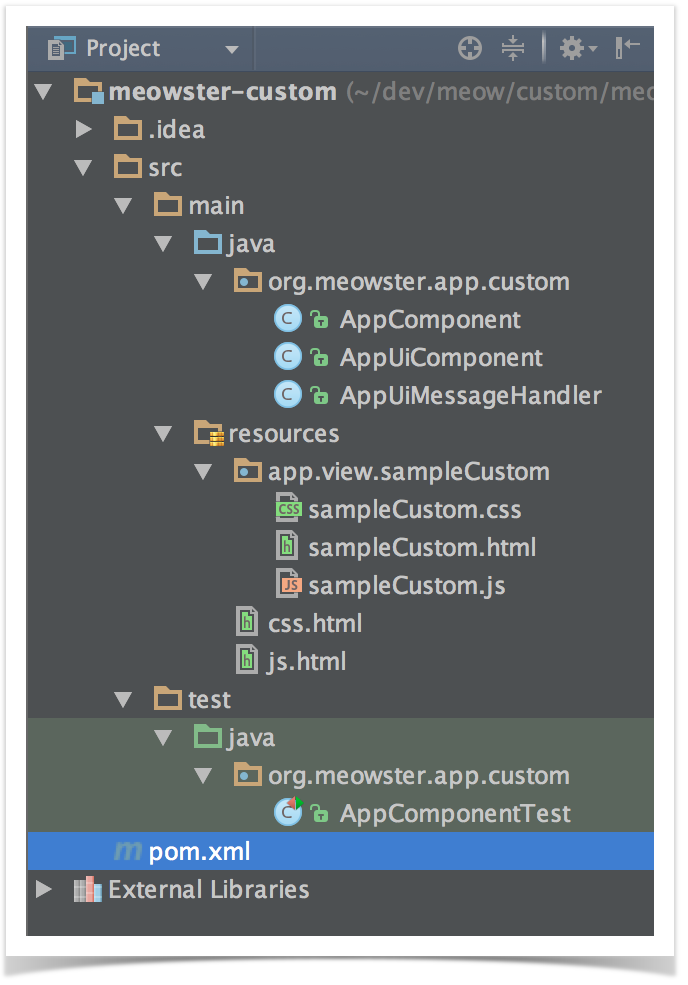
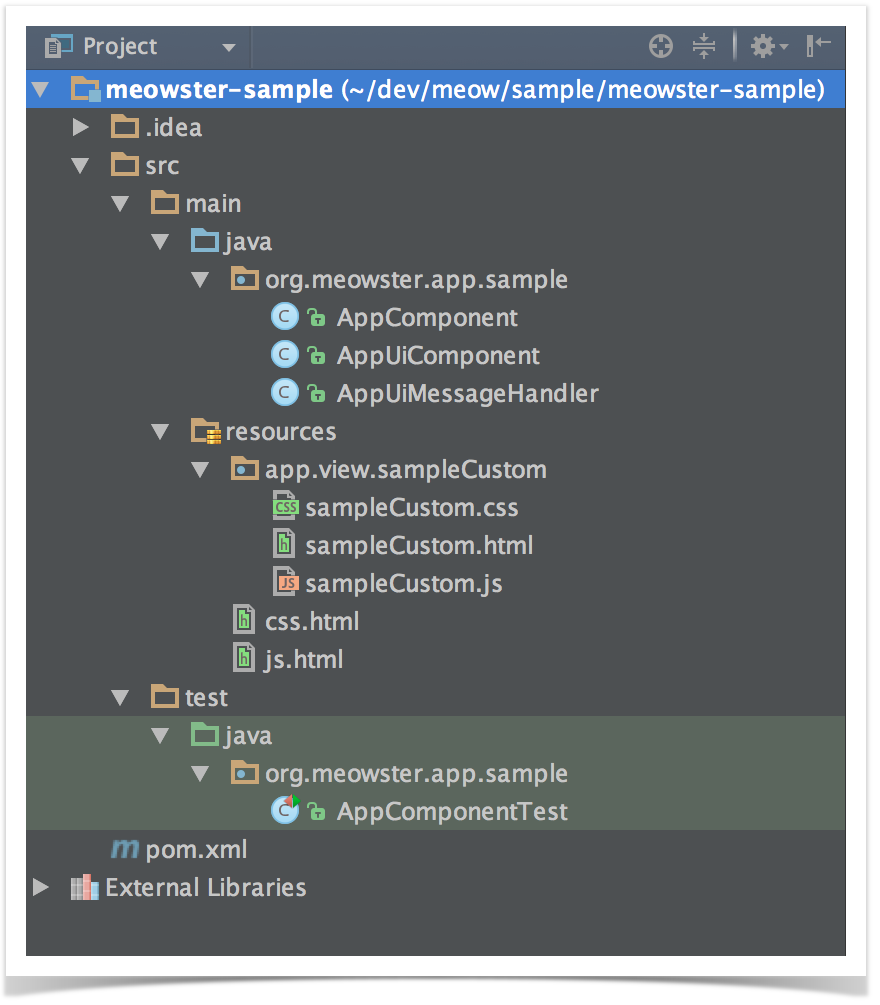
Once the project loads, you should finally see a directory structure like this:
Building and Installing the App
From the top level project directory (the one with the pom.xml file) build the project:
| Code Block |
|---|
$ mvn clean install |
...
| Code Block |
|---|
... [INFO] Installing /Users/simonh/dev/meow/customsample/meowster-customsample/target/meowster-customsample-1.0-SNAPSHOT.oar to /Users/simonh/.m2/repository/org/meowster/app/customsample/meowster-customsample/1.0-SNAPSHOT/meowster-customsample-1.0-SNAPSHOT.oar ... |
Assuming that you have ONOS running on your local machine, you can install (and activate) the app from the command line:
| Code Block |
|---|
$ onos-app localhost install! target/meowster-customsample-1.0-SNAPSHOT.oar |
You should see some JSON output that looks something like this:
| Code Block |
|---|
{
  "name":"org.meowster.app.customsample",
  "id":39,
  "version":"1.0.SNAPSHOT",
  "description":"Meowster Sample ONOS Custom-View App",
  "origin":"Meowster, Inc.",
  "permissions":"[]",
  "featuresRepo":"mvn:org.meowster.app.customsample/meowster-customsample/1.0-SNAPSHOT/xml/features",
  "features":"[meowster-customsample]",
  "state":"ACTIVE"
} |
(Note that the above has been formatted for readability; what you will see will be more smushed together.)
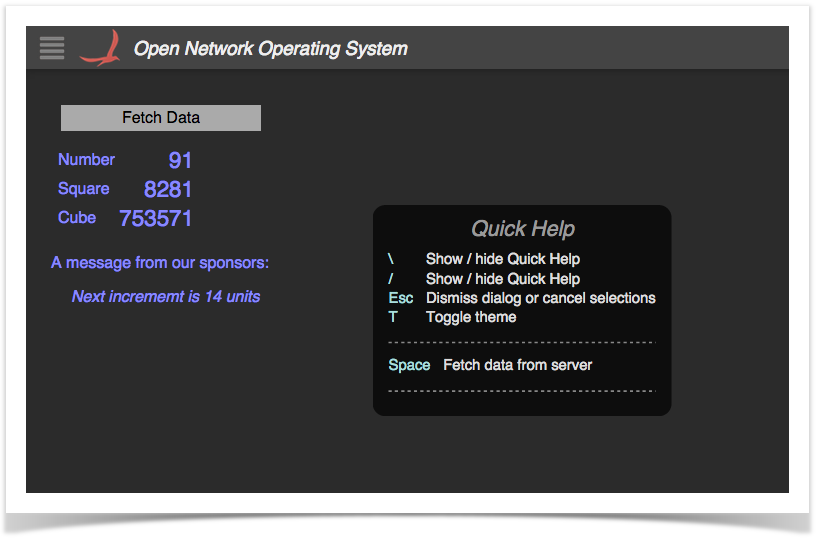
After refreshing the GUI in your web browser, the navigation menu should have an additional entry:
...
Also of note: pressing the T key will toggle the "theme" between light and dark:
Now that we have our application built and our custom view installed, let's take a look at the code that makes this happen...
Custom Views in Brief
To create a custom view requires both client-side and server-side resources; the client-side consists of HTML, JavaScript, and CSS files, and the server-side consists of Java classes.
- The HTML file defines the structure of the custom view, and indicates to Angular where directives (behaviors) need values need to be injected.
- The JavaScript file creates the Angular controller for the view, and defines code that drives the view.
- The CSS file defines custom styling.
- The server-side Java code:
- registers the view with the GUI framework
- receives requests from the client, fetches
- data, and sends the information back to the client
Description of Template Files - Server Side
This section gives a brief introduction to the files generated filesby the archetype.
AppComponent
This is the base Application class and may be used for non-UI related functionality (not addressed in this tutorial).
...
This is the base class for UI functionality. The salient features to note are introduced briefly belowbelow.
(1) Reference to the UiExtensionService:
| Code Block | ||
|---|---|---|
| ||
@Reference(cardinality = ReferenceCardinality.MANDATORY_UNARY) protected UiExtensionService uiExtensionService; |
Provides access to the UI Extension Service, so that we can register our "view".
(2) List of application view descriptors, defining which category categories the view appears views appear under in the GUI navigation pane (if not a hidden view), the internal identifier identifiers for the viewviews, and the corresponding display text for the link:
| Code Block | ||
|---|---|---|
| ||
//private List of application viewsstatic final String VIEW_ID = "sampleCustom"; private static final String VIEW_TEXT = "Sample Custom"; ... private final List<UiView> uiViews = ImmutableList.of( new UiView(UiView.Category.OTHER, "sampleCustom", "Sample Custom"VIEW_ID, VIEW_TEXT) ); |
Note that our application only contributes a single view, though more could be defined here if needed.
(3) Declaration of a UiMessageHandlerFactory to generate message handlers on demand. The example factory generates a single handler each time, AppUiMessageHandler, described below:
| Code Block | ||
|---|---|---|
| ||
// Factory for UI message handlers
private final UiMessageHandlerFactory messageHandlerFactory =
        () -> ImmutableList.of(
                new AppUiMessageHandler()
); |
Generally, there should be one message handler for each contributed view.
(4) Declaration of a UiExtension, configured with the previously declared UI view descriptors and message handler factory:
| Code Block | ||
|---|---|---|
| ||
// Application UI extension protected UiExtension extension = new UiExtension.Builder(getClass().getClassLoader(), uiViews) .resourcePath(VIEW_ID) .messageHandlerFactory(messageHandlerFactory) .build(); |
...
This class extends UiMessageHandler to implement code to handle events from the (client-side) sample application custom view.
Salient features to note:
...
| Code Block | ||
|---|---|---|
| ||
@Override
protected Collection<RequestHandler> createRequestHandlers() {
    return ImmutableSet.of(
            new SampleCustomDataRequestHandler()
    );
} |
In this simple example, There should be a request handler class for each event type generated by our view. In this case we only have to deal with a single event type, but this is where other event type handlers would be declared if our view generated additional events, so we only have one handler.
(2) define SampleCustomDataRequestHandler class to handle "sampleCustomDataRequest" events from the client.
...
| Info |
|---|
The payload parameter provides the payload of the request event, but we are not using it which in this exampleparticular case carries no data. |
The method creates and populates an ObjectNode instance with data to be (transformed into JSON and) shipped off back to the client.
...
The outer <div> element defines the contents of our custom "view". It should use a dash-delimited "id" of the internal identifier for the view, prefixed with "ov". So, in our example, "sampleCustom" becomes "ov-sample-custom". ("ov" stands for "ONOS view").
...
Note that we have used Angular's ng-click attribute in the button <div> to instruct Angular to invoke the getData() function (defined on our "scope" (, see later), whenever the user clicks on the <div>.
Data Panel
We have defined a <div> to create a "data panel" below the button panel:
| Code Block | ||
|---|---|---|
| ||
<div class="data-panel">
    <table>
        <tr>
            <td> Number </td>
            <td class="number"> {{data.number}} </td>
        </tr>
        <tr>
            <td> Square </td>
            <td class="number"> {{data.square}} </td>
        </tr>
        <tr>
            <td> Cube </td>
            <td class="number"> {{data.cube}} </td>
        </tr>
    </table>

    <p>
        A message from our sponsors:
    </p>
    <p>
        <span class="quote"> {{data.message}} </span>
    </p>
</div> |
...
| Code Block | ||
|---|---|---|
| ||
// js for sample app custom view
(function () {
    'use strict';

    ...

}()); |
Variables
Variables are declared to hold injected references (console logger, scope, services...), and configuration "constants":
| Code Block | ||
|---|---|---|
| ||
// injected refs
var $log, $scope, wss, ks;

// constants
var dataReq = 'sampleCustomDataRequest',
dataResp = 'sampleCustomDataResponse'; |
Defining the Controller
Note that the request and response event strings follow the convention of using the view ID as a prefix. This guarantees that our event names will be distinct from those of any other view.
Defining the Controller
WeWe'll skip over the helper functions for the moment and focus on the controller:
| Code Block | ||
|---|---|---|
| ||
angular.module('ovSampleCustom', [])
    .controller('OvSampleCustomCtrl',
    [ '$log', '$scope', 'WebSocketService', 'KeyService',

    function (_$log_, _$scope_, _wss_, _ks_) {
        ...
}]); |
The first line here gets a reference to the registers our "ovSampleCustom" module with angular, (the empty array states that our module is not dependent on any other module). Again, this is note the naming convention in play; the module name should start with "ov" (lowercase) followed by the identifier for our view, in continuing camel-case.
The controller() function is invoked on the returned module reference to define our controller. The first argument – "OvSampleCustomCtrl" – is the name of our controller, as registered with angular. Once again, the naming convention is to start with "Ov" (uppercase 'O') followed by the identifier for our view (continuing camel-case), followed by "Ctrl". The second argument is an array...
All the elements of the array (except the last) are the names of services to be injected into our controller function at run time. Angular uses these to bind the actual services to the specified parameters of the controller function (the last item in the array).
...
Inside our controller function, we start by saving injected references inside our closure, so that they are available to other functions. We also initialize our state:
| Code Block | ||
|---|---|---|
| ||
$log$log = _$log_; $scope = _$scope_; wss = _wss_; ks = _ks_; |
We also initialize our state; our map of event handlers, and the initial cached "data" from the server.
| Code Block | ||
|---|---|---|
| ||
var handlers = {};
$scope.data = {}; |
...
Next, we need to tell the WebSocketService which callback function to invoke when a "sampleCustomDataResponse" event arrives from the server:
| Code Block | ||
|---|---|---|
| ||
 // data response handler
handlers[dataResp] = respDataCb;
wss.bindHandlers(handlers); |
The callback function (one of the helper methods we skipped earlier) has the job of setting our scope variable data to be the payload of the event, (which is passed in as the first parameter to the function), and then prodding angular to re-process, (so, for example, the {{ }} substitutions get updated with the new data):
| Code Block | ||
|---|---|---|
| ||
function respDataCb(data) {
    $scope.data = data;
    $scope.$apply();
} |
| Info |
|---|
See the Web Socket Service for further details on event handler binding. |
Next up, we add our keybindings:
| Code Block | ||
|---|---|---|
| ||
addKeyBindings(); |
.. delegating to another of the previously skipped functions:
| Code Block | ||
|---|---|---|
| ||
function addKeyBindings() {
    var map = {
        space: [getData, 'Fetch data from server'],

        _helpFormat: [
            ['space']
        ]
    };

    ks.keyBindings(map);
} |
The map entries use well-known logical keys to identify the keystroke (in this example 'space' for the space-bar), with a value being a two-element array defining ; the first element is a callback function reference, and the second element is the text to display in the Quick Help panel, for the corresponding key.
The _helpFormat key is a special value that is used by the Quick Help Service to lay out the definition of bound keystrokes; each sub-array in the main array is a "column" in the panel; the entries in each sub-array define the order in which the keys are listed.
...
The getData() function tells the WebSocketService to send the data request event to the server:
| Code Block | ||
|---|---|---|
| ||
function getData() {
    wss.sendEvent(dataReq);
} |
Since no second parameter is provided for the sendEvent() call, the web socket service defaults to sending an empty payload along with the event.
Remember the ng-click attribute in the "Remember the ng-click attribute in the "button" div in our HTML snippet? Well, here we set the function reference on our scope, to bind to that element's click handler:
| Code Block | ||
|---|---|---|
| ||
// custom click handler $scope.getData = getData; |
...
To populate our view the first time it is loaded, we need to send an initial event to the server explicitly:
| Code Block | ||
|---|---|---|
| ||
// get data the first time... getData(); |
...
| Code Block | ||
|---|---|---|
| ||
// cleanup
$scope.$on('$destroy', function () {
    wss.unbindHandlers(handlers);
    ks.unbindKeys();
    $log.log('OvSampleCustomCtrl has been destroyed');
}); |
We unbind our event handlers and key bindings, and log a message to the console.
The last thing the controller does when it is initialized is to log to the console:
| Code Block | ||
|---|---|---|
| ||
$log.log('OvSampleCustomCtrl has been created'); |
sampleCustom.css
Glue Files
css.html
...
The last file in our client-side trio is the stylesheet for the custom view:
| Code Block | ||||||
|---|---|---|---|---|---|---|
| ||||||
/* css for sample app view */

#ov-sample-custom {
    padding: 20px;
}
.light #ov-sample-custom {
    color: navy;
}
.dark #ov-sample-custom {
    color: #88f;
}

#ov-sample-custom .button-panel {
    margin: 10px;
    width: 200px;
}

.light #ov-sample-custom .button-panel {
    background-color: #ccf;
}
.dark #ov-sample-custom .button-panel {
    background-color: #444;
}

#ov-sample-custom .my-button {
    cursor: pointer;
    padding: 4px;
    text-align: center;
}

.light #ov-sample-custom .my-button {
    color: white;
    background-color: #99d;
}
.dark #ov-sample-custom .my-button {
    color: black;
    background-color: #aaa;
}

#ov-sample-custom .number {
    font-size: 140%;
    text-align: right;
}

#ov-sample-custom .quote {
    margin: 10px 20px;
    font-style: italic;
} |
This should be fairly self-explanatory. However, note the use of the .light and .dark classes to change color selections based on each of the GUI's themes.
Glue Files
The final piece to the puzzle are the two "glue" files used to patch references to our client-side source into index.html. These files are located in the ~src/main/resources/sampleCustom directory. They must be named css.html and js.html respectively, so the framework can find them.
css.html
This is a short snippet that is injected into index.html. It contains exactly one line:
| Code Block | ||
|---|---|---|
| ||
<link rel="stylesheet" href="app/view/sampleCustom/sampleCustom.css"> |
js.html
This is a short snippet that is injected into index.html. It contains exactly one line:
| Code Block | ||
|---|---|---|
| ||
<script src="app/view/sampleCustom/sampleCustom.js"></script> |
Summary
Obviously, this sample page doesn't do anything particularly useful, but it should serve as a template of how to stitch things together to create your own custom views. Just remember to follow the naming convention – generally, using your view ID as a prefix to DOM elements, event names, and other "public" identifiers.
Have fun creating your own views!