Due to a ransomware attack, the wiki was reverted to a July 2022 version. . We apologize for the lack of a more recent valid backup.
...
Note that the directory naming convention must be observed for the files to be placed in the correct location when the archive is built. Since our view has the unique identifier "samplesampleTable", its client source files should be placed under the directory ~/src/main/resources/app/view/samplesampleTable.
| ~/src/main/resources/ | app/view/ | samplesampleTable/ |
|---|---|---|
| client files | client files for UI views | client files for "samplesampleTable" view |
There are three files here:
- samplesampleTable.html
- samplesampleTable.js
- samplesampleTable.css
Note the convention to name these files using the identifier for the view; in this case "samplesampleTable".
...
sampleTable.html
This is an HTML snippet for the sample table view, providing the view's structure. Note that this HTML markup is injected into the Web UI by Angular, to make the view "visible" when the user navigates to it.
...
| Code Block | ||
|---|---|---|
| ||
<!-- partial HTML --> <div id="ov-sample-table"> ... </div> |
The outer <div> element defines the contents of your custom "view". It should be given the id of "ov-" + <view identifier>, ("ov" standing for "Onos View"). Thus in this example the id is "ov-sample-table".
Table View Header <div>
...
| Code Block |
|---|
<div class="summary-list" onos-table-resize> ... </div> |
The onos-table-resize directive dynamically resizes the table to take up the size of the window and to have a scrolling inner body. The column widths are also dynamically adjusted.
...
| Code Block | ||
|---|---|---|
| ||
<div class="table-header" onos-sortable-header>
    <table>
        <tr>
            <td colId="id" sortable>Item ID </td>
            <td colId="label" sortable>Label </td>
            <td colId="code" sortable>Code </td>
        </tr>
    </table>
</div>
|
| Info |
|---|
See the tabular view directives page for more information on the onos-sortable-header and sortable directives. |
| Note |
|---|
...
The colId |
...
attributes of each column header cell |
...
must match the column identifier values defined in |
...
the AppUiTableMessageHandler class (see above). |
Table Body <div>
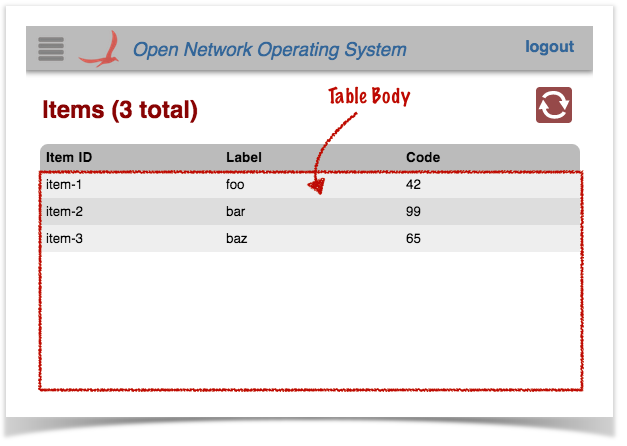
The <div> with class "table-body" provides a template row for Angular to use to format and populate the table data.:
| Code Block | ||
|---|---|---|
| ||
<div class="table-body">
    <table>

        ...

    </table>
</div>
|
There are two <tr> elements defined in the inner <table> element:
...
| Code Block | ||
|---|---|---|
| ||
<tr ng-if="!tableData.length" class="no-data">
    <td colspan="3">
        No Items found
    </td>
</tr>
|
The second is used as a template to stamp out rows; one per data item:
...
| Code Block | ||
|---|---|---|
| ||
<ov-sample-table-item-details-panel></ov-sample-table-item-details-panel> |
Following the naming convention, the prefix to this directive is ov-sample-table-. More details on what this directive does is shown below.
...
sampleTable.js
This file defines the view controller, invokes the Table Builder service Service to do the grunt work in creating the table, and defines a directive to drive the "fly-in" details panel.
...
An anonymous function invocation is used to wrap the contents of the file, to provide private scope (keeping our variables and functions out of the global scope):
| Code Block | ||
|---|---|---|
| ||
// js for sample app view
(function () {
    'use strict';

    ...

}()); |
Variables
Variables are declared to hold injected references (console logger, scope, services), and configuration "constants":
| Code Block | ||
|---|---|---|
| ||
// injected refs var $log, $scope, fs, wss, ps; // constants var detailsReq = 'sampleDetailsRequestsampleTableDetailsRequest', detailsResp = 'sampleDetailsResponsesampleTableDetailsResponse', pName = 'ov-sample-table-item-details-panel', propOrder = ['id', 'label', 'code'], friendlyProps = ['Item ID', 'Item Label', 'Special Code']; |
...
Next we define the callback function to be invoked when a "sampleDetailsResponsesampleTableDetailsResponse" event arrives with details about a selected item:
...
| Code Block | ||
|---|---|---|
| ||
angular.module('ovSample', [])
    .controller('OvSampleCtrl'
    ['$log', '$scope', 'TableBuilderService',
        'FnService', 'WebSocketService',

        function (_$log_, _$scope_, tbs, _fs_, _wss_) {
            ...
}]) |
The first line here gets a reference to the "ovSample" module. Again, this is the naming registers our "ovSampleTable" module with angular, (the empty array states that our module is not dependent on any other module). Again, note the naming convention in play; the module name should start with "ov" (lowercase) followed by the identifier for our view, first letter capitalisedin continuing camel-case.
The controller() function is invoked on the module to define our controller. The first argument – "OvSampleCtrlOvSampleTableCtrl" – is the name of our controller, as registered with angular. Once again, the naming convention is to start with "Ov" , (uppercase 'O') followed by the identifier for our view (first letter capitalizedcontinuing camel-case), followed by "Ctrl". Case is important. The second argument is an array...
All the elements of the array (except the last) are the names of services to be injected into our controller function at run time. Angular uses these to bind the actual services to the specified parameters of the controller function (the last item in the array).
...
Inside our controller function, we start by saving injected references inside our closure, so that they are available to other functions. We also initialize our state:
| Code Block | ||
|---|---|---|
| ||
$log = _$log_; $scope = _$scope_; fs = _fs_; wss = _wss_; ; |
We also initialize our state; our map of event handlers, and the cached data for the selected item (initially empty):
| Code Block | ||
|---|---|---|
| ||
var handlers = {};
$scope.panelDetails = {}; |
Next up, we need to bind our event handler function to the web socket service, so that tell the WebSocketService which callback function to invoke when a "sampleDetailsResponsesampleTableDetailsResponse" event comes in arrives from the server, it gets routed to us:
| Code Block | ||
|---|---|---|
| ||
// details response handler
handlers[detailsResp] = respDetailsCb;
wss.bindHandlers(handlers); |
...
Note that we do not need to worry about handling the basic table event response ("sampleDataResponsesampleTableDataResponse" in our case), as that is handled behind the scenes by the table builder, which we will see shortly.
...
Next we define the row selection callback function; this is invoked when the user clicks on a row in the table:
| Code Block | ||
|---|---|---|
| ||
// custom selection callback
function selCb($event, row) {
    if ($scope.selId) {
        wss.sendEvent(detailsReq, { id: row.id });
    } else {
        $scope.hidePanel();
    }
    $log.debug('Got a click on:', row);
} |
Behind the scenes, the table builder code will set the selId property on our scope to the identity (value of the "id" column) of the selected row (or null if no row is selected). It then invokes our callback function, passing it a reference to the event object, as well as the data structure for the row in question.
Our function uses the web socket service WebSocketService (wss) to send the details request event to the server, embedding the item identifier in the event payload.
In the case where there is no longer an item selected, the behavior is to hide the details panel instead.
Now we delegate the bulk of the work to the table builder service TableBuilderService (tbs), providing it with the necessary references:
| Code Block | ||
|---|---|---|
| ||
// TableBuilderService creating a table for us tbs.buildTable({ scope: $scope, tag: 'samplesampleTable', selCb: selCb }); |
The buildTable() function takes an options object as its single argument, to configure the table. The properties of the object used in our sample table are:
- scope: a reference to our view's $scope (as injected into our controller by Angular)
- tag: our table's "tag" used to derive the request and response event names and the "root" tag for the payload data (as described above; see SampleDataRequestHandler SampleTableDataRequestHandler)
- selCb: a reference to our row selection callback, described above
| Info |
|---|
See the Table Builder Service for more details, included additional parameters not used here. |
Finally we register a cleanup function with Angular, to be invoked when our view is destroyed (when When our view is destroyed (when the user navigates away to some other view), we need to do some cleanup:
| Code Block | ||
|---|---|---|
| ||
// cleanup $scope.$on('$destroy', function () { wss.unbindHandlers(handlers); $log.log('OvSampleTableCtrl has been destroyed'); }); |
Here, we simply need to We unbind our event handlers from the websocket service.
Defining the Details Panel Directive
, and log a message to the console.
The last thing the controller does when it is initialized is to log to the console:
| Code Block | ||
|---|---|---|
| ||
$log.log('OvSampleTableCtrl has been created'); |
Defining the Details Panel Directive
Chained onto the .controller() function call is a call to .directive(...) to define our details Chained onto the .controller() function call is a call to .directive() to define our details panel directive. Again, let's break the code down into chunks...
| Code Block | ||
|---|---|---|
| ||
.directive('ovSampleItemDetailsPanelovSampleTableItemDetailsPanel', ['PanelService', 'KeyService',
    function (ps, ks) {
        return {
            ...
        };
}]); |
The two arguments to directive() are:
...
The name, once again, follows the naming convention of starting with our prefix, "ovSampleovSampleTable". The whole name – "ovSampleItemDetailsPanelovSampleTableItemDetailsPanel" – is understood by Angular to relate to the HTML element <ov-sample-table-item-details-panel> that we saw at the bottom of the HTML file.
...
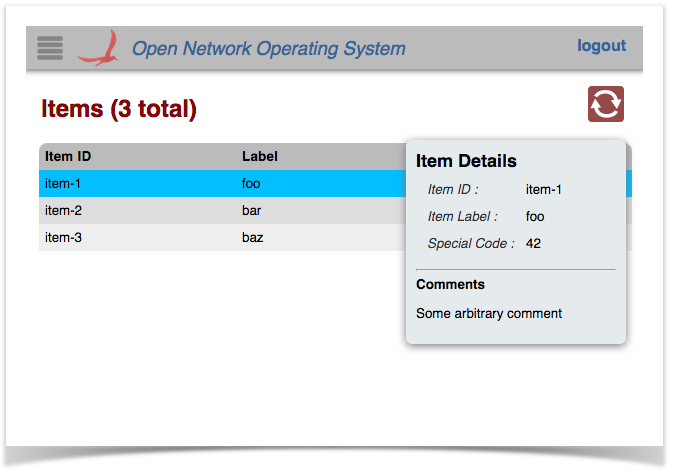
The link function is invoked when Angular parses the HTML document and finds the <ov-sample-table-item-details-panel> element. Our function sets up the "floating panel" behaviors as follows:
| Code Block | ||
|---|---|---|
| ||
var panel = ps.createPanel(pName, {
    width: 200,
    margin: 20,
    hideMargin: 0
});
panel.hide();
scope.hidePanel = function () { panel.hide(); }; |
First, use the panel service PanelService to create the panel, and start with the panel hidden. Also store a hidePanel() function on our scope which we can invoke later.
...
Now we use the key service to bind our callback to the ESC key, and also provide hints for the Quick Help panel:
| Code Block | ||
|---|---|---|
| ||
// create key bindings to handle panel
ks.keyBindings({
    esc: [closePanel, 'Close the details panel'],
    _helpFormat: ['esc']
});
ks.gestureNotes([
    ['click', 'Select a row to show item details']
]); |
...
Now would be a good time to revisit those helper functions that we glossed over earlier. First, populatePanel()...
...
| Code Block | ||||||
|---|---|---|---|---|---|---|
| ||||||
/* css for sample app view */ #ov-sample-table h2 { display: inline-block; } /* Panel Styling */ #ov-sample-table-item-details-panel.floatpanel { position: absolute; top: 115px; } .light #ov-sample-table-item-details-panel.floatpanel { background-color: rgb(229, 234, 237); } .dark #ov-sample-table-item-details-panel.floatpanel { background-color: #3A4042; } #ov-sample-table-item-details-panel h3 { margin: 0; font-size: large; } #ov-sample-table-item-details-panel h4 { margin: 0; } #ov-sample-table-item-details-panel td { padding: 5px; } #ov-sample-table-item-details-panel td.label { font-style: italic; opacity: 0.8; } |
It should be fairly self-explanatory. However, note:
#ov-sample-table h2is displayed as inline-block, so that the view title and the control button block are displayed on the same line:
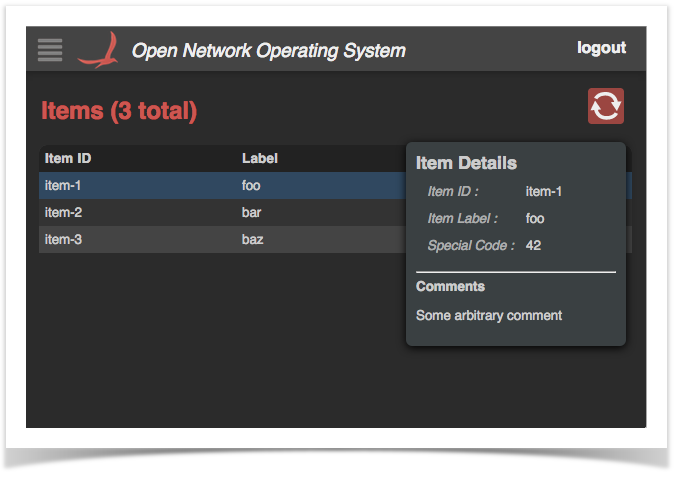
- the use of the
.lightand.darkclasses
...
- to select
...
- appropriate
...
- colors for each of the GUI's themes.
Glue Files
The final piece to the puzzle are the two "glue" files used to patch references to our client-side source into index.html. These files are located in the ~src/main/resources directory.
Recall in AppUiTableComponent we defined the resource path when building the UiExtension instance...
| Code Block |
|---|
private static final String VIEW_ID = "sampleTable";
...
protected UiExtension extension =
        new UiExtension.Builder(getClass().getClassLoader(), uiViews)
                .resourcePath(VIEW_ID)
... |
This tells the framework to look in the directory ~src/main/resources/sampleTable/ for the glue files. (As noted before, we did this so that the three archetype overlays could co-exist.)
css.html
This is a short snippet that is injected into index.html. It contains exactly one line:
| Code Block | ||
|---|---|---|
| ||
<link rel="stylesheet" href="app/view/samplesampleTable/samplesampleTable.css"> |
js.html
This is a short snippet that is injected into index.html. It contains exactly one line:
| Code Block | ||
|---|---|---|
| ||
<script src="app/view/samplesampleTable/samplesampleTable.js"></script> |
Summary
Obviously, this sample table doesn't do anything useful, with hard-coded data, but it should serve as a template of how to stitch things together to create your own tabular views. Do remember to follow the naming convention – generally, using your view ID as a prefix to DOM element, event names, and other "public" identifiers.
Have fun creating tables!