Due to a ransomware attack, the wiki was reverted to a July 2022 version. . We apologize for the lack of a more recent valid backup.
| Table of Contents |
|---|
1. Environment Setup
If you already know about ODTN emulators, you can directly go to step 1.1. Otherwise, you can read about ODTN emulators in this link: ODTN Emulators
1.1 Firstly, start two Cassini transponder emulator and one tapi-2.1 OLS emulator via Docker.
| Code Block | ||||
|---|---|---|---|---|
| ||||
docker pull onosproject/tapi-2.1:0.01
docker pull onosproject/oc-cassini:0.21
docker run -it -d --name odtn-emulator_openconfig_cassini_1_1 -p 11002:830 onosproject/oc-cassini:0.21
docker run -it -d --name odtn-emulator_openconfig_cassini_2_1 -p 11003:830 onosproject/oc-cassini:0.21
docker run -it -d --name odtn-emulator_tapi_ols_1 -p 11000:1234 onosproject/tapi-2.1:0.01 |
Optionally, check if these three emulators run successfully.
We need to create a XML file named get-terminal-device.xml as below:
| Code Block | ||
|---|---|---|
| ||
<?xml version="1.0"?>
  <get xmlns="urn:ietf:params:xml:ns:netconf:base:1.0">
    <filter xmlns:td='http://openconfig.net/yang/terminal-device'>
      <td:terminal-device/>
    </filter>
  </get>
|
And then use these three commands to test the emulators respectively.
| Code Block | ||
|---|---|---|
| ||
netconf-console --host=127.0.0.1 --port=11002 -u root -p root --rpc=get-terminal-device.xml
netconf-console --host=127.0.0.1 --port=11003 -u root -p root --rpc=get-terminal-device.xml
curl http://localhost:11000/restconf/data/tapi-common:context |
1.2 Secondly, start ONOS locally with application 'odtn-service' and 'roadm'
| Code Block | ||
|---|---|---|
| ||
cd ${ONOS_ROOT}
export ONOS_APPS=odtn-service,roadm,gui2
bazel build onos
bazel run onos-local -- clean |
2. Topo discovery
2.1 device discovery
Create a JSON file named device.json as below:
| Code Block | ||
|---|---|---|
| ||
{
  "devices" : {
    "netconf:127.0.0.1:11002" : {
      "basic" : {
        "name":"cassini2",
        "driver":"cassini-ocnos"
      },
      "netconf" : {
        "ip" : "127.0.0.1",
        "port" : "11002",
        "username" : "root",
        "password" : "root",
        "idle-timeout" : "0"
      }
    },
    "rest:127.0.0.1:11000": {
      "rest": {
        "ip": "127.0.0.1",
        "port": 11000,
        "protocol": "http",
        "testUrl":"/restconf/data/tapi-common:context",
        "manufacturer": "tapi-swagger",
        "hwVersion": "0",
        "swVersion": "2.1"
      },
      "basic": {
        "driver": "ols"
      }
    },
    "netconf:127.0.0.1:11003" : {
      "basic" : {
        "name":"cassini1",
        "driver":"cassini-ocnos"
      },
      "netconf" : {
        "ip" : "127.0.0.1",
        "port" : "11003",
        "username" : "root",
        "password" : "root",
        "idle-timeout" : "0"
      }
    }
  }
}
|
And then use command "onos-netcfg localhost device.json" to push device info into ONOS.
2.2 link discovery
Create a JSON file named link.json as below:
| Code Block | ||
|---|---|---|
| ||
{
  "links": {
    "netconf:127.0.0.1:11002/201-rest:127.0.0.1:11000/100000035178": {
      "basic": {
        "type": "OPTICAL",
        "metric": 1,
        "durable": true,
        "bidirectional": true
      }
    },
    "rest:127.0.0.1:11000/100000035182-netconf:127.0.0.1:11003/201": {
      "basic": {
        "type": "OPTICAL",
        "metric": 1,
        "durable": true,
        "bidirectional": true
      }
    }
  }
}
|
And then use command "onos-netcfg localhost device.json" to push link info into ONOS.
3 GUI2 View
Now open the home (topology) page of ONOS:
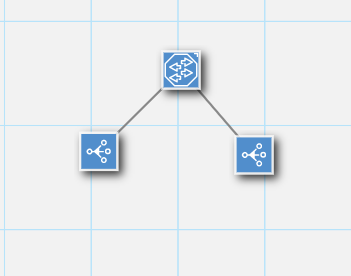
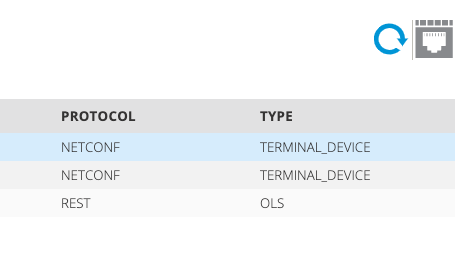
Then open the roadm custom view page:
http://localhost:8181/onos/ui/#/roadm-gui
Select the device "netconf:127.0.0.1:11003":
Click the icon on the top-right to see the port details (http://localhost:8181/onos/ui/#/roadm-gui/roadm-port-gui?devId=netconf:127.0.0.1:11003):
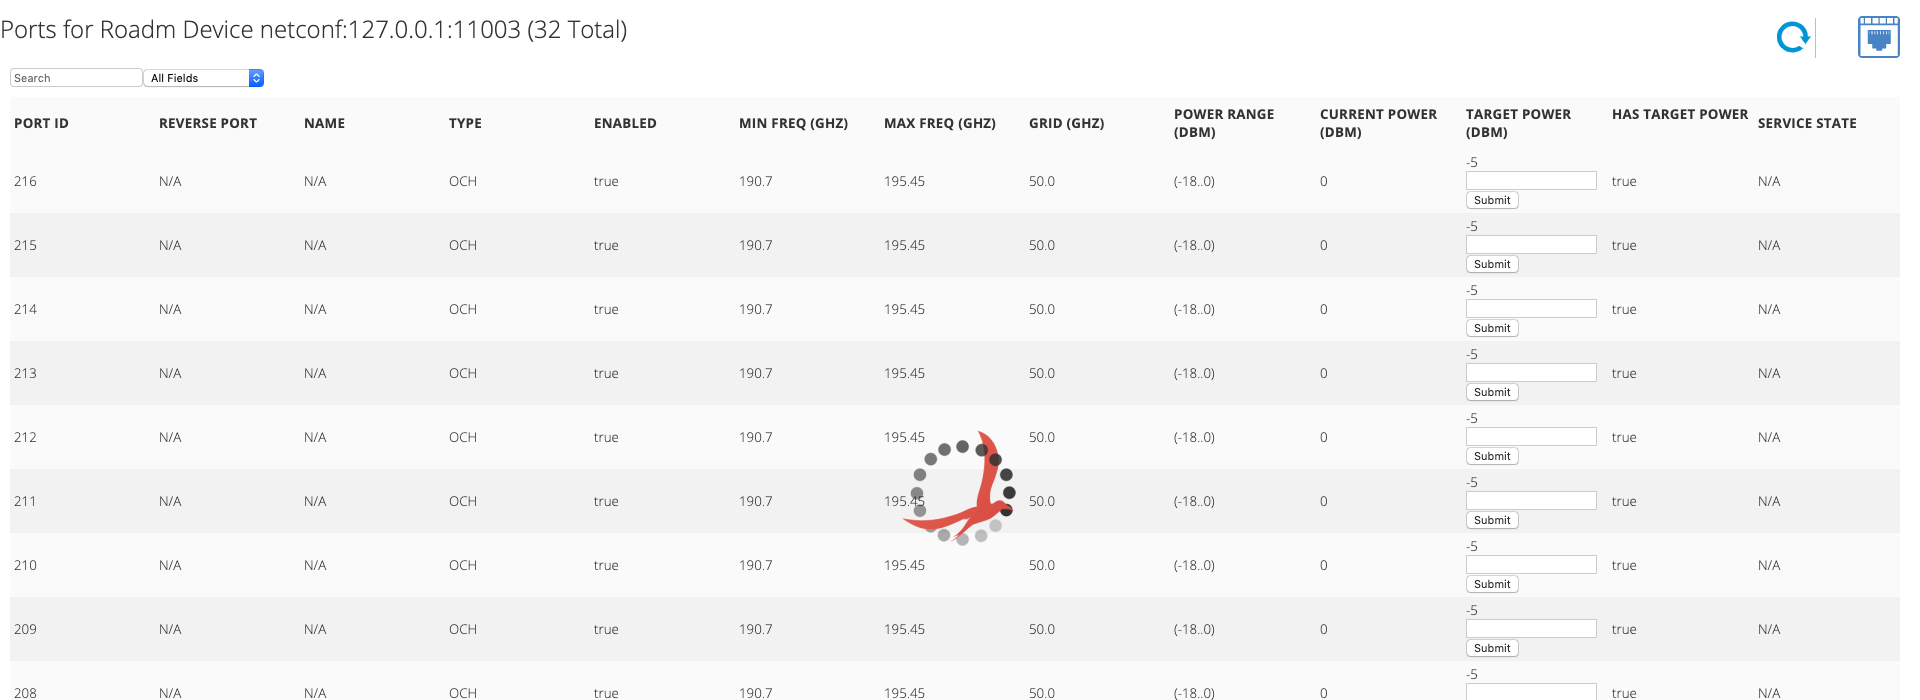
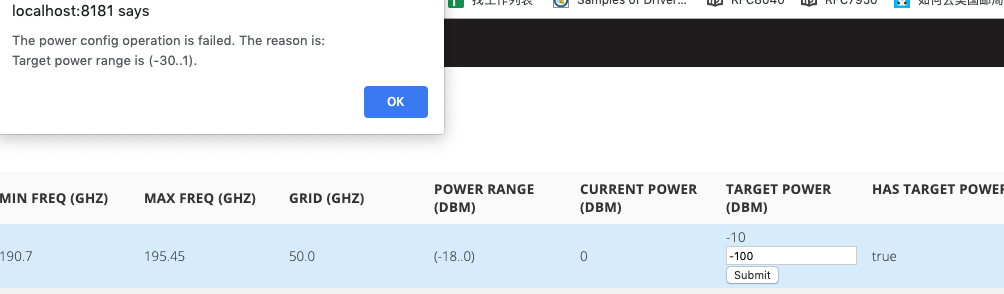
On the TARGET POWER column, we can type in the power value to modify the power of specific port:
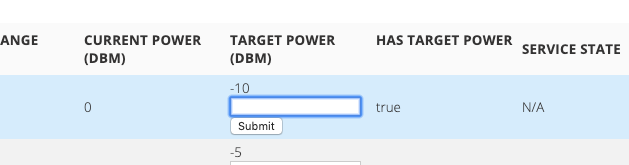
However, if the value is out of the available range, the alert appears:
 You can use ONOS GUI2 for ODTN to visualize devices and links. A user tutorial is posted here : GUI for ODTN , which explains how you can use GUI2 for ODTN.