Due to a ransomware attack, the wiki was reverted to a July 2022 version. . We apologize for the lack of a more recent valid backup.
Introduction
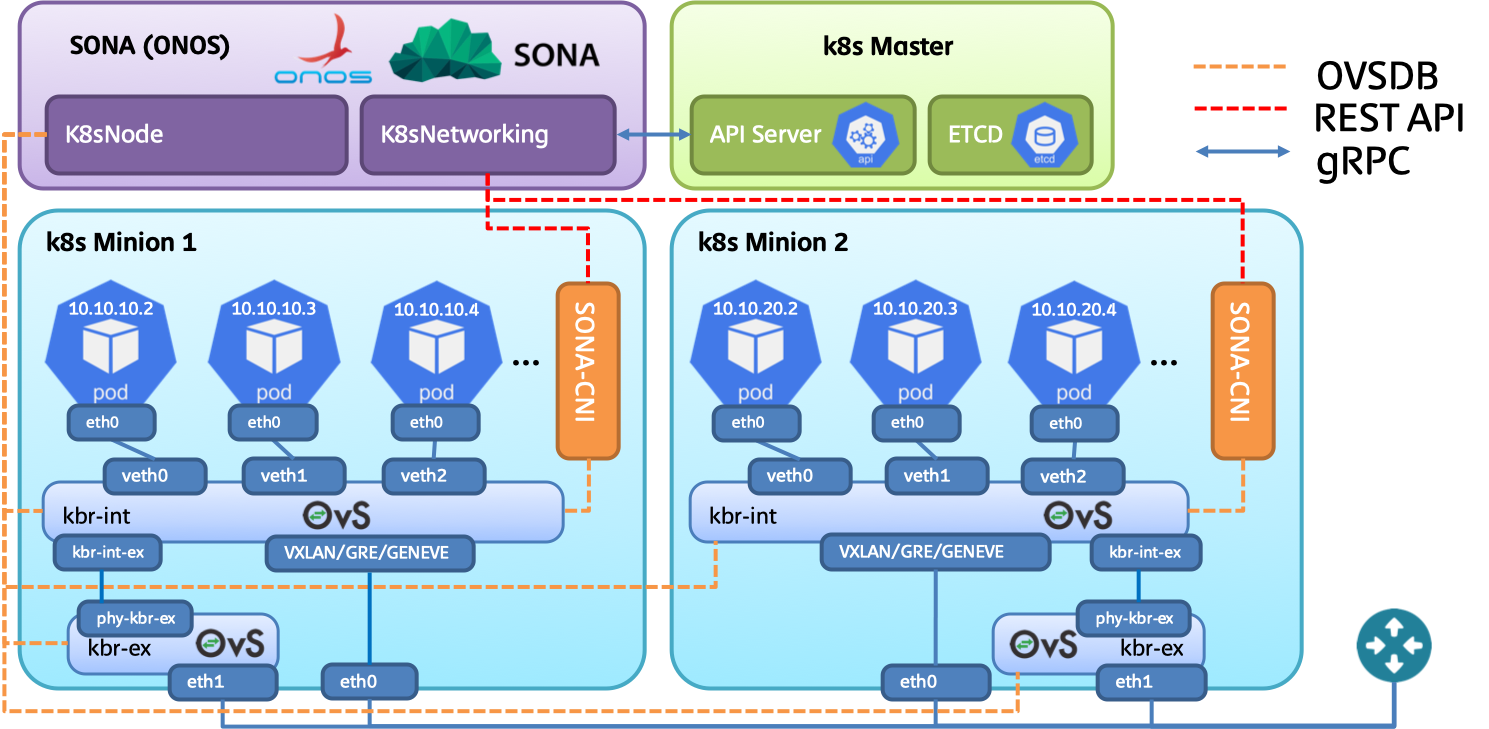
This tutorial shows the details instructions on installing kubernetes with SONA-CNI. The target OS used in this tutorial is CentOS. We will use three nodes to construct environment, one node behaves as a kubernetes master node where ONOS will be installed, while the others two nodes behave as kubernetes worker (minion) nodes. Note that OpenvSwitch (OVS) will be installed in all three nodes to ensure the inter-node connectivity.
The network topology used in this tutorial is depicted in the following figure. Two networks will be used for this deployment.
- Management and overlay tunneling network: this network will be used to access host machine from outside of the world, also this network will be used to provide tunnels among host machines.
- NodeIP + South to North traffic network: this network will be used to access kubernetes POD via NodeIP, also traffic initiated from POD and destined to internet will go through this network. Note that this network will be directly attached to OpenvSwitch (OVS)'s bridge; therefore, it should not be used for inter-host communication.
In case the host machines lack of network interfaces, it would be fine to merge management and overlay tunneling network. So we need to have two network interfaces at least in order to run kubernetes with SONA-CNI.
Pre-requisite
Prepare CentOS 7.X with all packages get updated to the latest version. We will use following hostname for each node.
- k8s-master: kubernetes master node will be used to schedule the resources to master and worker nodes.
- k8s-worker1: kubernetes worker node, a set of PODs will be scheduled here.
- k8s-worker2: kubernetes worker node, a set of PODs will be scheduled here.
Following commands are required to configure the host name.
$ sudo hostnamectl set-hostname $hostname
Note that $hostname should be replaced with the correct value.
Incase the DNS configuration is not enforced, please use following commands to configure DNS to ensure external connectivity.
# echo "DNS1=8.8.8.8" >> /etc/sysconfig/network-scripts/ifcfg-eth0 && service network restart
Docker Installation
Install docker engine to all master and worker nodes.
$ sudo yum update -y && yum install -y yum-utils device-mapper-persistent-data lvm2
$ sudo yum-config-manager --add-repo https://download.docker.com/linux/centos/docker-ce.repo
$ sudo yum install -y docker-ce
$ sudo systemctl start docker && sudo systemctl enable docker
To check the docker installation, you need to run following commands.
$ sudo docker ps
CONTAINER ID        IMAGE               COMMAND             CREATED             STATUS              PORTS               NAMES
OpenvSwitch Installation
OpenvSwitch replaces the role of iptables in this deployment; therefore, we need to install OpenvSwitch to all master and worker nodes.
Change SELinux to permissive mode.
$ sudo setenforce 0
$ sudo sed -i 's/^SELINUX=enforcing$/SELINUX=permissive/' /etc/selinux/config
Install dependencies.
$ sudo yum update -y && sudo yum install -y net-tools wget setuptool perl python-sphinx gcc make python-devel openssl-devel kernel-devel graphviz kernel-debug-devel autoconf automake rpm-build redhat-rpm-config libtool python-six checkpolicy selinux-policy-devel unbound-devel
Before go into the following procedures, it would be recommended to restart the server, because we need to use the latest kernel and its header to build OpenvSwitch RPM packages. To ease the work of RPM compilation, you can only compile packages in one node, and copy the RPM binaries to other nodes.
$ sudo reboot
Build OpenvSwitch RPMs from source. In this tutorial, we use OpenvSwitch v2.10.2, and the minimum requirements on OpenvSwitch version is v2.7.0.
# mkdir -p ~/rpmbuild/SOURCES/ && cd ~/rpmbuild/SOURCES/
# wget http://openvswitch.org/releases/openvswitch-2.10.2.tar.gz
# tar zxvf openvswitch-2.10.2.tar.gz
# cd openvswitch-2.10.2
# rpmbuild -bb --without check -D "kversion `uname -r`" rhel/openvswitch.spec
# rpmbuild -bb --without check -D "kversion `uname -r`" rhel/openvswitch-kmod-fedora.spec
# yum localinstall -y ~/rpmbuild/RPMS/x86_64/openvswitch-2.10.2-1.x86_64.rpm
# yum localinstall -y ~/rpmbuild/RPMS/x86_64/openvswitch-kmod-2.10.2-1.el7.x86_64.rpm
Start openvswitch.
$ sudo systemctl start openvswitch && sudo systemctl enable openvswitch
Let openvswitch_db daemon listen on port 6640. In case, you plan to run ONOS on master node, please listen on port 6650. Add the following line to /usr/share/openvswitch/scripts/ovs-ctl, right after "set ovsdb-server "$DB_FILE" line. You'll need to restart the openvswitch-switch service after that.
$ sudo sed -i '/set ovsdb-server \"$DB_FILE\"/a \        set \"$@\" --remote=ptcp:6650' /usr/share/openvswitch/scripts/ovs-ctl
$ sudo systemctl restart openvswitch
Kubernetes Installation
kubeadm is kubernetes cluster deployment tool. Following configurations should be enforced in all master and worker nodes to correctly run kubeadm.
Configure iptables settings.
$ sudo bash -c 'cat <<EOF > /etc/sysctl.d/k8s.conf
net.ipv4.ip_forward = 1
net.bridge.bridge-nf-call-ip6tables = 1
net.bridge.bridge-nf-call-iptables = 1
EOF'

$ sudo sysctl --system
(Optional) Disable firewalld service.
$ sudo systemctl stop firewalld
$ sudo systemctl disable firewalld
Turn off memory swapping.
$ sudo swapoff -a
Reboot server.
$ sudo reboot
Setup Kubernets yum repository in both master and worker nodes.
$ sudo bash -c 'cat <<EOF > /etc/yum.repos.d/kubernetes.repo
[kubernetes]
name=Kubernetes
baseurl=https://packages.cloud.google.com/yum/repos/kubernetes-el7-x86_64
enabled=1
gpgcheck=1
repo_gpgcheck=1
gpgkey=https://packages.cloud.google.com/yum/doc/yum-key.gpg https://packages.cloud.google.com/yum/doc/rpm-package-key.gpg
exclude=kube*
EOF'
Install and start kubeadm, kubectl and kubelet in both master and worker nodes.
$ sudo yum install -y kubelet kubeadm kubectl --disableexcludes=kubernetes
$ sudo systemctl enable kubelet && sudo systemctl start kubelet
Kubernetes Master Node Configuration
To initialize the entire Kubernetes cluster, you need to run following commands at master node. Note that the POD network CIDR can be configured through passing the value through --pod-network-cidr option. It is recommended to assign /16 CIDR into the entire Kubernetes cluster. With this configuration each node will get assigned /24 CIDR. So the first node will get assigned 20.20.0.0/24 range, and the second node will get assigned 20.20.1.0/24 and so on. By far we cannot install Kubernetes without installing kube-proxy, so we need to manually remove kube-proxy daemon set.
$ sudo kubeadm init --pod-network-cidr=20.20.0.0/16
Once you done all the initialization, you may see following output. In the output, you need to copy the last part which will be required for setting up the worker node. With the command you can let any worker nodes to join the existing Kubernetes cluster. Also make sure to copy the token string which will be used later.
...
To start using your cluster, you need to run the following as a regular user:

  mkdir -p $HOME/.kube
  sudo cp -i /etc/kubernetes/admin.conf $HOME/.kube/config
  sudo chown $(id -u):$(id -g) $HOME/.kube/config

You should now deploy a pod network to the cluster.
Run "kubectl apply -f [podnetwork].yaml" with one of the options listed at:
  https://kubernetes.io/docs/concepts/cluster-administration/addons/

Then you can join any number of worker nodes by running the following on each as root:

kubeadm join 10.1.1.29:6443 --token 7wjotj.50lcr77dds50gh8q \
    --discovery-token-ca-cert-hash sha256:d11c1256b16d8130596ca121a14b5900d11bc5bcc64a817db9190be00f70b161
Copy the authentication related CA file into the home directory to ensure kubectl get authorized against Kubernetes API server.
$ mkdir -p $HOME/.kube
$ sudo cp -i /etc/kubernetes/admin.conf $HOME/.kube/config
$ sudo chown $(id -u):$(id -g) $HOME/.kube/config
Once you done CA file locating, you can check the Kubernetes cluster by running following commands.
$ kubectl get nodes
NAME          STATUS     ROLES    AGE     VERSION
k8s-master    NotReady   master   4m45s   v1.14.2
Kubernetes Worker Node Configuration
Let each worker node to join Kubernetes cluster by running following commands.
$ sudo kubeadm join 10.1.1.29:6443 --token 7wjotj.50lcr77dds50gh8q \
    --discovery-token-ca-cert-hash sha256:d11c1256b16d8130596ca121a14b5900d11bc5bcc64a817db9190be00f70b161
Once you done worker node join, please check the cluster status by running following commands.
$ kubectl get nodes
NAME          STATUS     ROLES    AGE     VERSION
k8s-master    NotReady   master   4m45s   v1.14.2
k8s-worker1   NotReady   <none>   49s     v1.14.2
k8s-worker2   NotReady   <none>   46s     v1.14.2
The status of the nodes will be shown as NotReady, because none of CNIs were installed yet.
After all nodes are joint to Kubernetes cluster, users need to manually remove kube-proxy daemonset. The current version of kubeadm does not allow to skip kube-proxy installation.
$ kubectl delete ds kube-proxy -n kube-system
Remove all rules installed by iptables. Note that the following commands should be executed at all nodes.
$ sudo iptables -t nat -F
$ sudo iptables -F
$ sudo iptables -X
SONA-CNI Installation
Install python-pip dependencies.
$ sudo yum install epel-release -y
$ sudo yum install python-pip -y
Clone the sona-cni source from the repository.
$ git clone https://github.com/sonaproject/sona-cni.git && cd sona-cni
Install all python dependencies.
$ sudo pip install -r requirements.txt
Configure sona-cni via editing file located under etc/sona/sona-cni.conf
# Configuration options for ONOS CNI plugin endpoint

[onos]
# (StrOpt) ONOS REST interface URL. This is a mandatory field.
url_path = http://ONOS_IP:8181/onos/k8snetworking
# (StrOpt) Username for authentication. This is a mandatory field.
username = onos
# (StrOpt) Password for authentication. This is a mandatory field.
password = rocks

[network]
# (StrOpt) Default overlay network type (VXLAN, GRE, GENEVE). This is an optional field, VXLAN is the default value.
# type = VXLAN
# (StrOpt) Default segment identifier of the network. This is an optional field, 100 is the default value.
# segment_id = 100
# (StrOpt) External uplink interface name. This is a mandatory field.
external_interface = ens7
# (StrOpt) External gateway IP address. This is a mandatory field.
external_gateway_ip = 192.168.1.1
# (StrOpt) Transient network CIDR. This is an optional field. If not specified 172.10.0.0/16 will be used in stread.
# transient_cidr = 172.10.0.0/16
# (StrOpt) Service network CIDR. This is an optional field. If not specified 10.96.0.0/12 will be used instead.
# service_cidr = 10.96.0.0/12
# (StrOpt) Network Maximum Transmission Unit (MTU). This is a mandatory field.
mtu = 1400
Make sure to change the ONOS_IP to correct IP address. Also need to specify the external_interface and external_gateway_ip. It is optional to change other attributes.
Install sona-cni.
$ sudo python setup.py install
Configure the external interface.
$ sudo python config-external.py
ONOS/SONA Installation and Setup
Since ONOS is relying on Java, we need to install Java first. In this tutorial, we will install OpenJDK on CentOS 7.X. ONOS should be installed on master node.
$ sudo yum -y install java-1.8.0-openjdk java-1.8.0-openjdk-devel zip unzip
We need to add "sdn" user on master node, and grant all privileges to "sdn" user by adding it into sudoer group.
$ sudo adduser sdn
$ sudo passwd sdn
$ sudo bash -c 'cat <<EOF >> /etc/sudoers
sdn ALL=(ALL) NOPASSWD:ALL
EOF'
(deployment node) To deploy ONOS, we need to setup a deployment node. You can deploy ONOS from master node, but we recommend the user to deploy ONOS from deployment node. At deployment node, you need to install OpenJDK and git dependencies.
$ sudo yum -y install java-1.8.0-openjdk java-1.8.0-openjdk-devel zip unzip git curl
(deployment node) After that, clone the ONOS source from official repository and build.
$ git clone http://gerrit.onosproject.org/onos
$ git checkout onos-1.15
$ echo 'ONOS_ROOT=~/onos' >> .bash_profile
$ echo '. $ONOS_ROOT/tools/dev/bash_profile' >> .bash_profile
$ source .bash_profile
$ o
$ ob
$ ssh-copy-id sdn@k8s-master-node
(deployment node) Generate a SONA-CNI cell file to automatically start k8s related ONOS application during deployment.
$ sudo bash -c 'cat <<EOF > ~/onos/tools/test/cells/sona-k8s
export OC1="$k8s-master-node"
export ONOS_APPS="drivers,openflow-base,k8s-networking"
EOF'
$ cell sona-k8s
Note that, you need to change the $k8s-master-node with its real IP address.
(deployment node) After build all ONOS source, deploy ONOS to the master node.
$ stc setup
If you run ONOS in the master node please change the default OVSDB port number from 6640 to 6650.
$ onos
Welcome to Open Network Operating System (ONOS)!
     ____  _  ______  ____
    / __ \/ |/ / __ \/ __/
   / /_/ /    / /_/ /\ \
   \____/_/|_/\____/___/

Documentation: wiki.onosproject.org
Tutorials:     tutorials.onosproject.org
Mailing lists: lists.onosproject.org

Come help out! Find out how at: contribute.onosproject.org

Hit '<tab>' for a list of available commands
and '[cmd] --help' for help on a specific command.
Hit '<ctrl-d>' or type 'system:shutdown' or 'logout' to shutdown ONOS.


onos> cfg set org.onosproject.k8snode.impl.DefaultK8sNodeHandler ovsdbPortNum 6650
Generate a configuration file (e.g., api-cfg-k8s.json) used for authenticating with Kubernetes API server. Followings are the example config file, please copy the corresponding content from ~/.kube/config file.
{
  "apiConfigs" : [
    {
      "scheme" : "HTTPS",
      "ipAddress" : "10.2.1.45",
      "port" : 6443,
      "token": "7wjotj.50lcr77dds50gh8q",
      "caCertData": "LS0tLS1CRUdJTiBDRVJUSUZJQ0FURS0tLS0tCk1JSUN5RENDQWJDZ0F3SUJBZ0lCQURBTkJna3Foa2lHOXcwQkFRc0ZBREFWTVJNd0VRWURWUVFERXdwcmRXSmwKY201bGRHVnpNQjRYRFRFNU1EVXlOekEzTURBeU5Wb1hEVEk1TURVeU5EQTNNREF5TlZvd0ZURVRNQkVHQTFVRQpBeE1LYTNWaVpYSnVaWFJsY3pDQ0FTSXdEUVlKS29aSWh2Y05BUUVCQlFBRGdnRVBBRENDQVFvQ2dnRUJBTmtxCndWTS85dXhBcytycTFIVmtIS3NJVWdGNWdPcXJTVXhjVTE4U1BPOU9PUjg0QXZyOVpvRDcraFVkU0ZsNHkwMXkKWVI2NnkvU3dodUZaOWxGUklsSFlYcWtralBkYU0ra3BKcmtVS1UvY3laNVEwWnpuaEhNaFM3Y0l4WWpNbkpXTwpkbFdkOGErS2E4bEQzVTZ5RlhxMlNtalg4NTlkSVEwVml5czJETHRhc3BpRDZmdElwZlhGTlNDa3RHWVVlN3pICnhUMm82U3A0WWYwSWM0eG5MRTROWUhVYXhLbW81VHRZNVVBT3NzVzJGT0NhaDBpaTZ6QXViTWtITC9zeWdEL24KaWJuYzV3eHJFaTZFcFFwb3Y2dk05bDd3NzhYT2tBd3lWUzZLV3FnMEw2aDZSMnBtby9DUEdaekVPTDRYOXExVQpscWgvTWVFYjZsU1hpdUNsazZVQ0F3RUFBYU1qTUNFd0RnWURWUjBQQVFIL0JBUURBZ0trTUE4R0ExVWRFd0VCCi93UUZNQU1CQWY4d0RRWUpLb1pJaHZjTkFRRUxCUUFEZ2dFQkFHSm53aG9VVTl0eElJanZpcUt2b0pIZTRBN0IKeEEzZkt5WDBPSjJLNHhNb0hPVXBDVUVoNFIwOFVoWGFWcUNseDUrT2RhVTAyd0pRZFJzVHF3V2JQdlI0WmNRNwpDY0dFVUkyaHlBMVdXSWRZWWtWbEloNStRKzMyaXRQQXF5RzJBTTVuSHhJOUhYK3BzU242TjlJbFBoaEkxQ1l4Ck1pazVXaDQ1TE9NYk1TTlNLeXFPK2pjcUY1ZmNEYmNHdGhpajVKMzgzQzhtdzBjcUhjTCs2WXFxbU5hOXRBSFkKaVJPazZva1VOcUtsbkN1Z2FkaTVDcXVLazVob0tQWnZiRTBmWHVPbVdYUTR6Nlc5dWs4d2ZFOFdWZjNZQWpDdAorWDR6QjhFOXIvbzdsSlJDcTB5RU5hUEhPQ2x5MGZkZlVLU0ZzWFRiRWdSMmxQTTArd2ZRbGVuallVZz0KLS0tLS1FTkQgQ0VSVElGSUNBVEUtLS0tLQo=",
      "clientCertData": "LS0tLS1CRUdJTiBDRVJUSUZJQ0FURS0tLS0tCk1JSUM4akNDQWRxZ0F3SUJBZ0lJQXZFTG5EeW1LeDB3RFFZSktvWklodmNOQVFFTEJRQXdGVEVUTUJFR0ExVUUKQXhNS2EzVmlaWEp1WlhSbGN6QWVGdzB4T1RBMU1qY3dOekF3TWpWYUZ3MHlNREExTWpZd056QXdNalZhTURReApGekFWQmdOVkJBb1REbk41YzNSbGJUcHRZWE4wWlhKek1Sa3dGd1lEVlFRREV4QnJkV0psY201bGRHVnpMV0ZrCmJXbHVNSUlCSWpBTkJna3Foa2lHOXcwQkFRRUZBQU9DQVE4QU1JSUJDZ0tDQVFFQTFNMFlLZUloZG15a1V2eTkKWEpFVnpZRGRYbk9GdVRWQ1ZpOG5acFpTeWUvTXB3Q3FiUTNiSGNQNHRETG03eUh2YWdoekJsUmc3TldKMjFkWAowUFhuZlZFbTJDRnNYNmNOeERSRGhzV1ZnVWtMWHVvNzU1dmpsMGt2YlVUZkpHcEZ6MlY1UUVpMERoNnp5eitOCkR5cENpRFEyQXI3NXA4cDJwV1dhdkNESGUwak1Mb2gxRDlyTUJJNFFSRFluQmlHcDB0WEd3VnBXWmdhZkUyeFYKS3VKMXVQRmJITDJLRlZKSDlrK1p5ZnpjQ28wejhYank4Rlh3cnRYZHFwVzFXYW1iTm1lOStsbWZ5QTdhbmowTgprSkU5RnhnbFlRNFROWHNrM09RNTdyUXFtUXVUVTdYUXlmZzVtN20xMlk2V0I1Q2d3dVZCWngxSlpuMU5mZHpvCmo5WWtxUUlEQVFBQm95Y3dKVEFPQmdOVkhROEJBZjhFQkFNQ0JhQXdFd1lEVlIwbEJBd3dDZ1lJS3dZQkJRVUgKQXdJd0RRWUpLb1pJaHZjTkFRRUxCUUFEZ2dFQkFMdlZPREZRblFkeklXcVFiQnBmSE9PTm05ZE13c0Vic01EVgo3eGFmK0JNYmZ0V1M5OTc5MTZ5QUJSbWRxVzA2VmJnSlFnUysyQW1JYTllWG4rLzM0T3B4SGpROWNEK0pNdWhlCnlGTVozMmlOanY4bWFSVUZ3R2pGRkhGR0xNM2pXVTZFM016NG1Yb2xvWU9JcEppRDdDb3lCYytGSFRkeUdtVlkKZDNlWVR4WGU5d0xESzRaaFBOS3BwY0RWUm1hdXlMbW9HaGtKK2pvb3JXNzhIVUJKTnBHSVd5dCtHRjUzc2hCcQpNazE4MDF0Z3plVGE5K09Vd1VDMUlZZDJzUkhOUXRpNkd4ekNXN0cxRldPaUdZTFRQVDZ3ejRUNEEveDN2OCtDCm9VbTUva204Y2NBa2FLV1hqU3NVdUF1RUtOdGVuTXRzazlURGhZQk1hb2xnUUkxc3IrND0KLS0tLS1FTkQgQ0VSVElGSUNBVEUtLS0tLQo=",
      "clientKeyData": "LS0tLS1CRUdJTiBSU0EgUFJJVkFURSBLRVktLS0tLQpNSUlFcFFJQkFBS0NBUUVBMU0wWUtlSWhkbXlrVXZ5OVhKRVZ6WURkWG5PRnVUVkNWaThuWnBaU3llL01wd0NxCmJRM2JIY1A0dERMbTd5SHZhZ2h6QmxSZzdOV0oyMWRYMFBYbmZWRW0yQ0ZzWDZjTnhEUkRoc1dWZ1VrTFh1bzcKNTV2amwwa3ZiVVRmSkdwRnoyVjVRRWkwRGg2enl6K05EeXBDaURRMkFyNzVwOHAycFdXYXZDREhlMGpNTG9oMQpEOXJNQkk0UVJEWW5CaUdwMHRYR3dWcFdaZ2FmRTJ4Vkt1SjF1UEZiSEwyS0ZWSkg5aytaeWZ6Y0NvMHo4WGp5CjhGWHdydFhkcXBXMVdhbWJObWU5K2xtZnlBN2FuajBOa0pFOUZ4Z2xZUTRUTlhzazNPUTU3clFxbVF1VFU3WFEKeWZnNW03bTEyWTZXQjVDZ3d1VkJaeDFKWm4xTmZkem9qOVlrcVFJREFRQUJBb0lCQUI1aXdzYUlRWnIxWEdsMQpLVnprWXFhYmRnQ2Nva1dWODBqM0pyc2hUK1VCMXNrcDhTdnRSSkoxZnpmTDVPblVnS2sxVjZkWnVSVllVSHovCmRjeWlzRkZXbXlOVmNuSWVHbnNmczF5MUxlbnVFaStWWnNSbG9CUGtJVitLN0FuNUdzckloSTNIVTk2SVI4Z0gKNVE1N1RGRENrOHZFbFVWK1JYN01pVkcvcEh4WDMra29hck0wTkl2cVBjUEZmVDNNYnlzekczZ3pDMVArRVZzNQpsdUtHeVZ5VTVWbkFsSi9lN0VTM2xUWHRwc0laYnZodVFPUFZ4QzZEZ28vdEVHVzk1VHNYKzVCcCtrWTV0Mk92CnU2YXkrUi9WK0wwUEtJaDNhVHdINkhaM05Ub3JyYjRSRXpZbFR0THFtZ1N6U2x0K1pyclQ3WkFXRXBxem9ZZkMKbEJtUEx3RUNnWUVBKzFkMlJwbnZoZStJeXFJaGdLSWRBdjhQWGgxRkxCb3R0d3Q3TlE4RW5lcUlsWGw3NWUxUQplSkIyWjlMdG9uTTZWYWRJRDhGdG5NL0FvV2o0OC80dUcydG9vL2lIR251VHJ3T3NveGpoMjhkc3ByNW8yMzZOCmR3bjBaRi9aNUFVWXdEeHcySjFhTFRyOS95YWZ1ZXRERW9lR1Z4QlpDNm1qbGN4TnpNdXdTamtDZ1lFQTJMN0YKQ21wWmxNRmw5VFNSQ2VDcGgyQ20vRVk4a2pqRTVqNnU2NVRtVTVWV1IvSDlXWVFaeFRzdFBGR3h6OWFzODF1YwpYSWlDTzhwTTlVRTlVK2tFQ1B3bVhnRURvanh6VzJKWCtIMU5xeGluWUNIYTJOcHdPemRwbkYrSkNUVWJYbk5pCkNxSThNaCtXR2I5dEtZSGlKaFNQdzFRWWVzYVZOZ3FneU5GMmJmRUNnWUVBMHR5dnA4K2hlWlphQnRZNmtUWncKYklFYm5YT2xBcmo3dldOdWZEY2JRbmp2R2FnUDMvaFcySzhxQnpTWWxQOWk0MVV5U2JXWGhrVnRjSDBtejF4aAp4ak00V01nNllHZG9vUjNPQ2c3bi9ZQ3prTGlTTkFOYUg1SkViS2xWbmMwQTFOWmdQZnJWR3JreE9veG0ySTJkCmVjQWxYb21paXZ4STkzV3RsN0VUTjFFQ2dZRUF3Zm1aSmtVZmZyM0duYmc1eFhsR3YxMkVsR25YYzVWU3dpeC8KSjE3Tzh5YkhYUVA1Rk0vZ3NGN1JrUlliNkVIYjdyK2lKRDRYTDZOUlZIemFnZW9jTGw1YmgrMm9idDFpNy9vSAplTi9MVHNCMXF0Y2hvTWw5ZjhHTHh1TEpKWEJkMmgyeE5Jc1ZERmF3WXNLcTAyYm1HZVowOHY2a0dkejNWTElXClN5TUt0a0VDZ1lFQXBvQnFVcjdmaWNtOWRsWVJwUGdpb3Vhem1mWCtZU2k0QjJQSHFnclFhaCtaOTIxOTZYT1oKTFlrbHhkcy93UHdycEc3U3o4OVRrNUpiWlAxUHVjenBKcEE3ZDVCRzJURWo0ejdrVkY1OHNqMzA3ZXdpc2FjMgordWY5YWxRbFRXN0FOWVZuSnZEenZmMGhxRm84ZTg0Q0FETCt4WE1LeXUrbWZCY0l1SGc2M1BVPQotLS0tLUVORCBSU0EgUFJJVkFURSBLRVktLS0tLQo="
    }
  ]
}
Push the config into the ONOS through REST API.
$ curl --user onos:rocks -X POST -H "Content-Type: application/json" http://$OC1:8181/onos/k8snode/configure/api -d @api-cfg-k8s.json
Configure route in each node by running following command under sona-cni source directory.
$ sudo python config-route.py
Access ONOS shell, and issue following commands to make sure all Kubernetes nodes are discovered and running under COMPLETE status.
onos> k8s-nodes
Hostname                    Type           Management IP           Data IP             State
k8s-master                  MASTER         10.1.1.29               10.1.1.29           COMPLETE
k8s-worker1                 MINION         10.1.1.11               10.1.1.11           COMPLETE
k8s-worker2                 MINION         10.1.1.21               10.1.1.21           COMPLETE
Total 3 nodes
If you want to check the external gateway information please add -j option.
onos> k8s-nodes -j
[ {
  "hostname" : "k8s-master",
  "type" : "MASTER",
  "state" : "COMPLETE",
  "managementIp" : "10.1.1.29",
  "integrationBridge" : "of:0000000000000001",
  "externalBridge" : "of:0000000000000002",
  "dataIp" : "10.1.1.29",
  "externalInterface" : "eth2",
  "externalBridgeIp" : "172.16.230.2",
  "externalGatewayIp" : "172.16.230.1"
}, {
  "hostname" : "k8s-worker1",
  "type" : "MINION",
  "state" : "COMPLETE",
  "managementIp" : "10.1.1.11",
  "integrationBridge" : "of:0000000000000003",
  "externalBridge" : "of:0000000000000004",
  "dataIp" : "10.1.1.11",
  "externalInterface" : "eth2",
  "externalBridgeIp" : "172.16.230.11",
  "externalGatewayIp" : "172.16.230.1"
}, {
  "hostname" : "k8s-worker2",
  "type" : "MINION",
  "state" : "COMPLETE",
  "managementIp" : "10.1.1.21",
  "integrationBridge" : "of:0000000000000005",
  "externalBridge" : "of:0000000000000006",
  "dataIp" : "10.1.1.21",
  "externalInterface" : "eth2",
  "externalBridgeIp" : "172.16.230.4",
  "externalGatewayIp" : "172.16.230.1"
} ]
Helm Installation
Helm is deployment and package management tool for Kubernetes. You can issue following commands at master node to install Helm.
$ curl https://raw.githubusercontent.com/kubernetes/helm/master/scripts/get | bash
$ cat > /tmp/helm.yaml <<EOF
apiVersion: v1
kind: ServiceAccount
metadata:
  name: helm
  namespace: kube-system
---
apiVersion: rbac.authorization.k8s.io/v1beta1
kind: ClusterRoleBinding
metadata:
  name: helm
roleRef:
  apiGroup: rbac.authorization.k8s.io
  kind: ClusterRole
  name: cluster-admin
subjects:
  - kind: ServiceAccount
    name: helm
    namespace: kube-system
EOF
$ kubectl create -f /tmp/helm.yaml
$ helm init --service-account helm
$ helm repo add incubator https://kubernetes-charts-incubator.storage.googleapis.com/
Deployment using Ansible
For the one who would like to deploy Kubernetes with SONA-CNI, please try out the ansible scripts in following URL.
https://github.com/sonaproject/k8s-sona-ansible