Due to a ransomware attack, the wiki was reverted to a July 2022 version. . We apologize for the lack of a more recent valid backup.
Welcome to the ONOS tutorial!
In this tutorial, you’ll complete a set of exercises designed to explain the main concepts of ONOS, our distributed network operating system. Soon, you'll understand how to use the basic features of ONOS.
To get you started quickly, this tutorial is distributed as a preconfigured virtual machine with the needed software. Just run the VM in VirtualBox using the instructions in the next section.
Introduction
Pre-requisites
You will need a computer with at least 2GB of RAM and at least 5GB of free hard disk space. A faster processor or solid-state drive will speed up the virtual machine boot time, and a larger screen will help to manage multiple terminal windows.
The computer can run Windows, Mac OS X, or Linux – all work fine with VirtualBox, the only software requirement.
To install VirtualBox, you will need administrative access to the machine.
The tutorial instructions requires prior knowledge of SDN in general, and OpenFlow and Mininet in particular. So please first complete the OpenFlow tutorial and the Mininet walkthrough. Although not a requirement, completing the FlowVisor tutorial before starting this one is highly recommended. Also being familiar with Apache Karaf would be helpful although not entirely required.
Stuck? Found a bug? Questions?
Email us if you’re stuck, think you’ve found a bug, or just want to send some feedback. Please have a look at the guidelines to learn how to efficiently submit a bug report.
Setup your environment
Install required sofware
You will need to acquire two files: a VirtualBox installer and the Tutorial VM.
After you have downloaded VirtualBox, install it, then go to the next section to verify that the VM is working on your system.
Create Virtual Machine
####REVISIT THIS######
Start up VirtualBox, then select Machine>New, give it a name, and select Linux as type and Ubuntu (64 bit) as version. Press Continue.
Next, configure the VM with 2 GB (2048 MB) of memory. Press Continue.
Select ‘Use an existing virtual hard drive file’, and point it to the vmdk file you downloaded. Select Create.
Now you can start the VM by double clicking it; once it starts you can login with user tutorial1 and password tutorial1.
After some time you should see the desktop view for ubuntu. You can open a terminal by double clicking Terminal.
Make sure to read the command prompt notes below; they’re important to knowing where to run each command.
Important Command Prompt Notes
In this tutorial, commands are shown along with a command prompt to indicate the subsystem for which they are intended.
For example,
onos>
indicates that you are in the ONOS command line, whereas
mininet>
indicates that you are in mininet.
Start Mininet
We’ll be using the same physical topology for all exercises, so now is a good time to start Mininet. The network is a simple set of six switches where the outer switches interconnected by a mesh of four switches. The diagram below shows the topology.
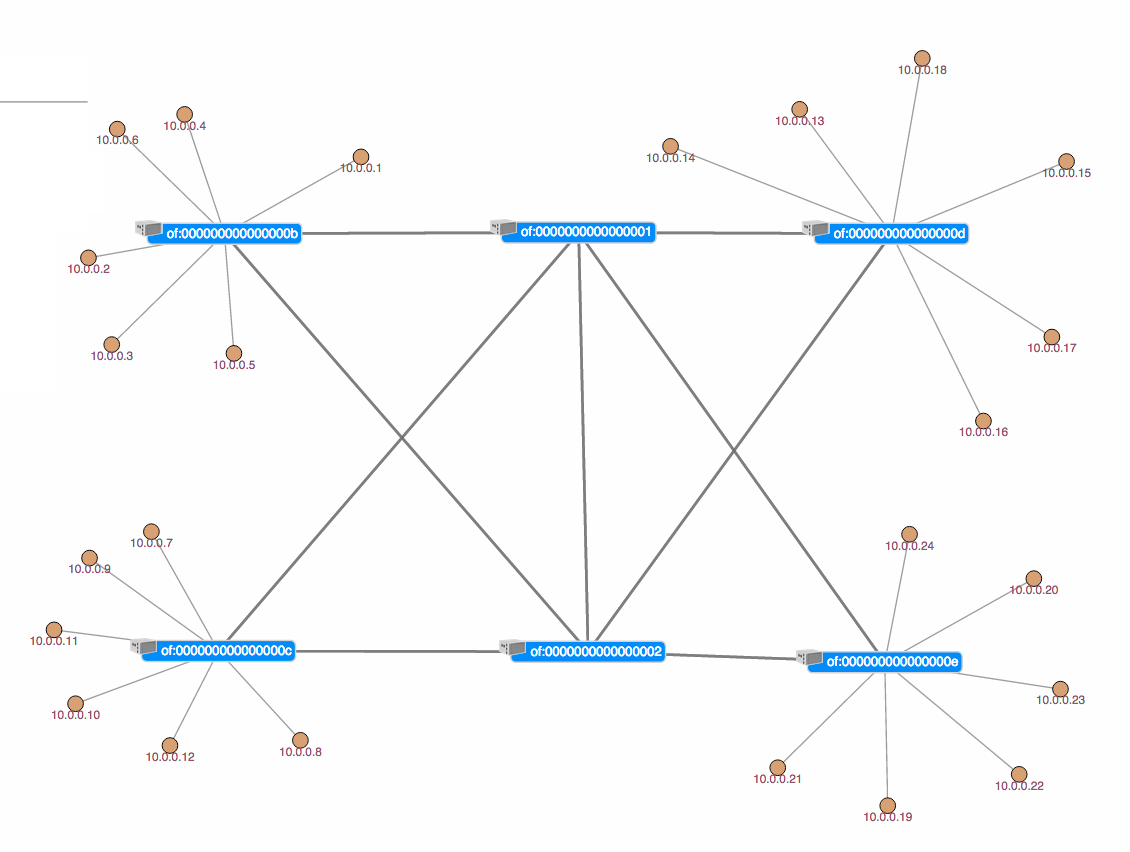
The outer switch each have six hosts attached to them. To start mininet with this topology, simply double click on the Mininet icon on your desktop.
Reactive Forwarding
In this exercise, we are going to run a sample app shipped with ONOS. Reactive Forwarding is a simple application which installs flows for every packet in that arrives at the controller. Go to your mininet prompt and do the following.
h1 ping h10
You will notice that the ping fails as shown below.
mininet> h11 ping -c3 h41
PING 10.0.0.19 (10.0.0.19) 56(84) bytes of data.
From 10.0.0.1 icmp_seq=1 Destination Host Unreachable
From 10.0.0.1 icmp_seq=2 Destination Host Unreachable
From 10.0.0.1 icmp_seq=3 Destination Host Unreachable
--- 10.0.0.19 ping statistics ---
3 packets transmitted, 0 received, +3 errors, 100% packet loss, time 2009ms
So why did the ping fail? Well we didn't load the reactive forwarding application. Indeed, if you list the loaded application you will see the following:
110 | Active |  80 | 1.0.0.SNAPSHOT   | onos-rest
116 | Active |  80 | 1.0.0.SNAPSHOT   | onos-of-api
117 | Active |  80 | 1.0.0.SNAPSHOT   | onos-of-ctl
118 | Active |  80 | 1.0.0.SNAPSHOT   | onos-lldp-provider
119 | Active |  80 | 1.0.0.SNAPSHOT   | onos-host-provider
120 | Active |  80 | 1.0.0.SNAPSHOT   | onos-of-provider-device
121 | Active |  80 | 1.0.0.SNAPSHOT   | onos-of-provider-packet
122 | Active |  80 | 1.0.0.SNAPSHOT   | onos-of-provider-flow
136 | Active |  80 | 1.0.0.SNAPSHOT   | onos-cli
137 | Active |  80 | 8.1.15.v20140411 | Jetty :: Websocket
138 | Active |  80 | 1.0.0.SNAPSHOT   | onos-gui
151 | Active |  80 | 1.0.0.SNAPSHOT   | onos-core-net
152 | Active |  80 | 1.0.0.SNAPSHOT   | onos-core-trivial
As you can see above, there is no reactive forwarding application loaded. Let's see how we load it.
In your ONOS window, do
feature:install onos-app-fwd
Then, in a mininet window run the ping again, just this time don't limit the number of pings.
h11 ping h41
This time the ping is flowing:
mininet> h11 ping h41
PING 10.0.0.19 (10.0.0.19) 56(84) bytes of data.
64 bytes from 10.0.0.19: icmp_req=1 ttl=64 time=9.12 ms
64 bytes from 10.0.0.19: icmp_req=2 ttl=64 time=0.892 ms
64 bytes from 10.0.0.19: icmp_req=3 ttl=64 time=0.075 ms
64 bytes from 10.0.0.19: icmp_req=4 ttl=64 time=0.068 ms
You have now seen that you can load applications into ONOS dynamically. Actually you can also interrupt applications while they are running so, for example, let's stop the reactive forwarding application.
stop onos-app-fwd
Observe that the ping has now stopped. This is because when the reactive forwarding application is unloaded, it cleans up after itself by removing the rules that it has pushed. We'll talk more about this in the next section. For now, let's restart the reactive forwarding application.
start onos-app-fwd
...and the ping restarts ![]()
ONOS CLI commands
ONOS has many CLI commands. In this section, we will go through some of the most useful commands. This section may also serve as a CLI reference for you during this tutorial. While we will explain some of the ONOS CLI command here you can find an exhaustive list by running:
help onos
or more information about an individual command adding --help to any command.
Links command
The links command is used to list the links detected by ONOS. At the ONOS prompt run
links
and you should get the following output:
onos> links
src=of:000000000000000e/1, dst=of:0000000000000001/5, type=DIRECT
src=of:000000000000000d/1, dst=of:0000000000000001/4, type=DIRECT
src=of:000000000000000e/2, dst=of:0000000000000002/5, type=DIRECT
src=of:000000000000000c/1, dst=of:0000000000000001/3, type=DIRECT
src=of:000000000000000d/2, dst=of:0000000000000002/4, type=DIRECT
src=of:000000000000000b/1, dst=of:0000000000000001/2, type=DIRECT
src=of:000000000000000c/2, dst=of:0000000000000002/3, type=DIRECT
src=of:000000000000000b/2, dst=of:0000000000000002/2, type=DIRECT
src=of:0000000000000002/2, dst=of:000000000000000b/2, type=DIRECT
src=of:0000000000000002/3, dst=of:000000000000000c/2, type=DIRECT
src=of:0000000000000001/2, dst=of:000000000000000b/1, type=DIRECT
src=of:0000000000000002/4, dst=of:000000000000000d/2, type=DIRECT
src=of:0000000000000001/3, dst=of:000000000000000c/1, type=DIRECT
src=of:0000000000000002/5, dst=of:000000000000000e/2, type=DIRECT
src=of:0000000000000001/4, dst=of:000000000000000d/1, type=DIRECT
src=of:0000000000000001/5, dst=of:000000000000000e/1, type=DIRECT
src=of:0000000000000002/1, dst=of:0000000000000001/1, type=DIRECT
src=of:0000000000000002/2, dst=of:0000000000000001/2, type=DIRECT
src=of:0000000000000001/1, dst=of:0000000000000002/1, type=DIRECT
src=of:0000000000000001/2, dst=of:0000000000000002/2, type=DIRECT
The output show you the list of