Due to a ransomware attack, the wiki was reverted to a July 2022 version. . We apologize for the lack of a more recent valid backup.
Table of Contents
Introduction
Note that this instructions assume you’re familiar with ONOS and OpenStack, and do not provide a guide to how to install or trouble shooting these services. However, If you aren’t, please find a guide from ONOS(http://wiki.onosproject.org) and OpenStack(http://docs.openstack.org), respectively.
The example deployment depicted in the above figure uses three networks with an external router.
- Management network: used for ONOS to control virtual switches, and OpenStack to communicate with nova-compute agent running on the compute node
- Data network: used for East-West traffic via VXLAN, GRE or GENEVE tunnel
- External network: used for North-South traffic, normally only gateway nodes have an access to this network
All networks can share a network interface in case your test machine does not have enough interfaces. You can also emulate external router. The figure below shows an example test environment used in the rest of this guide with emulated external router and two network interfaces, one for sharing management and external, and the other for data.

Prerequisite
1. Install OVS to all nodes including compute and gateway. Make sure your OVS version is 2.3.0 or later (later than 2.5.0 is recommended). Refer to this guide for updating OVS (don't forget to change the version in the guide).
In ONOS version 1.11 (Loon) or later, stateful NAT feature is included, which is disabled by default. If you want to use the stateful NAT feature, you have to install OVS 2.6 or later.
2. Set OVSDB listening mode. Note that "compute_node_ip" in the below command should be an address accessible from the ONOS instance.
$ ovs-appctl -t ovsdb-server ovsdb-server/add-remote ptcp:6640:[compute_node_ip]
If you want to make the setting permanent, add the following line to /usr/share/openvswitch/scripts/ovs-ctl, right after "set ovsdb-server "$DB_FILE" line. You'll need to restart the openvswitch-switch service after that.
set "$@" --remote=ptcp:6640
Now you should be able to see port "6640" is in listening state.
$ netstat -ntl
Active Internet connections (only servers)
Proto Recv-Q Send-Q Local Address           Foreign Address         State
tcp        0      0 0.0.0.0:22              0.0.0.0:*               LISTEN
tcp        0      0 0.0.0.0:6640            0.0.0.0:*               LISTEN
tcp6       0      0 :::22
3. Check your OVS state. It is recommended to clean up all stale bridges used in OpenStack including br-int, br-tun, and br-ex if there is any. Note that SONA will add required bridges via OVSDB once it is up.
$ sudo ovs-vsctl show
cedbbc0a-f9a4-4d30-a3ff-ef9afa813efb
    ovs_version: "2.8.2"
OpenStack Setup
How to deploy OpenStack is out of scope of this documentation. Here, it only describes configurations related to use SONA. All other settings are completely up to your environment.
Controller Node
The guide is based on OpenStack Ocata/Pike version. If you want to install Newton version of OpenStack, please refer to here <TBA>.
1. The first step is installing networking-onos. Please create '/opt/stack' folder and install networking-onos in /opt/stack as follows.
/opt/stack$ git clone --branch [stable/ocata or stable/pike] https://github.com/openstack/networking-onos.git
Next, please create a file /opt/stack/networking-onos/etc/conf_onos.ini using the following template. Please set the IP_ADDRESS_OF_ONOS to host IP address of ONOS controller.
conf_onos.ini
# Configuration options for ONOS ML2 Mechanism driver
[onos]
# (StrOpt) ONOS ReST interface URL. This is a mandatory field.
url_path = http://IP_ADDRESS_OF_ONOS:8181/onos/openstacknetworking
# (StrOpt) Username for authentication. This is a mandatory field.
username = onos
# (StrOpt) Password for authentication. This is a mandatory field.
password = rocks
2. The next step is installing and running OpenStack services. For DevStack users, use the following sample DevStack local.conf to build OpenStack controller node. Make sure your DevStack branch is consistent with the OpenStack branch, "stable/ocata" for example.
clone DevStack
$ git clone -b [stable/ocata or stable/pike] https://git.openstack.org/openstack-dev/devstack
The following is the example of local.conf. Please set the IP addresses correctly, and the network setting should be set properly as below.(Branches can be modified to stable/queens or stable/rocky for your wish)
local.conf of Controller Node
[[local|localrc]]
HOST_IP=10.134.231.28
SERVICE_HOST=10.134.231.28
RABBIT_HOST=10.134.231.28
DATABASE_HOST=10.134.231.28
Q_HOST=10.134.231.28

ADMIN_PASSWORD=nova
DATABASE_PASSWORD=$ADMIN_PASSWORD
RABBIT_PASSWORD=$ADMIN_PASSWORD
SERVICE_PASSWORD=$ADMIN_PASSWORD
SERVICE_TOKEN=$ADMIN_PASSWORD

DATABASE_TYPE=mysql

# Log
USE_SCREEN=True
SCREEN_LOGDIR=/opt/stack/logs/screen
LOGFILE=/opt/stack/logs/xstack.sh.log
LOGDAYS=1
# Force config drive
FORCE_CONFIG_DRIVE=True

# Networks
Q_ML2_TENANT_NETWORK_TYPE=vxlan
Q_ML2_PLUGIN_MECHANISM_DRIVERS=onos_ml2
Q_ML2_PLUGIN_TYPE_DRIVERS=flat,vlan,vxlan
ML2_L3_PLUGIN=onos_router
NEUTRON_CREATE_INITIAL_NETWORKS=False
enable_plugin networking-onos https://github.com/openstack/networking-onos.git stable/pike
ONOS_MODE=controller_only

# Services
ENABLED_SERVICES=key,nova,n-api,n-cond,n-sch,n-novnc,n-cauth,placement-api,g-api,g-reg,q-svc,horizon,rabbit,mysql

# Branches
GLANCE_BRANCH=stable/pike
HORIZON_BRANCH=stable/pike
KEYSTONE_BRANCH=stable/pike
NEUTRON_BRANCH=stable/pike
NOVA_BRANCH=stable/pike
If you use other deployment tool or build OpenStack manually, refer to the following Nova and Neutron configurations.
/etc/neutron/neutron.conf
core_plugin = ml2
service_plugins = onos_router
dhcp_agent_notification = False
/etc/neutron/plugins/ml2/ml2_conf.ini
[ml2]
tenant_network_types = vxlan
type_drivers = flat,vlan,vxlan
mechanism_drivers = onos_ml2

[ml2_type_flat]
flat_networks = public1, public2 #Whatever physical networks you want to create

[securitygroup]
enable_security_group = True
Set Nova to use config drive for metadata service, so that we don't need to run Neutron metadata-agent. And of course, set Neutron for network service.
/etc/nova/nova.conf
[DEFAULT]
force_config_drive = True
network_api_class = nova.network.neutronv2.api.API
security_group_api = neutron

[neutron]
url = http://10.134.231.28:9696
auth_strategy = keystone
admin_auth_url = http://10.134.231.28:35357/v2.0
admin_tenant_name = service
admin_username = neutron
admin_password = [admin passwd]
Don't forget to set conf_onos.ini when you start Neutron service.
/usr/bin/python /usr/local/bin/neutron-server --config-file /etc/neutron/neutron.conf --config-file /etc/neutron/plugins/ml2/ml2_conf.ini --config-file /opt/stack/networking-onos/etc/conf_onos.ini
Compute node
No special configurations are required for compute node other than setting network api to Neutron. For DevStack users, here's a sample DevStack local.conf.
local.conf for Compute Node
[[local|localrc]]
HOST_IP=10.134.231.30
SERVICE_HOST=10.134.231.28
RABBIT_HOST=10.134.231.28
DATABASE_HOST=10.134.231.28

ADMIN_PASSWORD=nova
DATABASE_PASSWORD=$ADMIN_PASSWORD
RABBIT_PASSWORD=$ADMIN_PASSWORD
SERVICE_PASSWORD=$ADMIN_PASSWORD
SERVICE_TOKEN=$ADMIN_PASSWORD

DATABASE_TYPE=mysql

NOVA_VNC_ENABLED=True
VNCSERVER_PROXYCLIENT_ADDRESS=$HOST_IP
VNCSERVER_LISTEN=$HOST_IP

# Force config drive
FORCE_CONFIG_DRIVE=True
LIBVIRT_TYPE=kvm # should be qemu if your compute node is a vm
# Log
USE_SCREEN=True
SCREEN_LOGDIR=/opt/stack/logs/screen
LOGFILE=/opt/stack/logs/xstack.sh.log
LOGDAYS=1

# Services
ENABLED_SERVICES=n-cpu,placement-client,neutron

enable_plugin networking-onos https://github.com/openstack/networking-onos.git stable/pike
ONOS_MODE=compute

# Branches
NOVA_BRANCH=stable/pike
KEYSTONE_BRANCH=stable/pike
NEUTRON_BRANCH=stable/pike
If your compute node is a VM, try http://docs.openstack.org/developer/devstack/guides/devstack-with-nested-kvm.html this first or set LIBVIRT_TYPE=qemu. Nested KVM is much faster than qemu, if possible.
For manual set up, set Neutron as a network API in the Nova configuration.
/etc/nova/nova.conf
[DEFAULT]
force_config_drive = True
network_api_class = nova.network.neutronv2.api.API
security_group_api = neutron

[neutron]
url = http://10.134.231.28:9696
auth_strategy = keystone
admin_auth_url = http://10.134.231.28:35357/v2.0
admin_tenant_name = service
admin_username = neutron
admin_password = [admin passwd]
Post Installation Setup
After installing OpenStack completely, please run the following configuration in the OpenStack controller node. It is required for OpenStack Ocata version, NOT because of SONA. Please replace OPENSTACK_CONTROLLER_HOST_IP to the correct IP address.
$ nova-manage cell_v2 map_cell0 --database_connection 'mysql+pymysql://root:nova@OPENSTACK_CONTROLLER_HOST_IP/nova_cell0?charset=utf8'
$ nova-manage cell_v2 simple_cell_setup --transport-url rabbit://stackrabbit:nova@OPENSTACK_CONTROLLER_HOST_IP:5672/
$ nova-manage cell_v2 discover_hosts
Gateway node
No OpenStack service is required for a gateway node.
ONOS-SONA Setup
1. Refer to SONA Network Configuration Guide and write a network configuration file, typically named network-cfg.json. Place the configuration file under tools/package/config/, build, create package, and then install ONOS.
Note that following tutorial is relevant only for building SONA apps against BUCK tool, and this only works from ONOS 1.13.0. So we strongly recommend the user to use ONOS 1.13.0 or above, if you would like to use BUCK to build SONA apps. For some reasons, if you have to use ONOS below 1.12.0, please use MAVEN to build the ONOS.
# SONA cluster (1-node)
export OC1=onos-01
export ONOS_APPS="drivers,openflow-base,openstacknetworking"
In case you are using cell, here's example cell file for 3-node cluster
export OC1=172.27.0.7
export OC2=172.27.0.8
export OC3=172.27.0.10
export ONOS_APPS="drivers,openflow-base,openstacknetworking"
onos$ ob
onos$ op
onos$ stc setup
onos$ curl --user onos:rocks -X POST -H "Content-Type: application/json" http://ONOS_IP:8181/onos/openstacknode/configure -d @network-cfg.json
2. Check all applications are activated successfully.
onos> apps -a -s
*   9 org.onosproject.ovsdb-base           1.13.0.SNAPSHOT OVSDB Provider
*  13 org.onosproject.optical-model        1.13.0.SNAPSHOT Optical information model
*  20 org.onosproject.drivers              1.13.0.SNAPSHOT Default device drivers
*  39 org.onosproject.drivers.ovsdb        1.13.0.SNAPSHOT OVSDB Device Drivers
*  47 org.onosproject.openflow-base        1.13.0.SNAPSHOT OpenFlow Provider
*  56 org.onosproject.openstacknode        1.13.0.SNAPSHOT OpenStack Node Bootstrap App
*  57 org.onosproject.openstacknetworking  1.13.0.SNAPSHOT OpenStack Networking App
3. Check all nodes are registered and all COMPUTE type node's states are COMPLETE with openstack-nodes command. Use openstack-node-check command for more detailed states if the state is INCOMPLETE. If you want to reinitialize only a particular compute node, use openstack-node-init command with hostname. If you have no physical peer switch, for GATEWAY type node, the state of the node would be DEVICE_CREATED state. You'll need additional configurations explained later for gateway nodes.
onos> openstack-nodes
Hostname            Type           Integration Bridge      Router Bridge           Management IP       Data IP             VLAN Intf      State
sona-compute-01     COMPUTE        of:00000000000000a1                             10.1.1.162          10.1.1.162                         COMPLETE
sona-compute-02     COMPUTE        of:00000000000000a2                             10.1.1.163          10.1.1.163                         COMPLETE
sona-gateway-02     GATEWAY        of:00000000000000a4     of:00000000000000b4     10.1.1.165          10.1.1.165                         COMPLETE
Total 3 nodes
Switch Setup
For switch to which Gatewy Node is connected, vlan and trunk setup is required.
1. Suppose we chose '172.27.0.1/24' as floating IP range and Gateway Nodes are connected to switch via port 2,3. And you decided to assign vlan number 20 to floating IP range. In that case, switch setup should be like below(Arista syntax).
Swtich(config)#interface vlan 20
Swtich(config-vlan-20)ip address 172.27.0.1/24
Swtich(config-vlan-20)no shutdown
Swtich(config)#interface ethernet 2-3
Swtich(config-if-Et1-2)#switchport mode trunk
Swtich(config-if-Et1-2)#switchport trunk allowed vlan 20
Swtich(config-if-Et1-2)#switchport trunk native vlan tag 20
2. If you need multiple floating IP ranges, for example 172.27.1.1/24 with vlan 200, additional setup is required(Arista syntax).
Swtich(config)#interface vlan 20
Swtich(config-vlan-20)ip address 172.27.0.1/24
Swtich(config-vlan-20)no shutdown
Swtich(config)#interface vlan 200
Swtich(config-vlan-20)ip address 172.27.1.1/24
Swtich(config-vlan-20)no shutdown
Swtich(config)#interface ethernet 2-3
Swtich(config-if-Et1-2)#switchport mode trunk
Swtich(config-if-Et1-2)#switchport trunk allowed vlan 20-21
Swtich(config-if-Et1-2)#switchport trunk native vlan tag 20
Gateway Node Setup
Basically there's no additional setup is required on Gateway nodes. Those are for whom doen't have physical peer switch.
1. Let's download and install Docker first.
$ wget -qO- https://get.docker.com/ | sudo sh
2. Install and configure OVS
OVS version depends on the SONA features you want to enable. If you want staful NAT features, you have to install OVS 2.6 or higher. Otherwise, you can install OVS 2.5.
Then, set the OVSDB listener port as 6640 so that ONOS can intiated OVSDB connection.
$ sudo ovs-vsctl set-manager ptcp:6640
Confgiure br-int bridge using openstack-node-init command.
onos> openstack-node-init gateway-01
Initializing gateway-01
Done.
You can check if br-int bridge is configured correctly using ovs-vsctl command, as follows.
$ sudo ovs-vsctl show
427d7ee0-218f-4d68-b503-a5639a367357
    Manager "ptcp:6640"
    Bridge br-int
        Controller "tcp:10.1.1.30:6653"
            is_connected: true
        fail_mode: secure
        Port br-int
            Interface br-int
        Port vxlan
            Interface vxlan
                type: vxlan
                options: {key=flow, remote_ip=flow}
    ovs_version: "2.5.2"
3. Download sona-setup scripts as well.
$ git clone https://github.com/sonaproject/sona-setup.git
$ cd sona-setup
4. Write externalRouterConfig.ini and place it under sona-setup directory.
externalRouterConfig.ini
floatingCidr = "172.27.0.1/24"
externalPeerMac = "fa:00:00:00:00:01"
- line 1, floatingCidr: Floating IP address ranges. It can be comma separated list.
- line 2, externalPeerMac: Remote peer router's MAC address.
5. Run createExternalRouter.sh. It will create emulated external peer router.
sona-setup$ ./createExternalRouter.sh
sona-setup$ sudo docker ps
CONTAINER ID        IMAGE                    COMMAND                  CREATED             STATUS              PORTS                         NAMES
5885654827e2        opensona/docker-quagga   "/usr/bin/supervisord"   3 weeks ago         Up 3 weeks          179/tcp, 2601/tcp, 2605/tcp   router
*Note that we don't use quagga app. We just use quagga container for convenience.
6. When every work is done, you create router with appropriate extenal network that floating IP range is assigned. Then you execute below CLI to check MAC learning for external peer rotuer is working well,
onos> openstack-peer-routers
Router IP Mac Address VLAN ID
172.27.0.1 FA:00:00:00:00:01 None
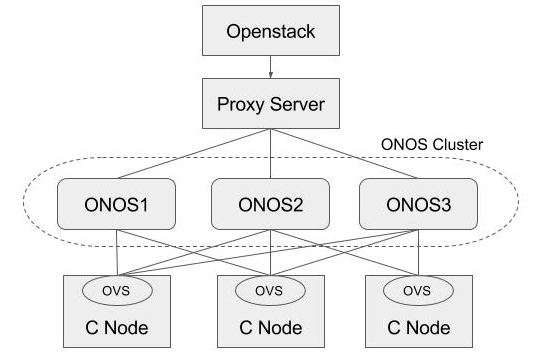
HA Setup
Basically, ONOS itself provides HA by default when there are multiple instances in the cluster. This section describes how to add a proxy server beyond the ONOS cluster, and make use of it in Neutron as a single access point of the cluster. For the proxy server, we used the HA proxy server (http://www.haproxy.org) here.
1. Install HA proxy.
$ sudo add-apt-repository -y ppa:vbernat/haproxy-1.5
$ sudo add-apt-repository -y ppa:vbernat/haproxy-1.5
$ sudo apt-get update
$ sudo apt-get install -y haproxy
2. Configure HA proxy.
/etc/haproxy/haproxy.cfg
global
    log /dev/log    local0
    log /dev/log    local1 notice
    chroot /var/lib/haproxy
    stats socket /run/haproxy/admin.sock mode 660 level admin
    stats timeout 30s
    user haproxy
    group haproxy
    daemon

    # Default SSL material locations
    ca-base /etc/ssl/certs
    crt-base /etc/ssl/private

    # Default ciphers to use on SSL-enabled listening sockets.
    # For more information, see ciphers(1SSL). This list is from:
    #  https://hynek.me/articles/hardening-your-web-servers-ssl-ciphers/
    ssl-default-bind-ciphers ECDH+AESGCM:DH+AESGCM:ECDH+AES256:DH+AES256:ECDH+AES128:DH+AES:ECDH+3DES:DH+3DES:RSA+AESGCM:RSA+AES:RSA+3DES:!aNULL:!MD5:!DSS
    ssl-default-bind-options no-sslv3

defaults
    log global
    mode    http
    option  httplog
    option  dontlognull
        timeout connect 5000
        timeout client  50000
        timeout server  50000

    errorfile 400 /etc/haproxy/errors/400.http
    errorfile 403 /etc/haproxy/errors/403.http
    errorfile 408 /etc/haproxy/errors/408.http
    errorfile 500 /etc/haproxy/errors/500.http
    errorfile 502 /etc/haproxy/errors/502.http
    errorfile 503 /etc/haproxy/errors/503.http
    errorfile 504 /etc/haproxy/errors/504.http

frontend localnodes
        bind *:8181
        mode http
        default_backend nodes

backend nodes
        mode http
        balance roundrobin
        option forwardfor
        http-request set-header X-Forwarded-Port %[dst_port]
        http-request add-header X-Forwarded-Proto https if { ssl_fc }
        option httpchk GET /onos/ui/login.html
        server web01 [onos-01 IP address]:8181 check
        server web02 [onos-02 IP address]:8181 check
        server web03 [onos-03 IP address]:8181 check

listen stats *:1936
    stats enable
    stats uri /
    stats hide-version
    stats auth someuser:password
3. Set url_path to point to the proxy server in Neutron ML2 ONOS mechanism driver configuration and restart Neutron.
networking-onos/etc/conf_onos.ini
# Configuration options for ONOS ML2 Mechanism driver
[onos]
# (StrOpt) ONOS ReST interface URL. This is a mandatory field.
url_path = http://[proxy-server IP]:8181/onos/openstackswitching
# (StrOpt) Username for authentication. This is a mandatory field.
username = onos
# (StrOpt) Password for authentication. This is a mandatory field.
password = rocks
4. Stop one of the ONOS instance and check everything works fine.
$ onos-service $OC1 stop