This section covers development and test environment setup and configuration.
The project does not enforce the use of a specific IDE, but rather, a set of guidelines that can be configured in an IDE. As such, developers should consult the documentation for the IDE of choice for specific configuration steps.
The examples used here, if any, are either for Eclipse and IntelliJ.
If your IDE supports the importing of projects, ONOS should be imported as a Maven project.
In Eclipse, this amounts to:
As ONOS is a multi-module project, it may appear as a collection of many (about 50 at the time of this writing) projects beginning with "onos-". This is normal for some IDEs such as Eclipse. For a listing of the software modules that comprise ONOS, please refer to the [Javadocs], or [Appendix C] of this Guide. |
The formatting followed by the project are:
if, for, while, and castsThe whitespace formatting, among other code styling, is enforced via Checkstyle, which is run against the code during each Maven build. The build will fail if formatting violations are found.
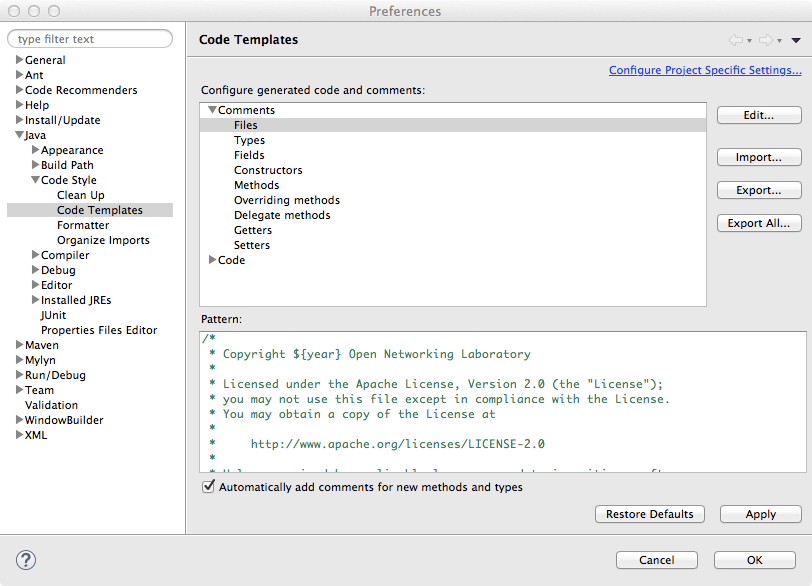
Prior to contributing code to ONOS, all developers should set-up their IDE to appropriately tag the code with the Apache 2 license header text. The bare text is checked in under tools/dev/header.txt, and the original can be found at:
http://www.apache.org/licenses/LICENSE-2.0.html
First make sure that you have the Copyright plugin enabled. Then, under Preferences, select Copyright section and create a new Copyright profile, call it something like Apache 2, and prime it with the text above, without any decorations. Then configure your copyright formatting options as shown:

Files comments
Remember to put a check on "Automatically add comments for new methods and types" to apply these templates on new files.

Developers planning to contribute code should configure git with their username and email.
git config --global user.name "firstname lastname" git config --global user.email "email@domain.com" |
To streamline the code review process, it is highly recommended that contributors set up git-review, which integrates code submission with git. Refer to this link for instructions for setting up git-review.
Build failures may occur if multiple Java versions are installed, and Maven is pointed to the incorrect version i.e. if there is a mismatch in Java versions reported by commands mvn -V and java -version.
The best way to prevent this version mismatch is to install Maven before Java 8. |
For OS X, the latest Oracle Java 8 SDK can be downloaded from Oracle.
For Ubuntu, the following steps will upgrade the installation to Java 8:
$ sudo add-apt-repository ppa:webupd8team/java -y $ sudo apt-get update $ sudo apt-get install oracle-java8-installer oracle-java8-set-default -y |
You will have to accept the Oracle binary license terms
If not set automatically during the Java 8 installation process, The JAVA_HOME environment variable should be set to the JRE installation location for Java 8. The process for verifying/setting the proper version varies with platform.
The current JAVA_HOME may be verified with:
$ /usr/libexec/java_home /Library/Java/JavaVirtualMachines/jdk1.8.0_25.jdk/Contents/Home |
To set the version, either run or add the following to the shell profile:
$ export JAVA_HOME=$(/usr/libexec/java_home -v 1.8) |
To verify the JAVA_HOME:
$ env | grep JAVA_HOME JAVA_HOME=/usr/lib/jvm/java-8-oracle |
If JAVA_HOME is not set or incorrect, either run or add the following to the shell profile:
$ export JAVA_HOME=/usr/lib/jvm/java-8-oracle |
To build a local set of the ONOS Java API documentation bundle, use the onos-build-docs utility, which uses Maven to generate both internal and external documentation.
Running onos-build-docs from any location generates HTML pages under ONOS_ROOT/docs/, and can be accessed by pointing a browser to ONOS_ROOT/docs/target/site/apidocs/index.html .
The generated documentation is also wrapped into a gzipped tar archive and placed under /tmp with the naming convention onos-apidocs-<onos-version>.<user>.tar.gz.