Due to a ransomware attack, the wiki was reverted to a July 2022 version. . We apologize for the lack of a more recent valid backup.
Overview
The following tutorial describes the bare minimum required for an ONOS app to define and register a custom UI view, which will be injected into the ONOS GUI whenever the app is loaded.
(Note: we are currently working on simplifying this process by using Maven Archetypes. Watch this space for updates...)
Project Directory Layout
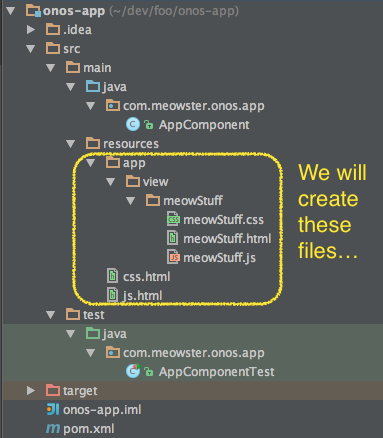
The project directory structure should look similar to the following illustration. Note that we will be creating the indicated UI specific resources:
AppComponent
The AppComponent class is the Java representation of your application. At activation, the application code should create the appropriate components and register them with the ONOS platform. At deactivation, the code should unregister components and do other necessary cleanup.
For this tutorial, we are going to create a UiExtension that defines a custom view to be injected into the GUI every time the application is installed and activated.
First of all, the skeletal AppComponent class should look something like this:
Injecting the UiExtensionService
Once we have defined our UiExtension, we are going to want to register it with the UiExtensionService. Thus we need to inject a reference to that service into our class. Note that our app can't really run without this, so we use the mandatory flag for the service:
@Reference(cardinality = ReferenceCardinality.MANDATORY_UNARY)
protected UiExtensionService uiExtensionService;
Defining the UiExtension
To create a UiExtension we need to supply a list of views that it defines, a factory that will generate our message handlers on demand, and a reference to the class loader. So let's take care of those things up front...
The class loader:
private static final ClassLoader CL = AppComponent.class.getClassLoader();
The message handler factory:
private final UiMessageHandlerFactory messageHandlerFactory =
        () -> ImmutableList.of(
                new MeowMessageHandler()
        );
This factory is called upon whenever we register our UiExtension with the extension service, to create instances of message handlers to be registered with the web-socket-based event system that the GUI uses to communicate with the server-side code. We will define the private inner class MeowMessageHandler in a little bit...
The list of UiViews:
private final List<UiView> uiViews = ImmutableList.of(
        new UiView(UiView.Category.OTHER, "meowStuff", "Meowster Stuff")
);
Note that our tutorial is only defining one custom view. However, a UiExtension can provide more than one view by defining each one in this list (and writing the supporting client-side code, obviously).
The first argument to the UiView constructor is the navigation category to which the view should be added. Currently defined categories are "Platform", "Network", and "Other". (Well, okay, there is also "Hidden", but views in this category don't show up in the navigation menu).
The second argument to the constructor ("meowStuff") is the internal identifier that will be used for this view. This identifier is used in several key places in the code; choose it well.
As a side note, in order to reduce the likelihood of ID collisions, we recommend that you pick a short word specific to your app as a prefix, and then provide a unique suffix for each view. In the tutorial here, "meow" is the prefix for all the Meowster Inc. views, and the individual views have IDs such as meowStuff, meowFoo, meowBar, etc.
The third argument is the text to display for the navigation item in the navigation menu.
With these three pieces defined, we can now construct the extension:
protected UiExtension extension =
        new UiExtension(uiViews, messageHandlerFactory, CL);
Registering the UiExtension
We need to register and unregister the extension at the appropriate times. Let's modify the activate() and deactivate() methods appropriately:
@Activate
protected void activate() {
    uiExtensionService.register(extension);
    log.info("Started Meowster App");
}

@Deactivate
protected void deactivate() {
    uiExtensionService.unregister(extension);
    log.info("Stopped Meowster App");
}
The Message Handler
The final piece to the puzzle is to write our message handler. For now we'll write the minimal code necessary; later we'll expand it to do something useful.
When a message handler is constructed, we tell the parent class which "event types" our handler supports by providing a list of strings. We have to provide at least one string, but may define many. In our example here, we are declaring that any events of type "meowRequest" should be routed to our handler.
On receipt of an event (matching one of the types declared) our process() method is invoked. It is passed a JSON ObjectNode representing the event. Our code can process the event and send back an appropriate response. For now, since we are simply working on bootstrapping a custom view, we will just log that we got the event.
private class MeowMessageHandler extends UiMessageHandler {
    protected MeowMessageHandler() {
        super(ImmutableSet.of("meowRequest"));
    }

    @Override
    public void process(ObjectNode objectNode) {
        log.info("we got a message: {}", objectNode);
    }
}
Putting it all together
Our AppComponent class should now look something like this:
Client-Side Code
We now need to write client-side code (an HTML partial, CSS, and JavaScript) to define our view. These resources will be downloaded to the GUI when the browser window is refreshed, and utilized when our view is selected from the navigation menu.
Note that the ONOS GUI uses AngularJS as the underlying framework. This means that:
- we define an HTML partial file to provide the template for our view
- we define the view's controller (in the JavaScript file) in its own Angular "Module"
View Source Directory
Looking back at the directory structure, you will see the following directory path:
src/main/resources/app/view
In this directory there should be a subdirectory for every view that our UiExtension defines; the name of the directory should be the internal identifier used for that view. In our tutorial, this is the following directory:
src/main/resources/app/view/meowStuff
We define our HTML partial, CSS, and JavaScript resources in this directory: meowStuff.html, meowStuff.css and meowStuff.js.
View HTML Partial File
We define a template for the view in an HTML partial file: meowStuff.html...
<!-- partial HTML -->
<div id="ov-meowStuff">
    <h2> Meowster Inc. -- Useful Stuff </h2>

    <p> {{ctrl.msg}} </p>
</div>
Notes:
- The view should have a top-level DIV element which has an "id" attribute of "ov-" + <view-id>.
- In our example, this is "ov-meowStuff". (Note that the "ov" simply stands for "ONOS View").
- The controller for the view will be represented by the variable ctrl, which we can use with the usual Angular evaluation syntax.
- Here, we are displaying a text message stored in the msg variable of the controller.
View CSS File
Our CSS rules will go in the file meowStuff.css. In this example, we provide style rules for paragraph elements:
/* css for a cat */

#ov-meowStuff p {
    margin: 0 30px;
    padding: 10px;
    border: 2px solid;
}

.light #ov-meowStuff p {
    color: darkblue;
    border-color: #88c;
}
.dark #ov-meowStuff p {
    color: #aac;
    border-color: #448;
}
Notes:
- All our rules should have selectors that specify the ID of our outer div; in our example, this is #ov-meowStuff
- we do this so that our rules only affect elements in our view
- Color-related styles should be placed in separate rules and use the "theme" class prefixes of .light and .dark
- Remember, the user can toggle between light and dark themes by pressing the 'T' key.
View JavaScript File
The JavaScript file (meowStuff.js) defines our angular "module" and the controller for the view. The structure of the file should be something like this:
// js for a cat
(function () {
    'use strict';

    angular.module('ovMeowStuff', [])
    .controller('OvMeowStuffCtrl',
        ['$log', '$scope',

        function ($log, $scope) {
            var self = this;

            self.msg = 'A message from our sponsors...';

            $log.log('OvMeowStuffCtrl has been created');
        }]);
}());
Notes:
- We are using a function closure to provide encapsulation of our code (and not pollute the global namespace) – lines 2 and 16
- Use strict mode to write safer code – line 3
- Define our module as "ovMeowStuff" – line 5
- This has to be "ov" + (capitalized)<view-id>"
- Define our controller as "OvMeowStuffCtrl" – line 6
- This has to be "Ov" + (capitalized)<view-id> + "Ctrl"
- Note we are using the "safe" injection syntax for the controller parameters – lines 7 and 9
- We capture the controller reference as the variable self – line 10
- A safeguard, in case the this context changes
- We store a message in the controller's state – line 12
- We write a message to the console – line 14
If little or none of this makes sense to you, then you probably need to go and study up on AngularJS controllers.
The reason that the module and controller names have to be exactly as specified above is because the main GUI controller derives these names from the internal identifier you supplied when you defined your UiView instance in your AppComponent class, to be able to stitch your view into the navigation and routing functions.
File Include Snippets
The final pieces of glue required are the two files css.html and js.html, which should both be at the top level of the resources directory. The contents of these files are spliced into the main index.html file of the GUI (on the fly) so that your resources are loaded into the browser.
For our tutorial example, css.html looks like this:
<link rel="stylesheet" href="app/view/meowStuff/meowStuff.css">
...and js.html looks like this:
<script src="app/view/meowStuff/meowStuff.js"></script>
And that's it... we should now be able to build and install our app, and see the view injected into the GUI.
Building and Installing the App
From the top level directory (onos-app) we can build the application with the command:
mvn clean install
or, if you have the shell tools and aliases sourced in...
mci
Fixing the Unit Test
When you first build the app, you will (probably) find that the build fails because of a broken unit test. The unit test skeleton (AppComponentTest.java) provided by the Maven archetype looks like this:
The problem is in our AppComponent's activate() method (invoked on line 11 above) where the component's reference to uiExtensionService is null.
To fix this we need to provide the component with a mock service. We can create one from an appropriate adapter:
private UiExtensionService mockService = new UiExtensionServiceAdapter();
... and then inject it into the component during the setUp() method:
@Before
public void setUp() {
    component = new AppComponent();
    component.uiExtensionService = mockService;
    component.activate();
}
This will at least allow us to build successfully.
Of course, since the unit test code doesn't actually assert anything, it isn't really a unit test yet... but let's not quibble over semantics for now. We'll leave it as an exercise for the reader to figure out how to make the unit test actually do something useful, such as asserting expected behavior of the AppComponent.
Go on... run 'mci' again... you know you want to. The output should bear a resemblance to this:
An important line to note from the above output is this one:
[INFO] Installing /Users/simonh/dev/foo/onos-app/target/onos-app-1.0-SNAPSHOT.oar to /Users/simonh/.m2/repository/com/meowster/onos/app/onos-app/1.0-SNAPSHOT/onos-app-1.0-SNAPSHOT.oar
Let's define an environment variable for the OAR file that was built. We can use the one from the target directory:
OAR=target/onos-app-1.0-SNAPSHOT.oar
We can also define an environment variable for the application name:
APPNAME=com.meowster.foo
Note: this was the name given during the Maven archetype "interview".
Installing the App for the First Time
We are going to use the onos-app shell tool. Its usage looks like this:
usage: onos-app <node-ip> list
       onos-app <node-ip> {install|install!} <app-file>
       onos-app <node-ip> {reinstall|reinstall!} <app-name> <app-file>
       onos-app <node-ip> {activate|deactivate|uninstall} <app-name>
Assuming that there is an ONOS instance running on localhost, we can install the application with the command:
onos-app localhost install $OAR
If you are tailing the karaf log, you should see an entry that looks like this:
<...> | 76 - org.onosproject.onos-core-net - 1.2.0.SNAPSHOT | Application com.meowster.foo has been installed
Opening the Applications view in the GUI should present you with something like this:

Now we can activate the application with the command:
onos-app localhost activate $APPNAME
The karaf log should have entries that look similar to this:
<...> | 20 - org.apache.karaf.features.core - 3.0.3 | Installing feature onos-app 1.0-SNAPSHOT
<...> | 20 - org.apache.karaf.features.core - 3.0.3 | Installing feature onos-api 1.2.0-SNAPSHOT
<...> | 20 - org.apache.karaf.features.core - 3.0.3 | Installing feature scr 3.0.3
<...> | 20 - org.apache.karaf.features.core - 3.0.3 | Installing feature onos-thirdparty-base 1.2.0-SNAPSHOT
<...> | 20 - org.apache.karaf.features.core - 3.0.3 | Installing feature scr-condition-management_0_0_0 3.0.3
<...> | 20 - org.apache.karaf.features.core - 3.0.3 | Installing feature scr-condition-webconsole_0_0_0 3.0.3
<...> | 20 - org.apache.karaf.features.core - 3.0.3 | Installing feature webconsole-condition-scr_0_0_0 3.0.3
<...> | 20 - org.apache.karaf.features.core - 3.0.3 | Installing feature standard-condition-webconsole_0_0_0 3.0.3
<...> | 179 - com.meowster.onos.app.onos-app - 1.0.0.SNAPSHOT | Started Meowster App
<...> | 76 - org.onosproject.onos-core-net - 1.2.0.SNAPSHOT | Application com.meowster.foo has been activated
Note (line 9) the log message from our application's activate() method.
Refreshing the Applications view in the GUI should show a checkmark next to the Meowster app, indicating that it is active:

Now check out that navigation menu:
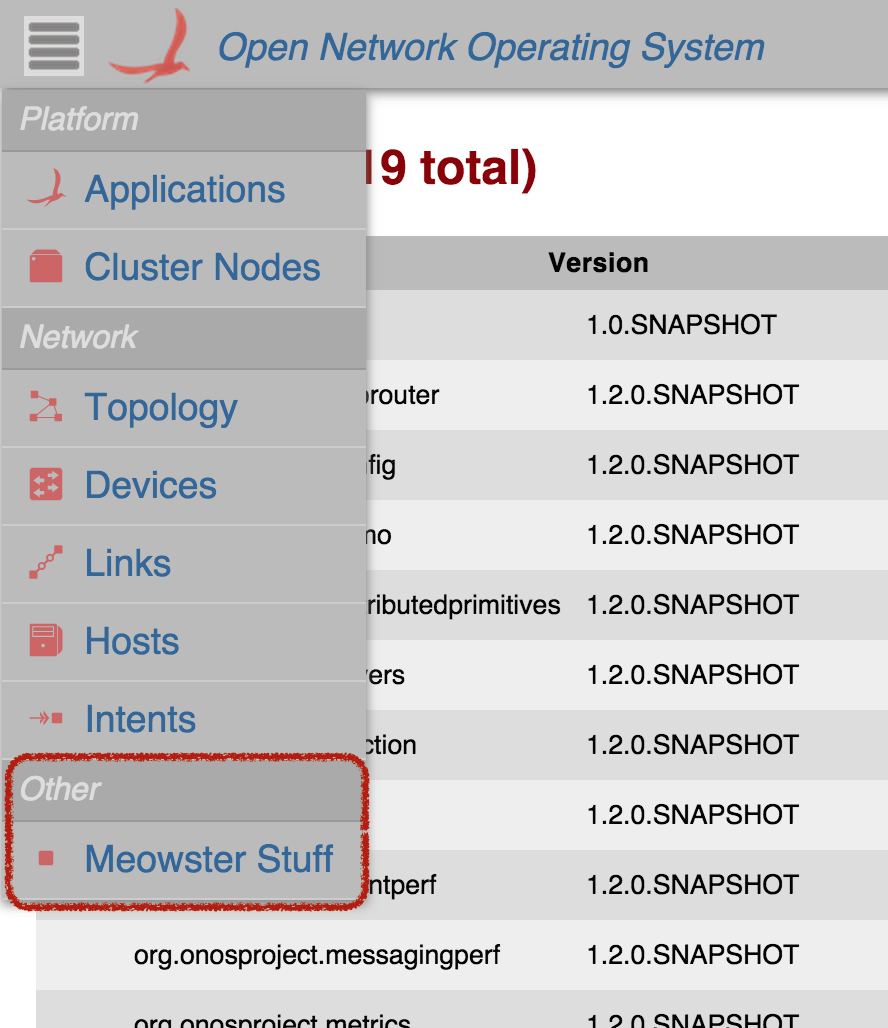
And click on the "Meowster Stuff" menu item, to load our custom view:

Congratulations!! You have successfully integrated a custom view for your ONOS application, into the ONOS GUI.
Application Development Cycle
Obviously, there will be a development cycle as you incrementally enhance your view's functionality:
- modify code
- re-build
- re-install and activate application
- refresh GUI
- test behavior
After you have modified the code and rebuilt (with mci), you can re-install and activate the application all in one command:
onos-app localhost reinstall! $APPNAME $OAR
Note: the exclamation point ('!') after reinstall means "...and activate".
What Next?
As stated at the beginning, this page describes the bare minimum required to get a custom view bootstrapped into the GUI. There are further refinements and details which can be applied. For further information you might like to peruse the following tutorials:
| Tutorial | Description |
|---|---|
| How to communicate with your server-side AppComponent, via message handlers | |
| UI View - Defining Custom Icons | How to add custom glyphs to the glyph library |
| UI View - Defining Key Bindings | How to bind keystrokes to actions (javascript callback functions) |
| UI View - Using Fly-In panels | How to use the Panel Service to customize "fly-in" panels |
| How to create a simple tabular view using the TableBuilderService | |
| UI View - Framework Libraries | A summary of the services that the GUI framework provides |