Due to a ransomware attack, the wiki was reverted to a July 2022 version. . We apologize for the lack of a more recent valid backup.
...
Let's install reactive forwarding and see if we can forward traffic:
| Code Block |
|---|
onos> feature:install onos-app-fwd |
| Note |
|---|
Note that you will have to do this on the node that is the master for all the switches for this to work - you can do it on all 3 nodes to be safe. |
app activate org.onosproject.fwd |
In the mininet console:
| Code Block |
|---|
mininet> pingall *** Ping: testing ping reachability h111 -> h112 h121 h122 h211 h212 h221 h222 h311 h312 h321 h322 h112 -> h111 h121 h122 h211 h212 h221 h222 h311 h312 h321 h322 h121 -> h111 h112 h122 h211 h212 h221 h222 h311 h312 h321 h322 h122 -> h111 h112 h121 h211 h212 h221 h222 h311 h312 h321 h322 h211 -> h111 h112 h121 h122 h212 h221 h222 h311 h312 h321 h322 h212 -> h111 h112 h121 h122 h211 h221 h222 h311 h312 h321 h322 h221 -> h111 h112 h121 h122 h211 h212 h222 h311 h312 h321 h322 h222 -> h111 h112 h121 h122 h211 h212 h221 h311 h312 h321 h322 h311 -> h111 h112 h121 h122 h211 h212 h221 h222 h312 h321 h322 h312 -> h111 h112 h121 h122 h211 h212 h221 h222 h311 h321 h322 h321 -> h111 h112 h121 h122 h211 h212 h221 h222 h311 h312 h322 h322 -> h111 h112 h121 h122 h211 h212 h221 h222 h311 h312 h321 *** Results: 0% dropped (132/132 received) |
...
Now we should uninstall reactive forwarding so it doesn't get in the way for the next part of the tutorial.
| Code Block |
|---|
onos> feature:uninstall onos-app-app deactivate org.onosproject.fwd |
At this point, you multi-instance ONOS deployment is functional. Let's move on to writing some code.
...
We are now going to start building BYON. BYON is a service which allows you to spawn virtual networks in which each host is connected to every other host of that virtual network. Basically, each virtual network contains a full mesh of the hosts that make it up.
Part 1:
...
Importing and building an application
FIXME We have downloaded some starter code in the ~/onos-byon directory. It contains a root pom.xml file for the project, as well as a initial implementation of the CLI bundle. We can start by importing the the entire project into IntelliJ.
...
Finally click on 'Finish'. You should see two top-level packages the byon source tree on the left sidebar: byon-app and byon-cli as you can see below. Expand the byon-app application, and find NetworkService.java.
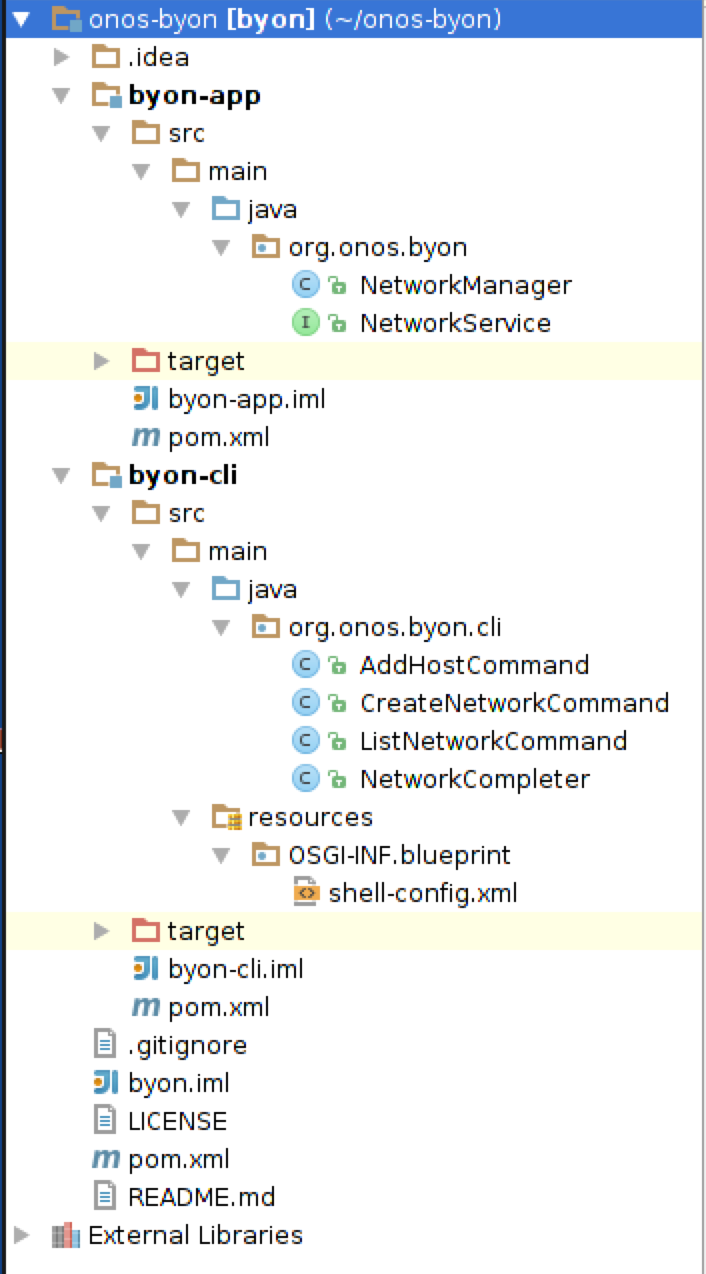
This file contains the interface for the NetworkService that we will be implementing. Next, open NetworkManager.java. This file is a component that doesn't export any services. Start by making NetworkManager implement NetworkService.
| Code Block | ||
|---|---|---|
| ||
...
public class NetworkManager implements NetworkService {
... |
We will need to implement all of the methods contained in NetworkService. For now, we can leave most of them empty. However, to be able to test the CLI, you should have implement getNetworks() return Lists.of("test"), and and implement getHosts() return Collections.emptyList().
| Code Block | ||||
|---|---|---|---|---|
| ||||
 @Override
 public Set<String> getNetworks() {
 	return Sets.newHashSet("test");
} |
and
| Code Block | ||||
|---|---|---|---|---|
| ||||
 @Override
 public Set<HostId> getHosts(String network) {
 	return Collections.emptySet();
} |
Also remember to put the @Service
Now that we have some code implemented lets try to run it, first though we must push the bundles we just coded. So let's start by building the code:
But before you build, unset JAVA_HOME as the default points to java7. You only need to do this step once.
| Code Block |
|---|
distributed@mininet-vm:~/onos-byon$ echo "unset JAVA_HOME" >> ~/.bashrc
distributed@mininet-vm:~/onos-byon$ source ~/.bashrc |
Now run the build step:
...
.
Next, we can return to a tutorial to build the project.
distributed@mininet-vm:~/onos-byon$ mci[INFO] Scanning for projects......[INFO] byon .............................................. |
...
SUCCESS |
...
[ |
...
1.104s] |
...
[INFO] |
...
------------------------------------------------------------------------ |
...
[INFO] |
...
BUILD |
...
SUCCESS |
...
[INFO] |
...
------------------------------------------------------------------------ |
...
[INFO] |
...
Total |
...
time: |
...
6.719s |
...
[INFO] |
...
Finished |
...
at: |
...
Fri |
...
Dec 12 |
...
14:28:16 |
...
PST 2014[INFO] |
...
Final |
...
Memory: |
...
30M/303M |
...
[INFO] |
...
------------------------------------------------------------------------ |
...
distributed@mininet-vm:~/onos-byon$ |
...
mci
...
is an alias for
...
mvn clean install. Now, that your project has successfully built your project let's push it up to the
...
ONOS cluster..
...
...
distributed@mininet |
...
|
...
1.0-SNAPSHOT.oar {"name":"org.onos.byon","id":37,"version":"1.0.SNAPSHOT","description":"Build Your Own Network App","origin":"Apps-R-Us LLC, Inc. GmbH","permissions":"[]","featuresRepo":"mvn:org.onos.byon/byon/1.0-SNAPSHOT/xml/features","features":"[byon]","state":"INSTALLED"} |
The onos-app command will take the oar file that is generated during the build and push it into the specified ONOS instance. The command can also activate the application if you replace install with install! as well as separately activate, deactivate, and uninstall the application. Every The byon-push-bits command will take the build bundles from your local maven repository and push them into the ONOS docker instances. The command will also load and start the bundles, in fact every time you update your code you simply need to run onos-app $OC1 reinstall! target/byon-push-bits1.0-SNAPSHOT.org and the new bundles application will be loaded and started in the remote ONOS instances.
Let's check that everything works by heading into ONOS and running a couple commands:
...
...
distributed@mininet-vm:~/onos-byon$ |
...
onos |
...
-w |
...
Logging in as karaf Welcome to Open Network Operating System (ONOS)! ____ |
...
_ |
...
______ |
...
____ |
...
/ __ |
...
\/ |
...
|/ |
...
/ |
...
__ |
...
\/ |
...
__/ |
...
/ /_/ |
...
/ |
...
/ |
...
/_/ |
...
/\ |
...
\ \____/_/|_/\____/___/ |
...
Hit '<tab>' |
...
for |
...
a |
...
list |
...
of |
...
available |
...
commands |
...
and '[cmd] |
...
--help' |
...
for |
...
help |
...
on |
...
a |
...
specific |
...
command. |
...
Hit '<ctrl-d>' |
...
or |
...
type 'system:shutdown' |
...
or 'logout' to shutdown ONOS.onos> apps -s |
The application has been successfully installed, but it has not yet been activated. Next, we will activate it:
| Code Block |
|---|
onos> app activate org.onos.byon onos> apps -s ... |
...
* |
...
37 org.onos.byon 1.0.SNAPSHOT Build Your |
...
Own Network App |
The star next to the application indicates that it has been activated. We can try running the list-networks command
...
to display the one fake network that
...
is hard coded in the starter code.
| Code Block |
|---|
onos> list-networks
my-network |
Congratulations! You have successfully built, installed and activated the byon application.
TODO continue from here... this section.
Part 2:
...
Connect the Manager to the Store
In this part we are going to implement a trivial store for our network service as well as learn how to push intents. The store will be used to store the service's network state (duh!) while the intent framework will allow us to simply connect together every host in the virtual network we create.
...