Due to a ransomware attack, the wiki was reverted to a July 2022 version. . We apologize for the lack of a more recent valid backup.
ONOS from Scratch
| Table of Contents |
|---|
Overview
If you have come across Installing and Running ONOS, you'll notice that there are several ways to install and run ONOS. This tutorial focuses on showing you one of several useful deployment methods - ONOS packaged from source, and deployed in an Ubuntu VirtualBox VM using Windows, Linux or Mac OS X as an operation system on your computer.
...
- Use cell definitions to configure the ONOS build environment to customize the ONOS package
- Configure which modules the ONOS binary loads by default
- Install ONOS on a VM using the onos-install utility
- Access the CLI and monitor ONOS remotely
Conventions
Commands at the shell of the ONOS VM begin with $ (or sdn@onos-scratch:~$)
| Code Block | ||
|---|---|---|
| ||
$ sudo -s # |
...
The commands at the build machine shell begin with build:~$: (or sdn@build:~$)
| Code Block | ||
|---|---|---|
| ||
build:~$ sudo -s build:~# |
...
1. Prerequisites and Setup for the Tutorial
You need a build machine for packaging ONOS and for running your Ubuntu Server ONOS VM. The build machine should be running a UNIX-like OS. In this tutorial you will create a build VM in VirtualBox named Build that is running Ubuntu 14.04, 64-bit Desktop.
...
- Install Oracle VirtualBox virtualization software
- Create a Virtual Machine 1 – onos-scratch VM - Ubuntu Server 14.04 TLS 64 bit
- Create a Virtual Machine 2 – Build VM running Ubuntu 14.04 TLS 64 bit desktop
1.
...
Install and prepare VirtualBox
| Info |
|---|
This link will guide you through installing VirtualBox if you do not have it installed: |
...
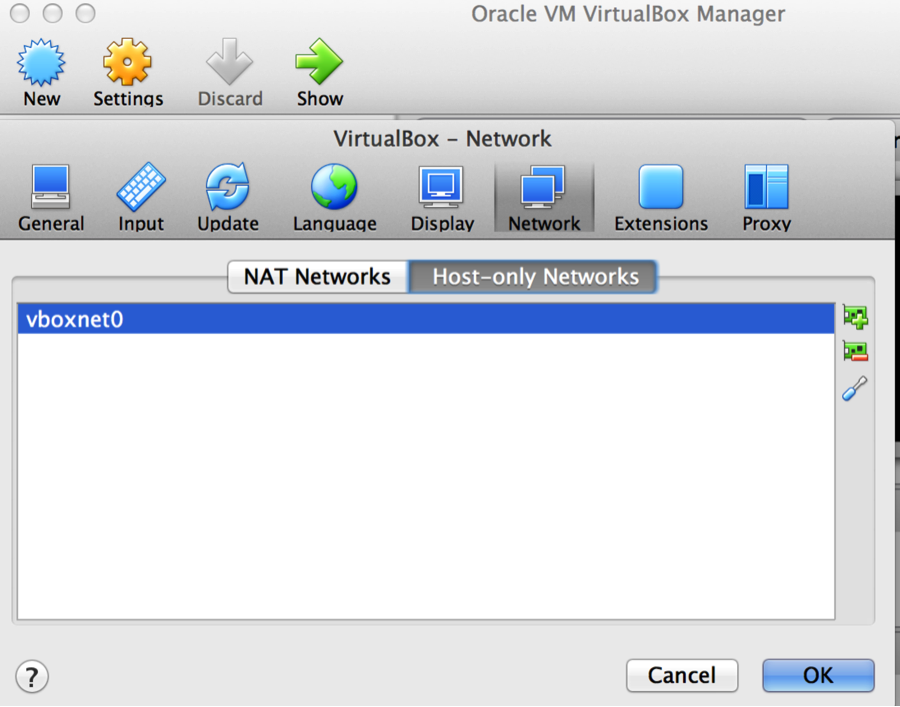
Add Host-only Networks vboxnet0 adapter in VirtualBox if it doesn’t have it:
Go to VirtualBox Preferances – Preferences > Network, select Host-only Networks tab, and:-
- click the green symbol with the + sign on the right to add host-only network
...
- click the blue tool icon on the right to edit host-only network and verify that dhcp is enabled.
2.
...
Prepare the Build VM and ONOS VM
Create onos-scratch VM
...
- Download Ubuntu Server 14.04 LTS 64-bit from Ubuntu.com
...
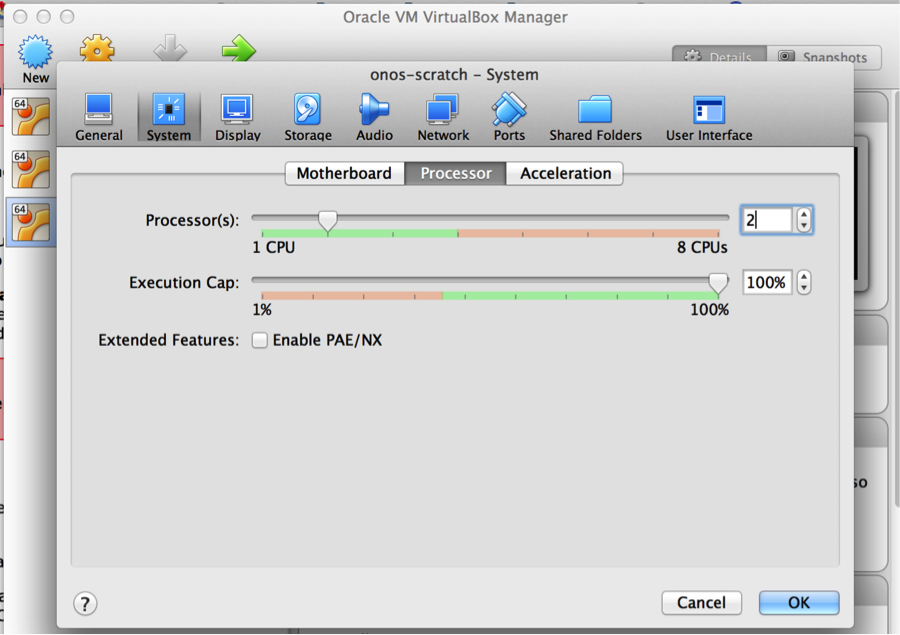
- Create an Ubuntu onos-scratch VM in VirtualBox using this image, with the following settings:
- 2GB RAM
- 2 processors
- At least 5GB disk space
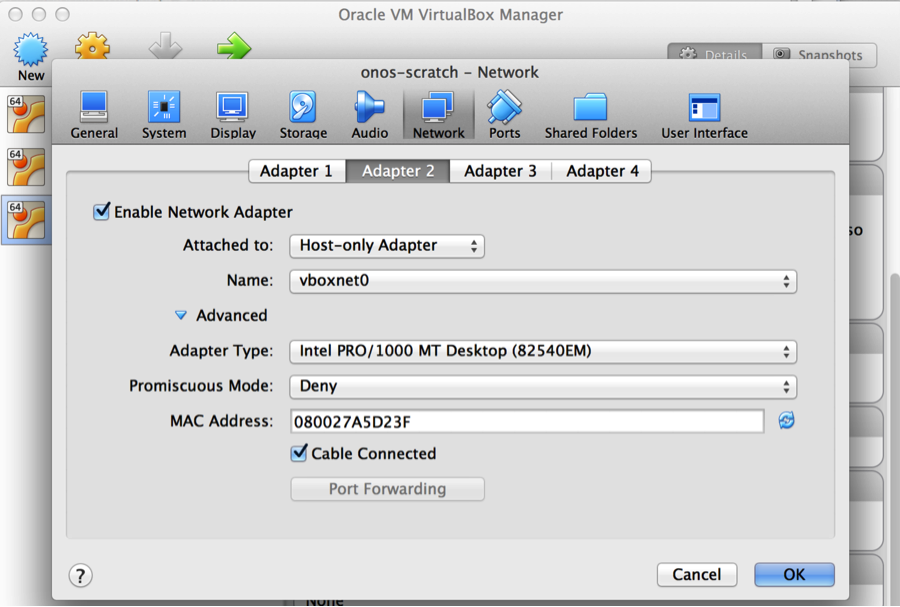
- Two network interfaces, Adapter 1 attached to NAT, and Adapter 2 attached to host-only Adapter set to vboxnet0. Configure both to use DHCP.
- This tutorial calls the VM onos-scratch.
...
- Add the second processor:
Install Ubuntu
- When the VM is created, attach the downloaded Ubuntu 14.04 LTS 64-bit ISO file to it: go to VM’s settings and click the “Storage” tab, add optical drive to the Controller: IDE by clicking the CD/DVD icon with the green plus sign.
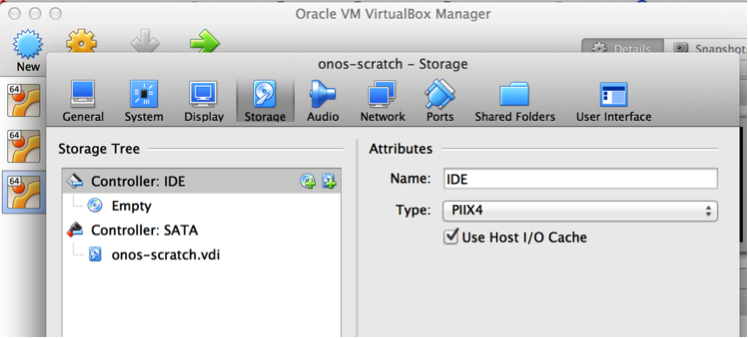
- When the VM is created, attach the downloaded Ubuntu 14.04 LTS 64-bit ISO file to it: go to VM’s settings and click the “Storage” tab, add optical drive to the Controller: IDE by clicking the CD/DVD icon with the green plus sign.
- Browse to the downloaded ISO file:
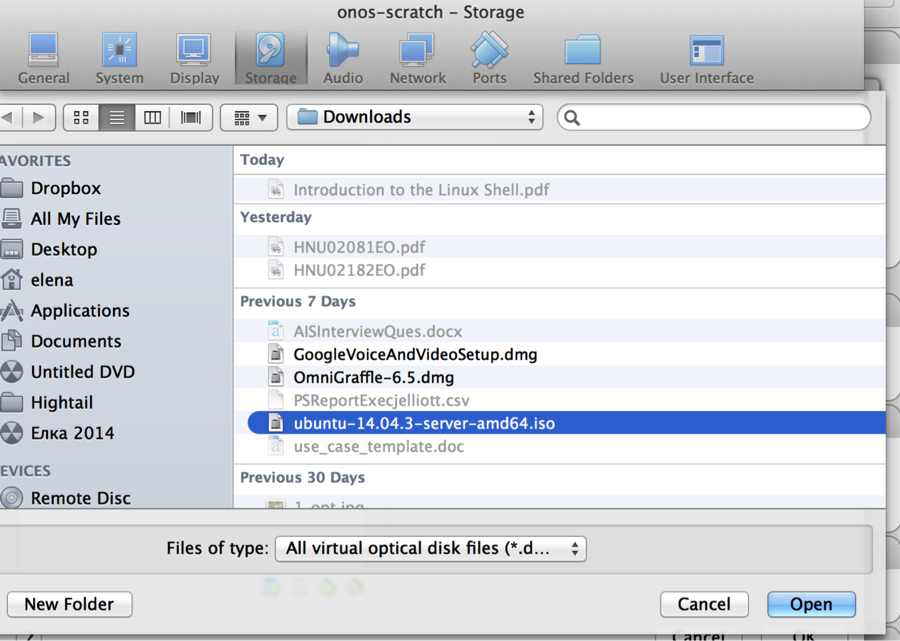
- Browse to the downloaded ISO file:
...
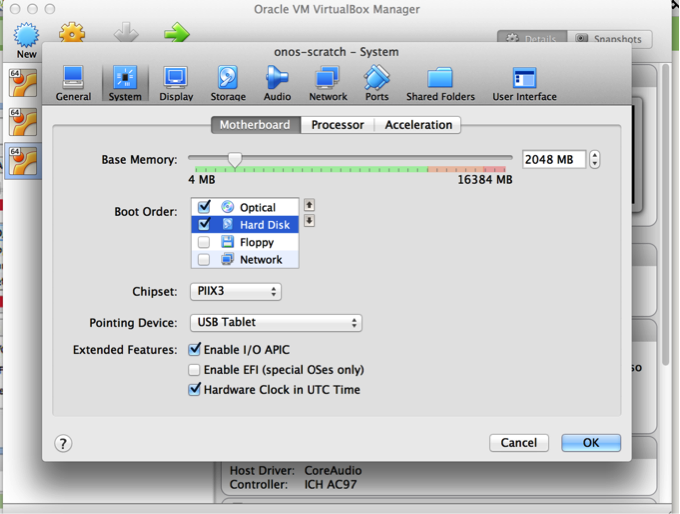
Click on the System tab. Choose boot order and keep CD/DVD on the top as first priority.
...
- Add the 2nd Network Adapter and attach it to Host-only Adapter:
- Add the 2nd Network Adapter and attach it to Host-only Adapter:
...
- Start the onos-scratch VM and install Ubuntu.
More help here: http://www.wikihow.com/Install-Ubuntu-on-VirtualBox
During the Ubuntu installation:
- Start the onos-scratch VM and install Ubuntu.
- create a user named sdn, with password rocks, and confirm that you want to use this password. This will be the primary account used for this tutorial.
- when prompted to encrypt the disk, select No
- For partitioning the disk, select Guided - use entire disk and follow with the defaults provided.
- For configuring proxy information, follow what best suits your environment.
- when prompted to install additional software (Software Install) choose OpenSSH server.
...
Once the onos-scratch VM starts up:
Log into your new VM as sdn and give the user passwordless sudo privileges. Run sudo visudo, and add the following line to the end of the file:
| Code Block | ||
|---|---|---|
| ||
sdn ALL=(ALL) NOPASSWD:ALL |
...
Then, update the package repository:
| Code Block | ||
|---|---|---|
| ||
$ sudo apt-get update |
You should also be able to verify that it has two network interfaces, eth0, eth1 and lo:
| Code Block | ||
|---|---|---|
| ||
$ ifconfig -a
eth0      Link encap:Ethernet  HWaddr 08:00:27:15:7e:e1
          inet addr:10.0.2.15  Bcast:10.0.2.255  Mask:255.255.255.0
          inet6 addr: fe80::a00:27ff:fe15:7ee1/64 Scope:Link
          UP BROADCAST RUNNING MULTICAST  MTU:1500  Metric:1
          RX packets:35 errors:0 dropped:0 overruns:0 frame:0
          TX packets:43 errors:0 dropped:0 overruns:0 carrier:0
          collisions:0 txqueuelen:1000
          RX bytes:3535 (3.5 KB)  TX bytes:3749 (3.7 KB)

eth1      Link encap:Ethernet  HWaddr 08:00:27:b7:18:47
          inet addr:192.168.56.101  Bcast:192.168.56.255  Mask:255.255.255.0
          inet6 addr: fe80::a00:27ff:feb7:1847/64 Scope:Link
          UP BROADCAST RUNNING MULTICAST  MTU:1500  Metric:1
          RX packets:157 errors:0 dropped:0 overruns:0 frame:0
          TX packets:48 errors:0 dropped:0 overruns:0 carrier:0
          collisions:0 txqueuelen:1000
          RX bytes:19323 (19.3 KB)  TX bytes:7379 (7.3 KB)

lo        Link encap:Local Loopback
          inet addr:127.0.0.1  Mask:255.0.0.0
          inet6 addr: ::1/128 Scope:Host
          UP LOOPBACK RUNNING  MTU:65536  Metric:1
          RX packets:0 errors:0 dropped:0 overruns:0 frame:0
          TX packets:0 errors:0 dropped:0 overruns:0 carrier:0
          collisions:0 txqueuelen:0
          RX bytes:0 (0.0 B)  TX bytes:0 (0.0 B)
|
...
If eth1 doesn't have UP as an attribute, manually run DHCP client (this should also bring the interface up):
| Code Block | ||
|---|---|---|
| ||
$ sudo dhclient eth1 |
Or manually assign IP and bring the interface up:
| Code Block | ||
|---|---|---|
| ||
$ sudo ifconfig eth1 <IP address> up |
Create a build VM
...
...
- In VirtualBox:
- create a new VM: Name: build, type: Linux:
- Select 2GB of RAM
- Hard disk: take the defaults: 8 GB and Create a virtual hard disk now
- Hard disk file type: VDI
- Storage on physical hard disk: Dynamically allocated
- File location and size: type build for the name
- Click on settings for the build VM:
- Storage: Controller IDE – click on the disk with a + sign symbol to add an optical drive. Choose disk: browse to the location of the downloaded iso file.
- Add a 2nd network adapter for host-only network (see the screenshot in the section for Creating onos-scratch VM.)
- System: Motherboard tab – uncheck floppy, move optical to the top in the Boot Order box.
- Install Ubuntu (use the same credentials as for the first Ubuntu VM). When the installation completes, power the VM on and login.
- create a new VM: Name: build, type: Linux:
...
- Generate a SSH public key on your build machine if you hadn't done so in the past:
Login to the build machine and run the following command:
Code Block language text build:~$ ssh-keygen -t rsaThe default options and no password are fine for this tutorial.
Verify connectivity:
From the build machine you should be able to SSH to the VM using the IP address assigned to eth1:Code Block language text build:~$ ssh -l sdn 192.168.56.101If the ssh connection failed make sure that the openssh-server is installed by running:
Code Block language text $ sudo apt-get install openssh-serverCheck that you can ping the onos-scratch VM by IP from the build machine and reverse, for example:
Code Block language text sdn@build:~$ ping 192.168.56.101
3.
...
Install required software
On the build machine
Install Git:
Code Block language text build:~$ sudo apt-get install git-coreKaraf, Maven:
Create two directories called ~/Downloads and ~/Applications. Download the Karaf 3.0.5 and Maven 3.3.9 binaries (the tar.gz versions of both) into ~/Downloads and extract it to ~/Applications. Keep the tar archives in ~/Downloads; we'll need that later.Code Block language text build:~$ cd; mkdir Downloads Applications build:~$ cd Downloads build:~$ wget http://archive.apache.org/dist/karaf/3.0.5/apache-karaf-3.0.5.tar.gz build:~$ wget http://archive.apache.org/dist/maven/maven-3/3.3.9/binaries/apache-maven-3.3.9-bin.tar.gz build:~$ tar -zxvf apache-karaf-3.0.5.tar.gz -C ../Applications/ build:~$ tar -zxvf apache-maven-3.3.9-bin.tar.gz -C ../Applications/Next, install Oracle Java 8:
Code Block language text build:~$ sudo apt-get install software-properties-common -y build:~$ sudo add-apt-repository ppa:webupd8team/java -y build:~$ sudo apt-get update build:~$ sudo apt-get install oracle-java8-installer oracle-java8-set-default -yIt will ask you to acknowledge the license; do so when prompted.
The second step above may prompt for the installation of python-software-properties. If prompted, do so.
- Clone the ONOS source:
Now let’s copy a repository into a new onos directory under the home directory on the build machine.
navigate to the home directory by issuing this command:
Code Block language text build:~$ cd ~ build:~$ git clone https://gerrit.onosproject.org/onosThis will create a directory called onos, with the source code in it.
- Clone the ONOS source:
...
On the onos-scratch VM
The VM only requires Java 8 - follow the instructions for Java 8 above performed on the build VM.
4. Set up your build environment
- Environmental
Environment variables
First off, you will need to export several environment variables. The ONOS source comes with a sample bash_profile that can set these variables for you.
...
| Code Block | ||
|---|---|---|
| ||
. ~/onos/tools/dev/bash_profile |
| Warning |
|---|
Warning: technically any bash-specific code should not go in .profile. If you have a Debian-based system (e.g. Raspbian) where .profile may be executed by a shell that is not bash (e.g. /bin/sh is dash or some other POSIX-like shell), make sure you put the above line in .bash_aliases or the interactive portion of .bashrc rather than .profile to avoid problems (such as startx not working on Raspbian.) |
Here is how:
On the build VM edit the .bashrc file (by typing the command below)
...
If previous version of ONOS is running, the service should be stopped (sudo service onos stop) before building with mvn. Otherwise, the test on onlab.nio package would fail with "address already in use" error.
5.
...
Create a custom cell definition
A quick intro to cells
Under ONOS terminology, a cell is a collection of environment variables that are used:
...
See vicell -h for the list of options.
6. Package and deploy ONOS
Passwordless VM access
For convenience, before we can deploy anything to our VM, we will configure paswordless login to the VM from our build machine with onos-push-keys:
...
| Code Block | ||
|---|---|---|
| ||
/opt/onos/apache-karaf-$KARAF_VERSION/bin/karaf clean |
What’s next?
- Now that you've got the basics of a development environment, try a hand at creating an application in the Template Application Tutorial.
- Learn more about the installation process in Installing and Running ONOS.
- Learn more about cells in Test Environment Setup.
...
Return To : Tutorials and Walkthroughs
...
...
...