Due to a ransomware attack, the wiki was reverted to a July 2022 version. . We apologize for the lack of a more recent valid backup.
This page is WIP –
Overview
Applications may provide what we call a "Topology Overlay" – a component that provides new behaviors to the GUI Topology View.

An overlay can:
- augment or override the contents of the Summary Panel
- augment or override the contents of the Details Panel for a selected item
- cause links to be highlighted and/or labeled
- cause devices/hosts to be badged with numeric or iconic information
- provide toolbar buttons to allow the user to invoke new functions
This tutorial walks you through the steps of developing such a component.
A fictitious company, "Meowster, Inc." is used throughout the examples. This tutorial builds on top of the Table View tutorial, although you could choose to only provide a topology overlay in your app, if you wished.
Let's get started...
Adding a Topology Overlay to our App
First of all, let's go back to the top level directory for our sample application:
$ cd ~/meow/sample
Now let's add the topology overlay template files by overlaying the uitopo archetype:
$ onos-create-app uitopo org.meowster.app.sample meowster-sample
When asked for the version, accept the suggested default: 1.0-SNAPSHOT, and press enter.
When asked to confirm the properties configuration, press enter.
Note that the pom.xml file should be ready to go (since we already edited it in the Custom View tutorial).
New Files in the Project Structure
You should see a number of new files added to the project:
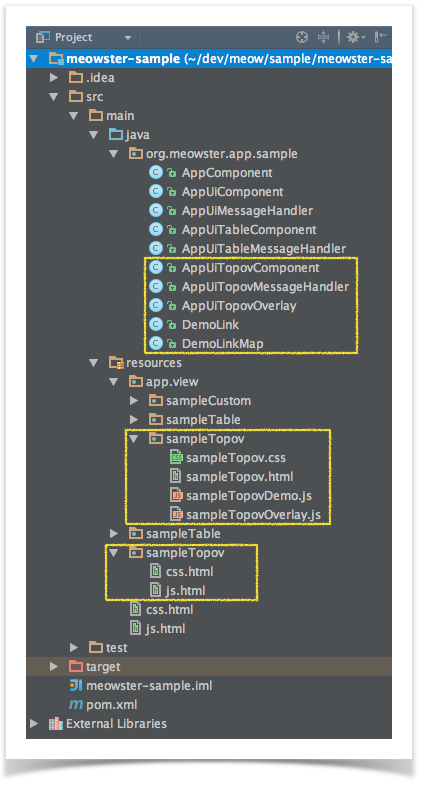
Specifically:
- New Java classes:
- AppUiTopovComponent
- AppUiTopovMessageHandler
- AppUiTopovOverlay
- DemoLink
- DemoLinkMap
- New directory ~/resources/app/view/sampleTopov, containing:
- sampleTopov.css
- sampleTopov.html
- sampleTopovDemo.js
- sampleTopovOverlay.js
- New directory ~/resources/sampleTopov, containing:
- css.html
- js.html
Building and Installing the App
From the top level project directory (the one with the pom.xml file) build the project:
$ cd meowster-sample
$ mvn clean install
Assuming that you have ONOS running on your local machine, you can install the app from the command line:
$ onos-app localhost install! target/meowster-sample-1.0-SNAPSHOT.oar
If you still have the app installed from the custom or table view tutorials, you can "reinstall" instead:
$ onos-app localhost reinstall! target/meowster-sample-1.0-SNAPSHOT.oar
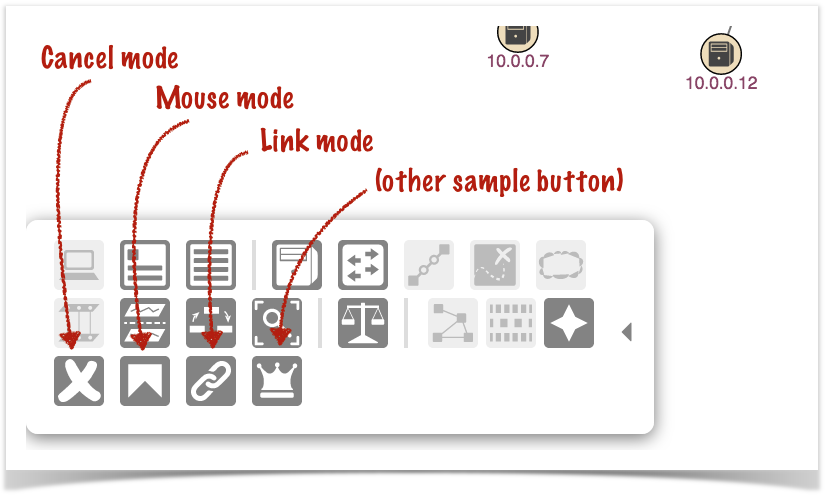
After refreshing the GUI in your web browser, the Topology View toolbar should have an additional overlay button:
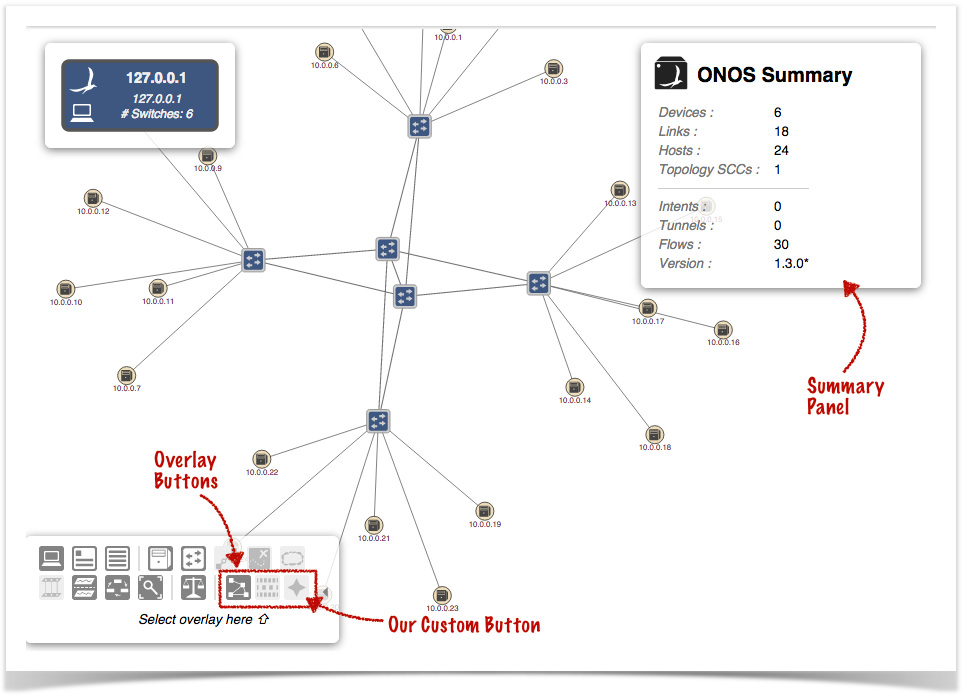
Pressing our overlay button will activate the overlay (invoking "activate" callbacks both on the client side and server side) and insert our custom action buttons in the toolbar.
Pressing the slash ( / ) key will display the Quick Help panel, where we can see our action button key bindings are listed:
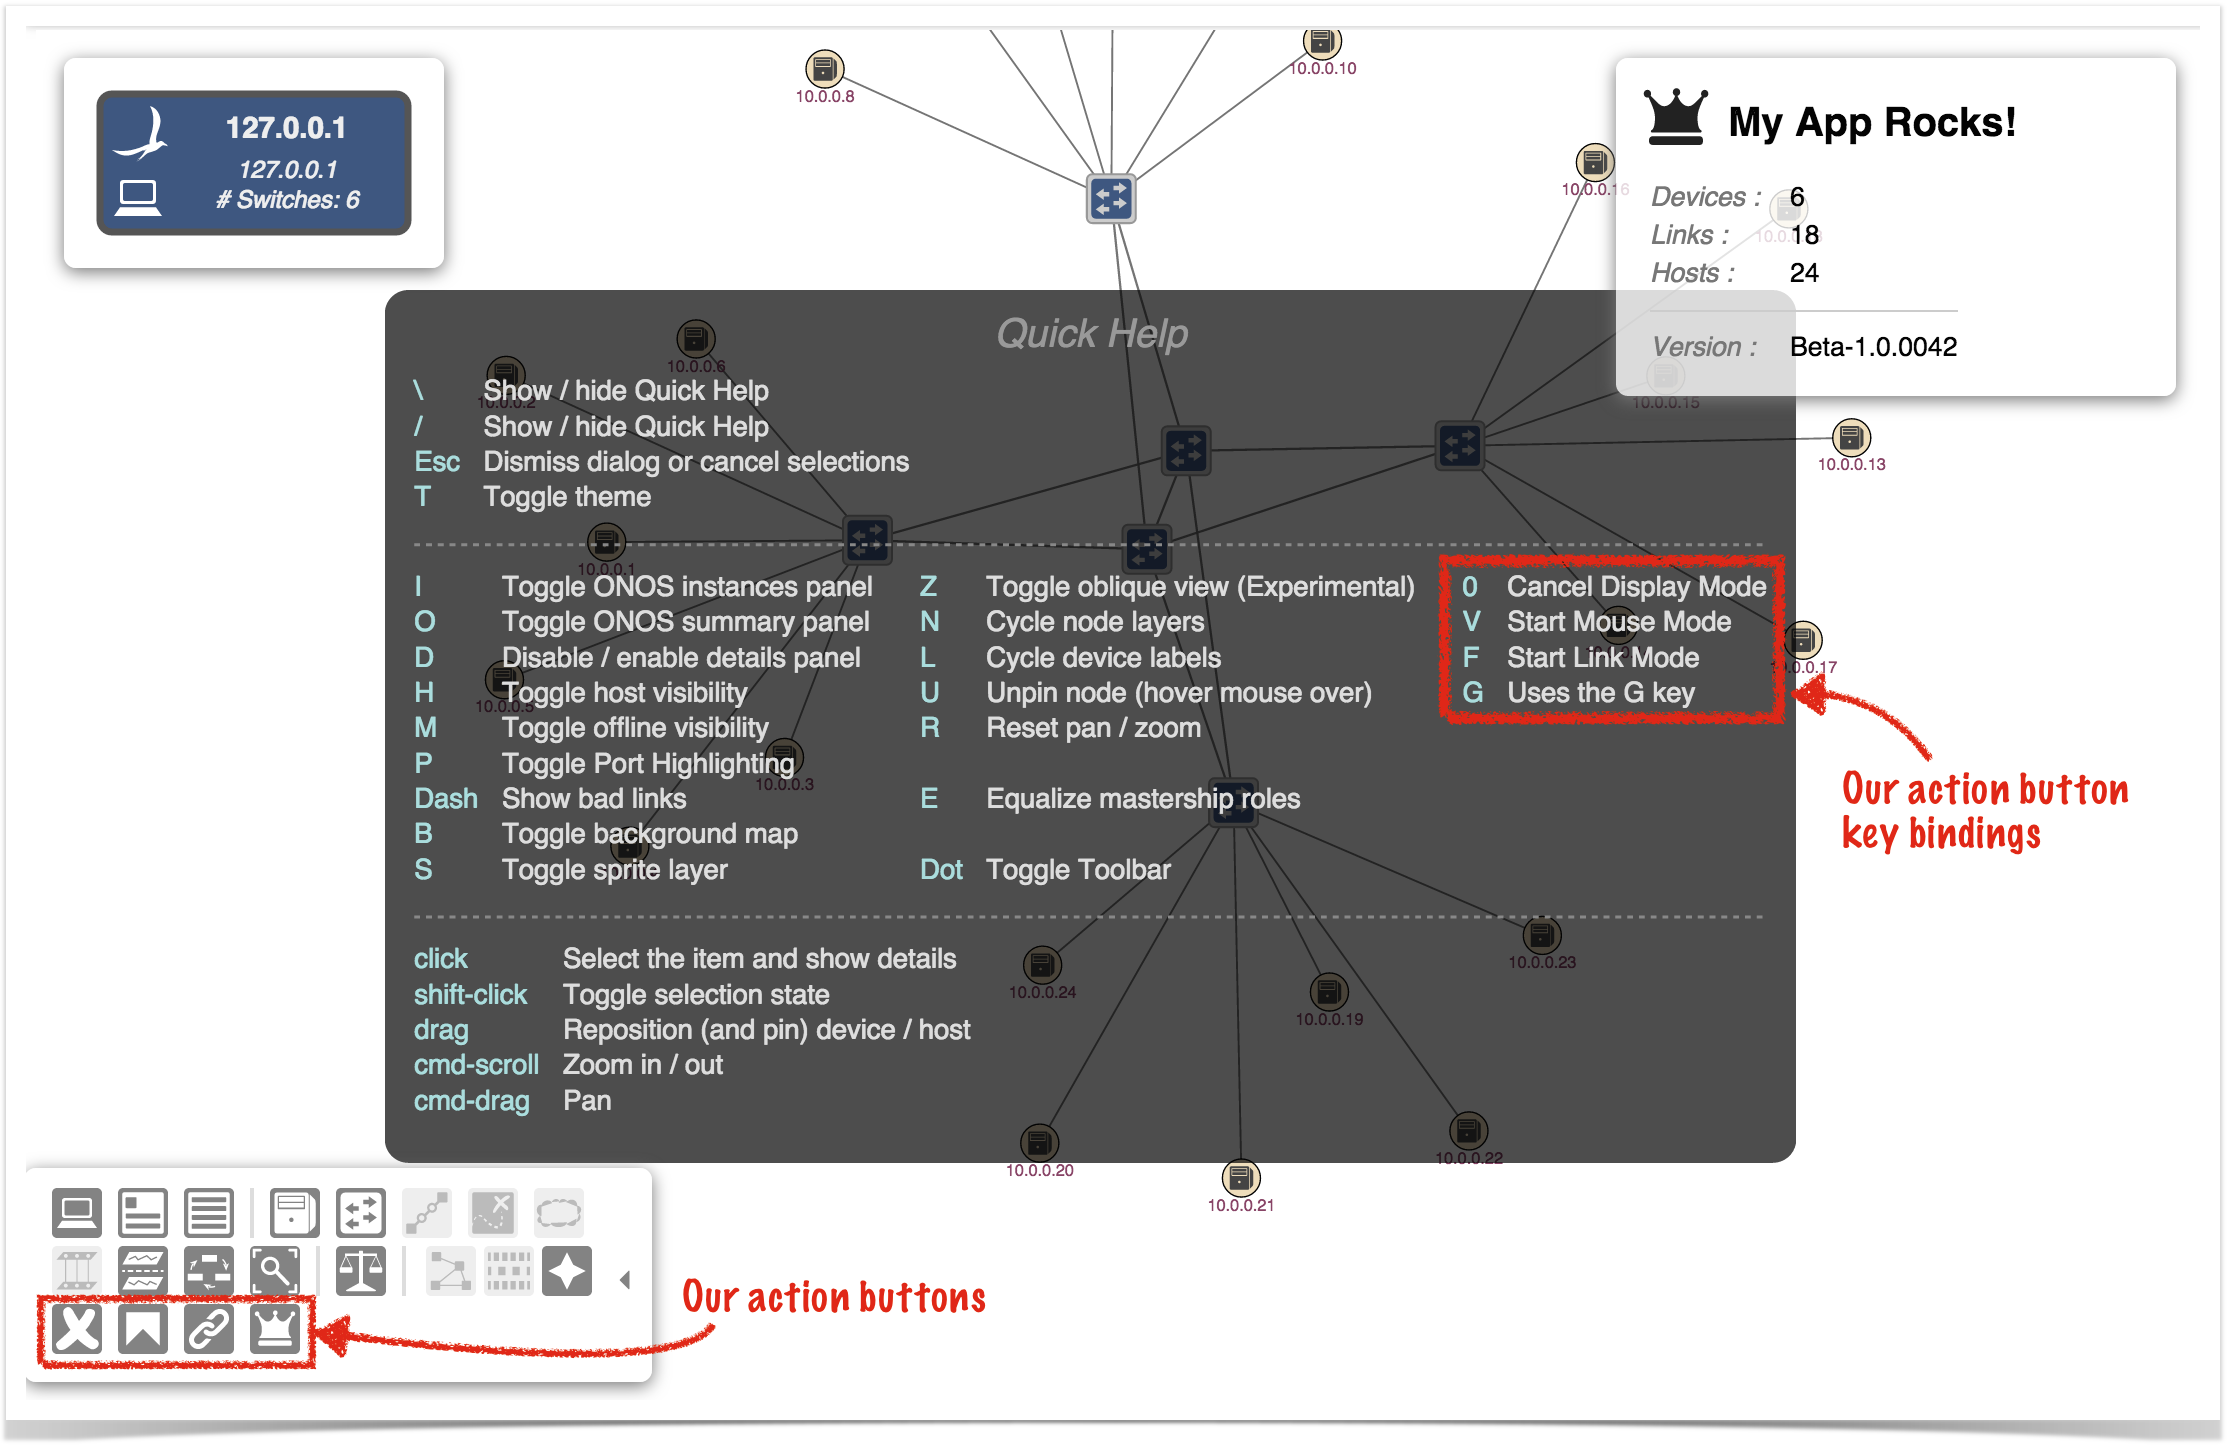
Pressing the ESC key will dismiss the panel.
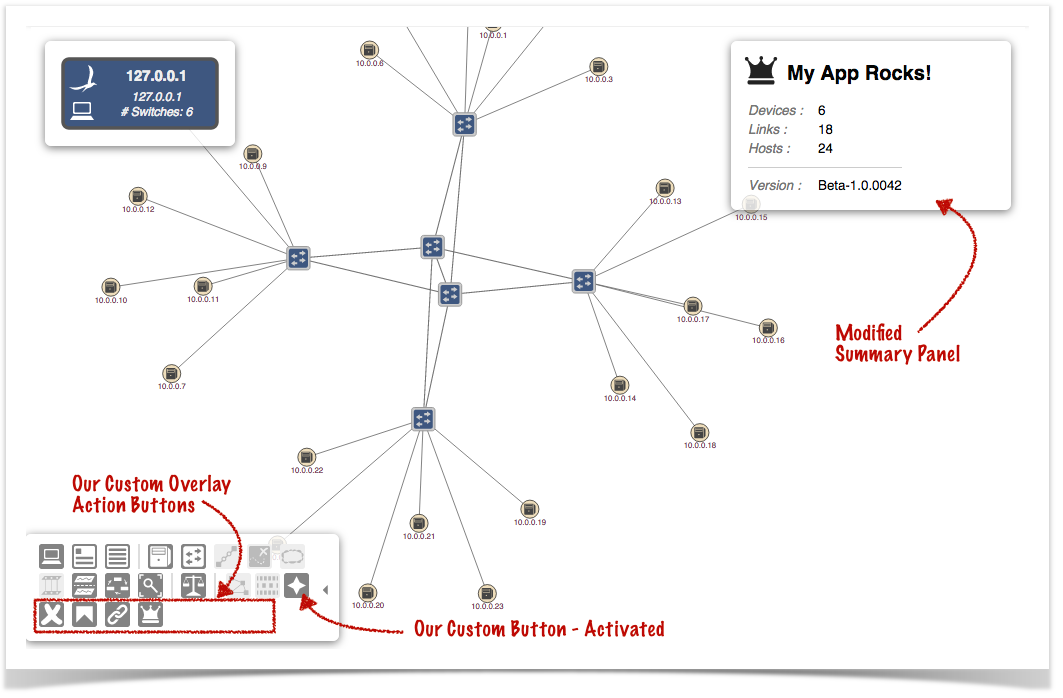
Pressing an alternate overlay button will deactivate our overlay (invoking "deactivate" callbacks both on the client side and server side).
The Sample Application
Our sample app installs a topology overlay that provides custom buttons:
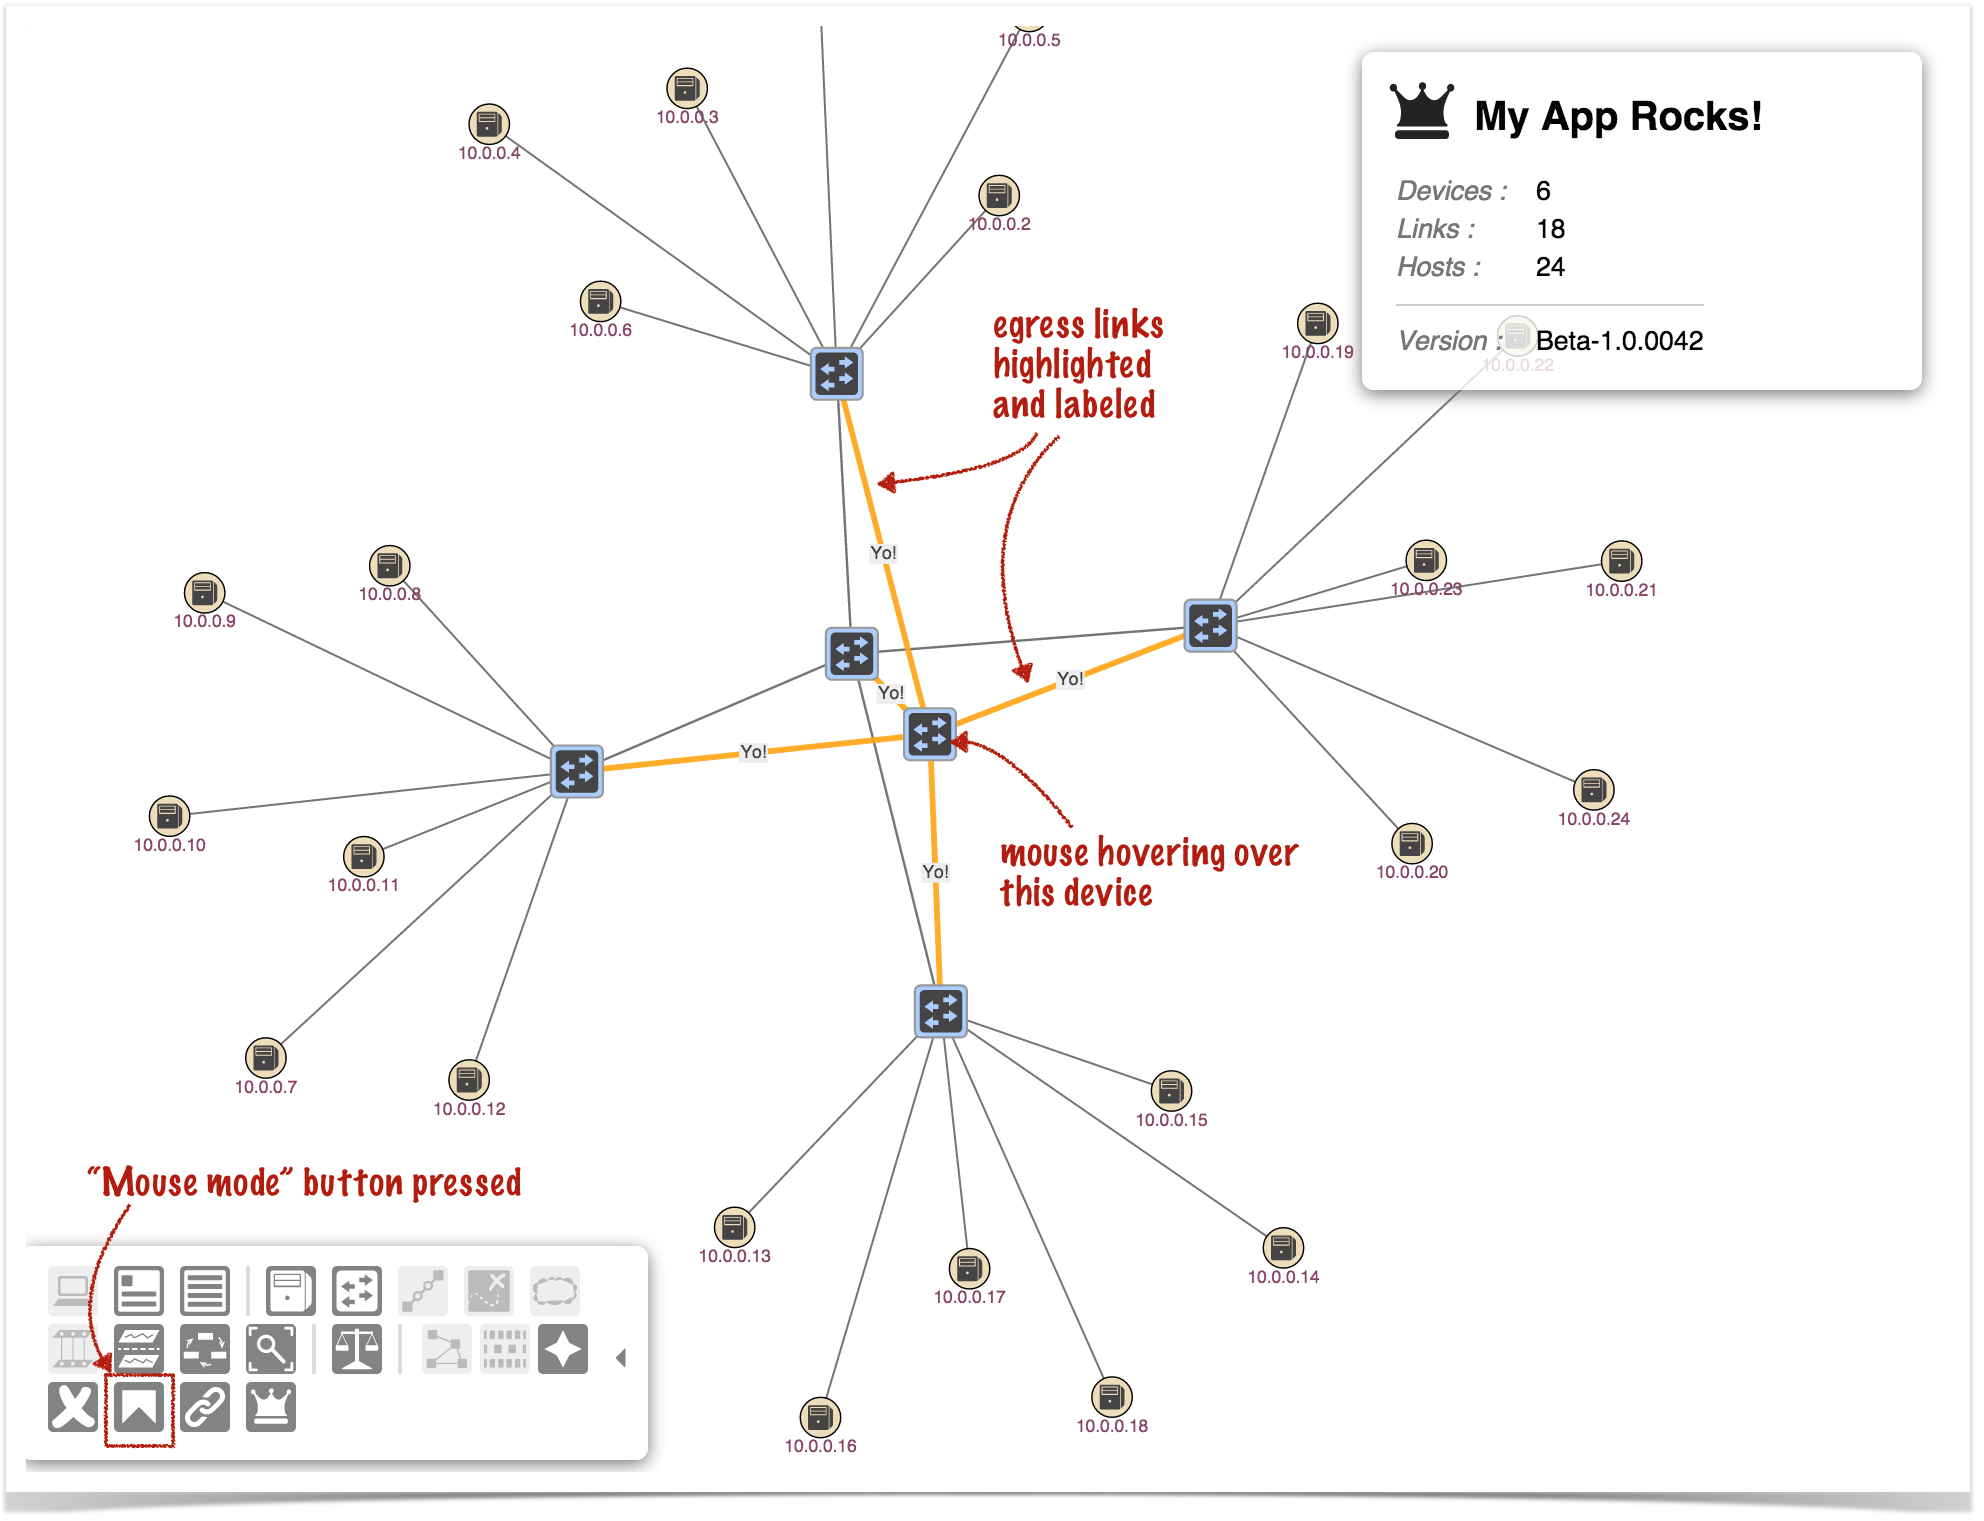
Pressing the "Mouse mode" button and then moving the mouse over devices causes egress links on that device to highlight:
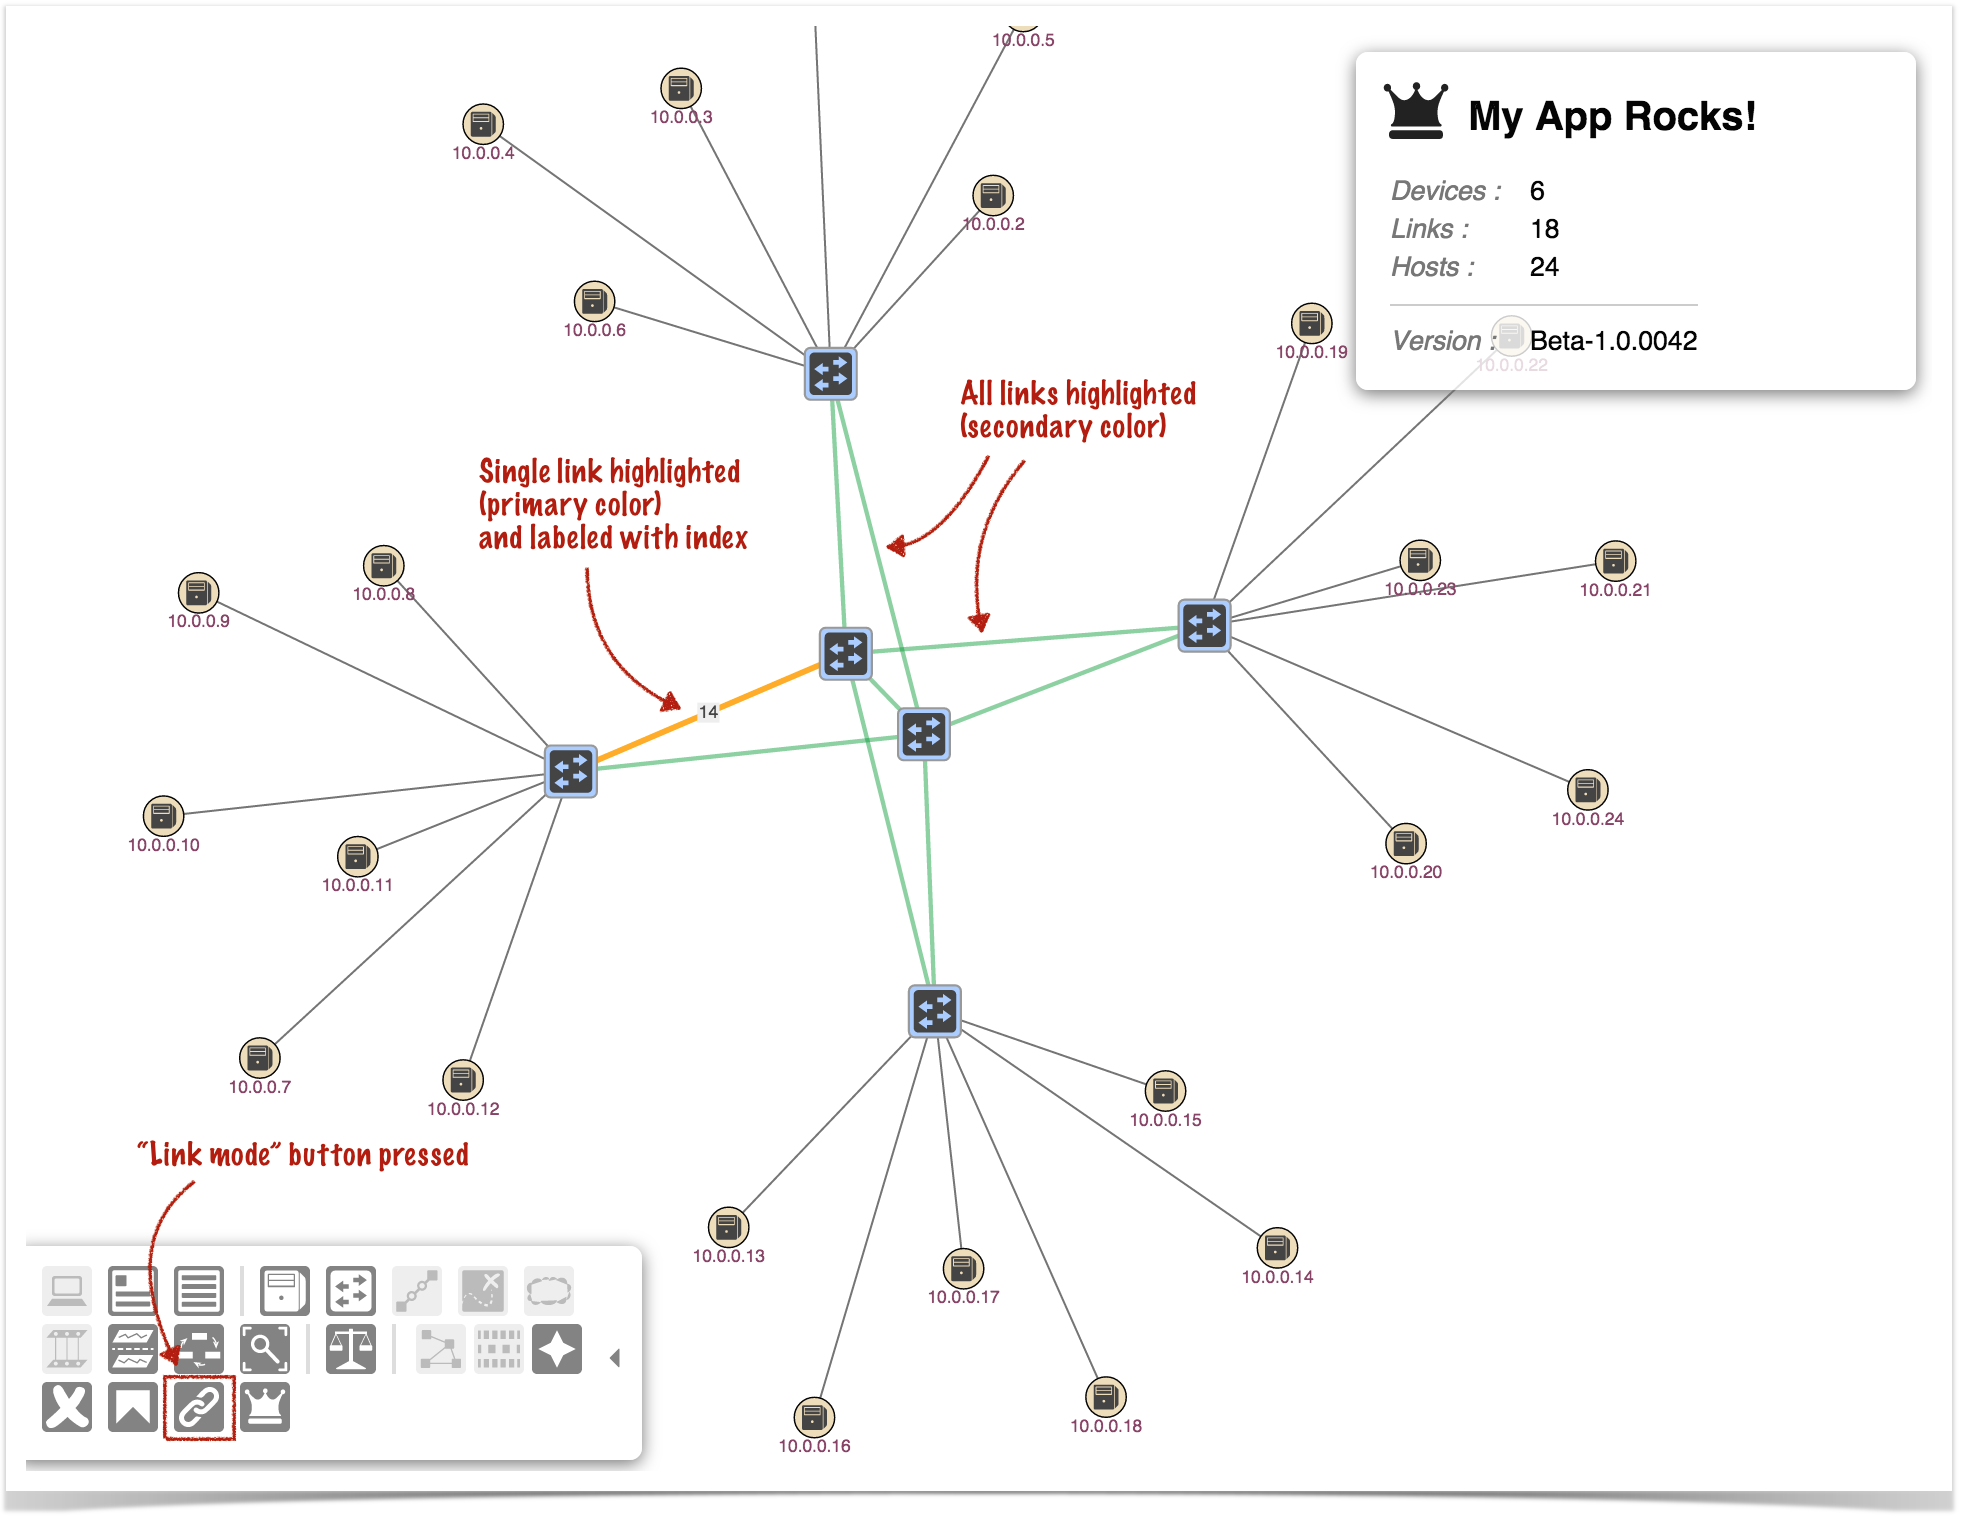
Pressing the "Link mode" button causes all the links in the topology to highlight in the secondary color, and each link in turn to highlight in the primary color, together with a label:
Pressing the "Cancel mode" button will put the topology view back into a quiescent state.
Overlays in Brief
To create a topology overlay requires both client-side and server-side resources; the client-side consists of JavaScript files (and possibly CSS), and the server-side consists of Java classes.
- The JavaScript defines and registers the overlay code with the topology view, providing callback functions for when certain events take place.
- The CSS (if needed) can provide custom styling.
- The server-side Java code provides the back-end support for deciding how to highlight the topology when needed, and how to customize the summary and detail panels.
Description of the Template Files - Server Side
These files are under the directory ~/src/main/java/org/meowster/app.
The exact path depends on the groupId (also used as the Java package) specified when the application was built with onos-create-app.
The following subsections describe the salient features of each file...
AppComponent
This is the base Application class and may be used for non-UI related functionality (not addressed in this tutorial).
AppUiComponent
This is the base class for UI functionality. The code is similar to the Custom View tutorial, but has a couple of subtle differences.
(1) Reference to the UIExtensionService:
@Reference(cardinality = ReferenceCardinality.MANDATORY_UNARY)
protected UiExtensionService uiExtensionService;
(2) List a single, hidden application view descriptor, defining the internal identifier:
// List of application views
private final List<UiView> uiViews = ImmutableList.of(
        new UiViewHidden("sample")
);
(3) Declaration of a UiMessageHandlerFactory to generate message handlers on demand. The sample factory generates a single handler each time, AppUiMessageHandler, described below:
// Factory for UI message handlers
private final UiMessageHandlerFactory messageHandlerFactory =
        () -> ImmutableList.of(
                new AppUiMessageHandler()
        );
(4) Declaration of a UiTopoOverlayFactory to generate topology overlays on demand. The sample factory generates a single overlay each time, AppUiTopoOverlay, described below:
// Factory for UI topology overlays
private final UiTopoOverlayFactory topoOverlayFactory =
        () -> ImmutableList.of(
                new AppUiTopoOverlay()
        );
(5) Declaration of a UiExtension, configured with the previously declared UI view descriptor, message handler factory, and topology overlay factory:
// Application UI extension
protected UiExtension extension =
        new UiExtension.Builder(CL, uiViews)
            .messageHandlerFactory(messageHandlerFactory)
            .topoOverlayFactory(topoOverlayFactory)
            .build();
(6) Activation and deactivation callbacks that register and unregister the UI extension at the appropriate times:
@Activate
protected void activate() {
    uiExtensionService.register(extension);
    log.info("Started");
}

@Deactivate
protected void deactivate() {
    uiExtensionService.unregister(extension);
    log.info("Stopped");
}
AppUiMessageHandler
This class extends UiMessageHandler to implement code that handles events from the client.
(1) override init() to store references to the services we need:
@Override
public void init(UiConnection connection, ServiceDirectory directory) {
    super.init(connection, directory);
    deviceService = directory.get(DeviceService.class);
    hostService = directory.get(HostService.class);
    linkService = directory.get(LinkService.class);
}
Since we will be querying for devices, hosts and links, grab references to the corresponding service APIs.
(2) implement createRequestHandlers() to provide request handler implementations for specific event types from our topology overlay.
@Override
protected Collection<RequestHandler> createRequestHandlers() {
    return ImmutableSet.of(
            new DisplayStartHandler(),
            new DisplayUpdateHandler(),
            new DisplayStopHandler()
    );
}
(3) define DisplayStartHandler class to handle "sampleDisplayStart" events from the client:
private static final String SAMPLE_DISPLAY_START = "sampleDisplayStart";
...
private final class DisplayStartHandler extends RequestHandler {
    public DisplayStartHandler() {
        super(SAMPLE_DISPLAY_START);
    }
    ...
}
(3a) implement process() to react to the start events, taking into account which "mode" we are in:
@Override
public void process(long sid, ObjectNode payload) {
    String mode = string(payload, MODE);

    log.debug("Start Display: mode [{}]", mode);
    clearState();
    clearForMode();

    switch (mode) {
        case "mouse":
            ...
        case "link":
            ...
        default:
            ...
    }
}
First of all, we clear our internal state:
private void clearState() {
    currentMode = Mode.IDLE;
    elementOfNote = null;
    linkSet = EMPTY_LINK_SET;
}
..and make sure that no links are highlighted on the topology:
private void clearForMode() {
    sendHighlights(new Highlights());
}
Then we deal with one of three modes: "mouse", "link", or "idle":
(3a.i) "mouse" mode reacts to which node in the UI the mouse is hovering over and returns data about the egress links for that node:
case "mouse":
    currentMode = Mode.MOUSE;
    cancelTask();
    sendMouseData();
    break;
Note that cancelTask() simply cancels the background timer, if it is running (it is used for the "link" mode).
sendMouseData() looks to see if a device is being hovered over, and if so, finds and highlights the egress links from that device:
private void sendMouseData() {
    if (elementOfNote != null && elementOfNote instanceof Device) {
        DeviceId devId = (DeviceId) elementOfNote.id();
        Set<Link> links = linkService.getDeviceEgressLinks(devId);
        sendHighlights(fromLinks(links, devId));
    }
    // Note: could also process Host, if available
}
Note the use of the fromLinks() helper method that takes a set of links and generates a Highlights object from them:
private Highlights fromLinks(Set<Link> links, DeviceId devId) {
    DemoLinkMap linkMap = new DemoLinkMap();
    if (links != null) {
        log.debug("Processing {} links", links.size());
        links.forEach(linkMap::add);
    } else {
        log.debug("No egress links found for device {}", devId);
    }

    Highlights highlights = new Highlights();

    for (DemoLink dlink : linkMap.biLinks()) {
        dlink.makeImportant().setLabel("Yo!");
        highlights.add(dlink.highlight(null));
    }
    return highlights;
}
See descriptions of DemoLink and DemoLinkMap below for more details.
(3a.ii) "link" mode uses a background timer to iterate across the set of links, highlighting each one in turn:
case "link":
    currentMode = Mode.LINK;
    scheduleTask();
    initLinkSet();
    sendLinkData();
    break;
initLinkSet() initializes an array of links to all active links in the topology, ready to iterate across them:
private void initLinkSet() {
    Set<Link> links = new HashSet<>();
    for (Link link : linkService.getActiveLinks()) {
        links.add(link);
    }
    linkSet = links.toArray(new Link[links.size()]);
    linkIndex = 0;
    log.debug("initialized link set to {}", linkSet.length);
}
sendLinkData() uses a DemoLinkMap (collection of DemoLink instances) to collate information about the links, to use as intermediate data to create highlighting information:
private void sendLinkData() {
    DemoLinkMap linkMap = new DemoLinkMap();
    for (Link link : linkSet) {
        linkMap.add(link);
    }
    DemoLink dl = linkMap.add(linkSet[linkIndex]);
    dl.makeImportant().setLabel(Integer.toString(linkIndex));
    log.debug("sending link data (index {})", linkIndex);

    linkIndex += 1;
    if (linkIndex >= linkSet.length) {
        linkIndex = 0;
    }

    Highlights highlights = new Highlights();
    for (DemoLink dlink : linkMap.biLinks()) {
        highlights.add(dlink.highlight(null));
    }

    sendHighlights(highlights);
}
Note that the background task (invoked once a second, while active) also calls sendLinkData().
(3a.iii) "idle" mode puts our service into a quiescent state:
default:
    currentMode = Mode.IDLE;
    cancelTask();
    break;
(4) define DisplayUpdateHandler class to handle "sampleDisplayUpdate" events from the client:
private static final String SAMPLE_DISPLAY_UPDATE = "sampleDisplayUpdate";
...
private final class DisplayUpdateHandler extends RequestHandler {
    public DisplayUpdateHandler() {
        super(SAMPLE_DISPLAY_UPDATE);
    }
    ...
}
(4a) implement process() to react to update events:
    @Override
    public void process(long sid, ObjectNode payload) {
        String id = string(payload, ID);
        log.debug("Update Display: id [{}]", id);
        if (!Strings.isNullOrEmpty(id)) {
            updateForMode(id);
        } else {
            clearForMode();
        }
    }
updateForMode() sets up the element for the identifier in the payload (if any), then invokes sendMouseData() or sendLinkData() if necessary:
private void updateForMode(String id) {
    log.debug("host service: {}", hostService);
    log.debug("device service: {}", deviceService);

    try {
        HostId hid = HostId.hostId(id);
        log.debug("host id {}", hid);
        elementOfNote = hostService.getHost(hid);
        log.debug("host element {}", elementOfNote);

    } catch (Exception e) {
        try {
            DeviceId did = DeviceId.deviceId(id);
            log.debug("device id {}", did);
            elementOfNote = deviceService.getDevice(did);
            log.debug("device element {}", elementOfNote);

        } catch (Exception e2) {
            log.debug("Unable to process ID [{}]", id);
            elementOfNote = null;
        }
    }

    switch (currentMode) {
        case MOUSE:
            sendMouseData();
            break;

        case LINK:
            sendLinkData();
            break;

        default:
            break;
    }
}
(5) define DisplayStopHandler class to handle "sampleDisplayStop" events from the client:
private static final String SAMPLE_DISPLAY_STOP = "sampleDisplayStop";
...
private final class DisplayStopHandler extends RequestHandler {
    public DisplayStopHandler() {
        super(SAMPLE_DISPLAY_STOP);
    }
    ...
}
(5a) implement process() to react to stop events:
    @Override
    public void process(long sid, ObjectNode payload) {
        log.debug("Stop Display");
        cancelTask();
        clearState();
        clearForMode();
    }
AppUiTopoOverlay
This class extends UiTopoOverlay to implement server-side callbacks for modifying the summary and details panels. In the constructor, we provide a unique identifier against which our overlay will be registered. Note that the same identifier must be used in the client-side definition of our overlay also:
// NOTE: this must match the ID defined in sampleTopov.js
private static final String OVERLAY_ID = "meowster-overlay";
...
public AppUiTopoOverlay() {
    super(OVERLAY_ID);
}
What happens in the background is that when it is time to refresh the Summary Panel, the framework constructs a PropertyPanel instance, modeling the information to be shown in the summary panel. If there is an active topology overlay, that overlay is given the opportunity to tweak the model, before it is shipped back to the client.
To make alterations to the panel, we override the modifySummary() method:
import static org.onosproject.ui.topo.TopoConstants.Properties.*;
...
private static final String MY_TITLE = "My App Rocks!";
private static final String MY_VERSION = "Beta-1.0.0042";
...
@Override
public void modifySummary(PropertyPanel pp) {
    pp.title(MY_TITLE)
        .typeId(Glyphs.CROWN)
        .removeProps(
                TOPOLOGY_SSCS,
                INTENTS,
                TUNNELS,
                FLOWS,
                VERSION
        )
        .addProp(VERSION, MY_VERSION);
}
First we set a new title and change the glyph to show, then we remove standard line items that we don't care to show, finally adding our own version string.
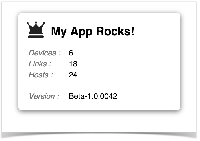
Note that the removeAllProps() method can be used to delete all the properties in one fell swoop (if you don't want to use any of the default property values).
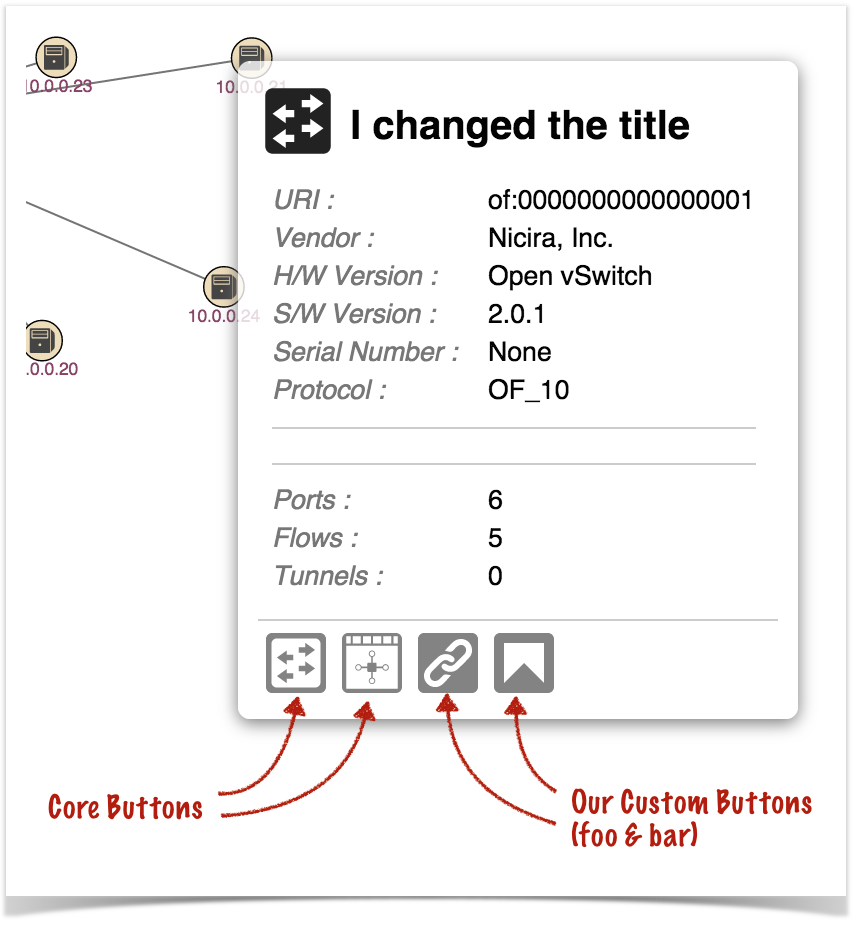
Alterations can also be made to the details panel. Here we override the modifyDeviceDetails() method:
import static org.onosproject.ui.topo.TopoConstants.Properties.*;
...
private static final ButtonId FOO_BUTTON = new ButtonId("foo");
private static final ButtonId BAR_BUTTON = new ButtonId("bar");
private static final String MY_DEVICE_TITLE = "I changed the title";
...
@Override
public void modifyDeviceDetails(PropertyPanel pp) {
    pp.title(MY_DEVICE_TITLE);
    pp.removeProps(LATITUDE, LONGITUDE);

    pp.addButton(FOO_BUTTON)
        .addButton(BAR_BUTTON);

    pp.removeButtons(CoreButtons.SHOW_PORT_VIEW)
        .removeButtons(CoreButtons.SHOW_GROUP_VIEW);
}
Here we change the title, and remove a couple of properties. We also remove two of the four default (core) buttons, replacing them with two of our own.
DemoLink
This class extends BiLink to facilitate collation of information about links, prior to determining how the links should be highlighted. The constructor simply delegates to the super class:
public DemoLink(LinkKey key, Link link) {
    super(key, link);
}
To collect the pertinent data while iterating over links, we provide public methods to capture the data:
private boolean important = false;
private String label = null;
...

public DemoLink makeImportant() {
    important = true;
    return this;
}

public DemoLink setLabel(String label) {
    this.label = label;
    return this;
}
Note that the methods return a reference to this, to facilitate chained calls.
Finally, we need to implement the highlight() method to generate a LinkHighlight for this particular instance, when requested:
@Override
public LinkHighlight highlight(Enum<?> anEnum) {
    Flavor flavor = important ? Flavor.PRIMARY_HIGHLIGHT
                              : Flavor.SECONDARY_HIGHLIGHT;
    return new LinkHighlight(this.linkId(), flavor)
            .setLabel(label);
}
The enumeration parameter is provided in the signature to allow parameterization of the highlight generation based on some user-defined state. We are not making use of that feature here.
See Web UI - Topology Highlights for more information about the highlighting model.
DemoLinkMap
This class extends BiLinkMap<DemoLink> to provide a concrete class for collating DemoLink instances. Here we simply need to override the create() method:
@Override
protected DemoLink create(LinkKey linkKey, Link link) {
    return new DemoLink(linkKey, link);
}
Description of the Template Files - Client Side
Note that the directory naming convention must be observed for the files to be placed in the correct location when the archive is built. Since our view is using the unique identifier "sample", its client source files should be placed under the directory ~/src/main/resources/app/view/sample.
We need to define a "view" to store the resources under the .../app/view/ directory. However, the view will be marked as "hidden", so that it is not listed in the navigation pane; we only want to contribute a topology view overlay, not add another view.
| ~src/main/resources/ | app/view/ | sample/ |
|---|---|---|
| client files | client files for UI views | client files for "sample" view |
There are five files here:
- sample.html
- sample.js
- sampleDemo.js
- sampleTopov.js
- sample.css
Note the convention to name (or prefix) the files using our unique identifier, in this case "sample".
sample.html
This HTML snippet is used simply as a placeholder:
<!-- partial HTML -->
<div id="ov-sample">
    <p>This is a hidden view .. just a placeholder to house the javascript</p>
</div>
sample.js
This is the base javascript file for our sample overlay code. In this example we simply define our angular module – "ovSample" – and create a simple controller that initializes our "Sample Demo Service (see below):
angular.module('ovSample', [])
    .controller('OvSampleCtrl',
    ['$log', '$scope', 'FnService', 'WebSocketService',
        'SampleDemoService',

    function (_$log_, _$scope_, _fs_, _wss_, sds) {
        ...
        sds.init();
        $log.log('OvSampleCtrl has been created');
    }]);
sampleDemo.js
This file implements our "Sample Demo Service" which provides an API for our topology view toolbar custom buttons to invoke. Let's break down the file and look at it in sections:
Registration of the Service
At the bottom of the file we register the service as a factory in our ovSample module:
angular.module('ovSample')
    .factory('SampleDemoService',
    ['$log', 'FnService', 'FlashService', 'WebSocketService',
    function (_$log_, _fs_, _flash_, _wss_) {
        $log = _$log_;
        fs = _fs_;
        flash = _flash_;
        wss = _wss_;

        return {
            init: init,
            startDisplay: startDisplay,
            updateDisplay: updateDisplay,
            stopDisplay: stopDisplay
        };
    }]);
This piece of code stores references to the injected services for future use by our other functions, and then returns the API object.
Variables
Back to the top of the file...
We provide variables in which to store the references to the injected services, some convenience "constants", and our internal state:
// injected refs
var $log, fs, flash, wss;

// constants
var displayStart = 'sampleDisplayStart',
    displayUpdate = 'sampleDisplayUpdate',
    displayStop = 'sampleDisplayStop';

// internal state
var currentMode = null;
Main API Functions
The first of these is init():
function init() {
    // do any initialization of state here
    $log.debug('init sample demo service here...');
}
Doesn't do anything in our sample, but this is where you might initialize state if you needed to.
The next is startDisplay():
function startDisplay(mode) {
    if (currentMode === mode) {
        $log.debug('(in mode', mode, 'already)');
    } else {
        currentMode = mode;
        sendDisplayStart(mode);
        flash.flash('Starting display mode: ' + mode);
    }
}
As long as the given mode is different to the current mode, we send a start event to the server and flash a feedback message to the user.
function sendDisplayStart(mode) {
    wss.sendEvent(displayStart, {
        mode: mode
    });
}
sendDisplayStart() uses the WebSocketService to send the start event to the server, parameterized by "mode".
The updateDisplay() function sends a display update event to the server (as long as mode is not "idle"):
function updateDisplay(m) {
    if (currentMode) {
        sendDisplayUpdate(m);
    }
}
The m parameter (if it is set) is a small object that has an id property set to the identity of the device hovered over by the mouse.
function sendDisplayUpdate(what) {
    wss.sendEvent(displayUpdate, {
        id: what ? what.id : ''
    });
}
The payload of the event includes the device ID if applicable.
The stopDisplay() function sends a stop event to the server, if our current mode is not "idle":
 function stopDisplay() {
    if (currentMode) {
        currentMode = null;
        sendDisplayStop();
        flash.flash('Canceling display mode');
        return true;
    }
    return false;
}
function sendDisplayStop() {
    wss.sendEvent(displayStop);
}
sampleTopov.js
todo
sample.css
todo
Glue Files
The final piece to the puzzle are the two "glue" files used to patch references to our client-side source into index.html. These files are located in the ~src/main/resources directory.
css.html
This is a short snippet that is injected into index.html. It contains exactly one line:
<link rel="stylesheet" href="app/view/sample/sample.css">
js.html
This is a short snippet that is injected into index.html. It contains exactly three lines:
<script src="app/view/sample/sample.js"></script>
<script src="app/view/sample/sampleDemo.js"></script>
<script src="app/view/sample/sampleTopov.js"></script>