Due to a ransomware attack, the wiki was reverted to a July 2022 version. . We apologize for the lack of a more recent valid backup.
...
Note that this instructions assume you’re familiar with ONOS and OpenStack, and do not provide a guide to how to install or trouble shooting these services. However, If you aren’t, please find a guide from ONOS(http://wiki.onosproject.org) and OpenStack(http://docs.openstack.org), respectively.
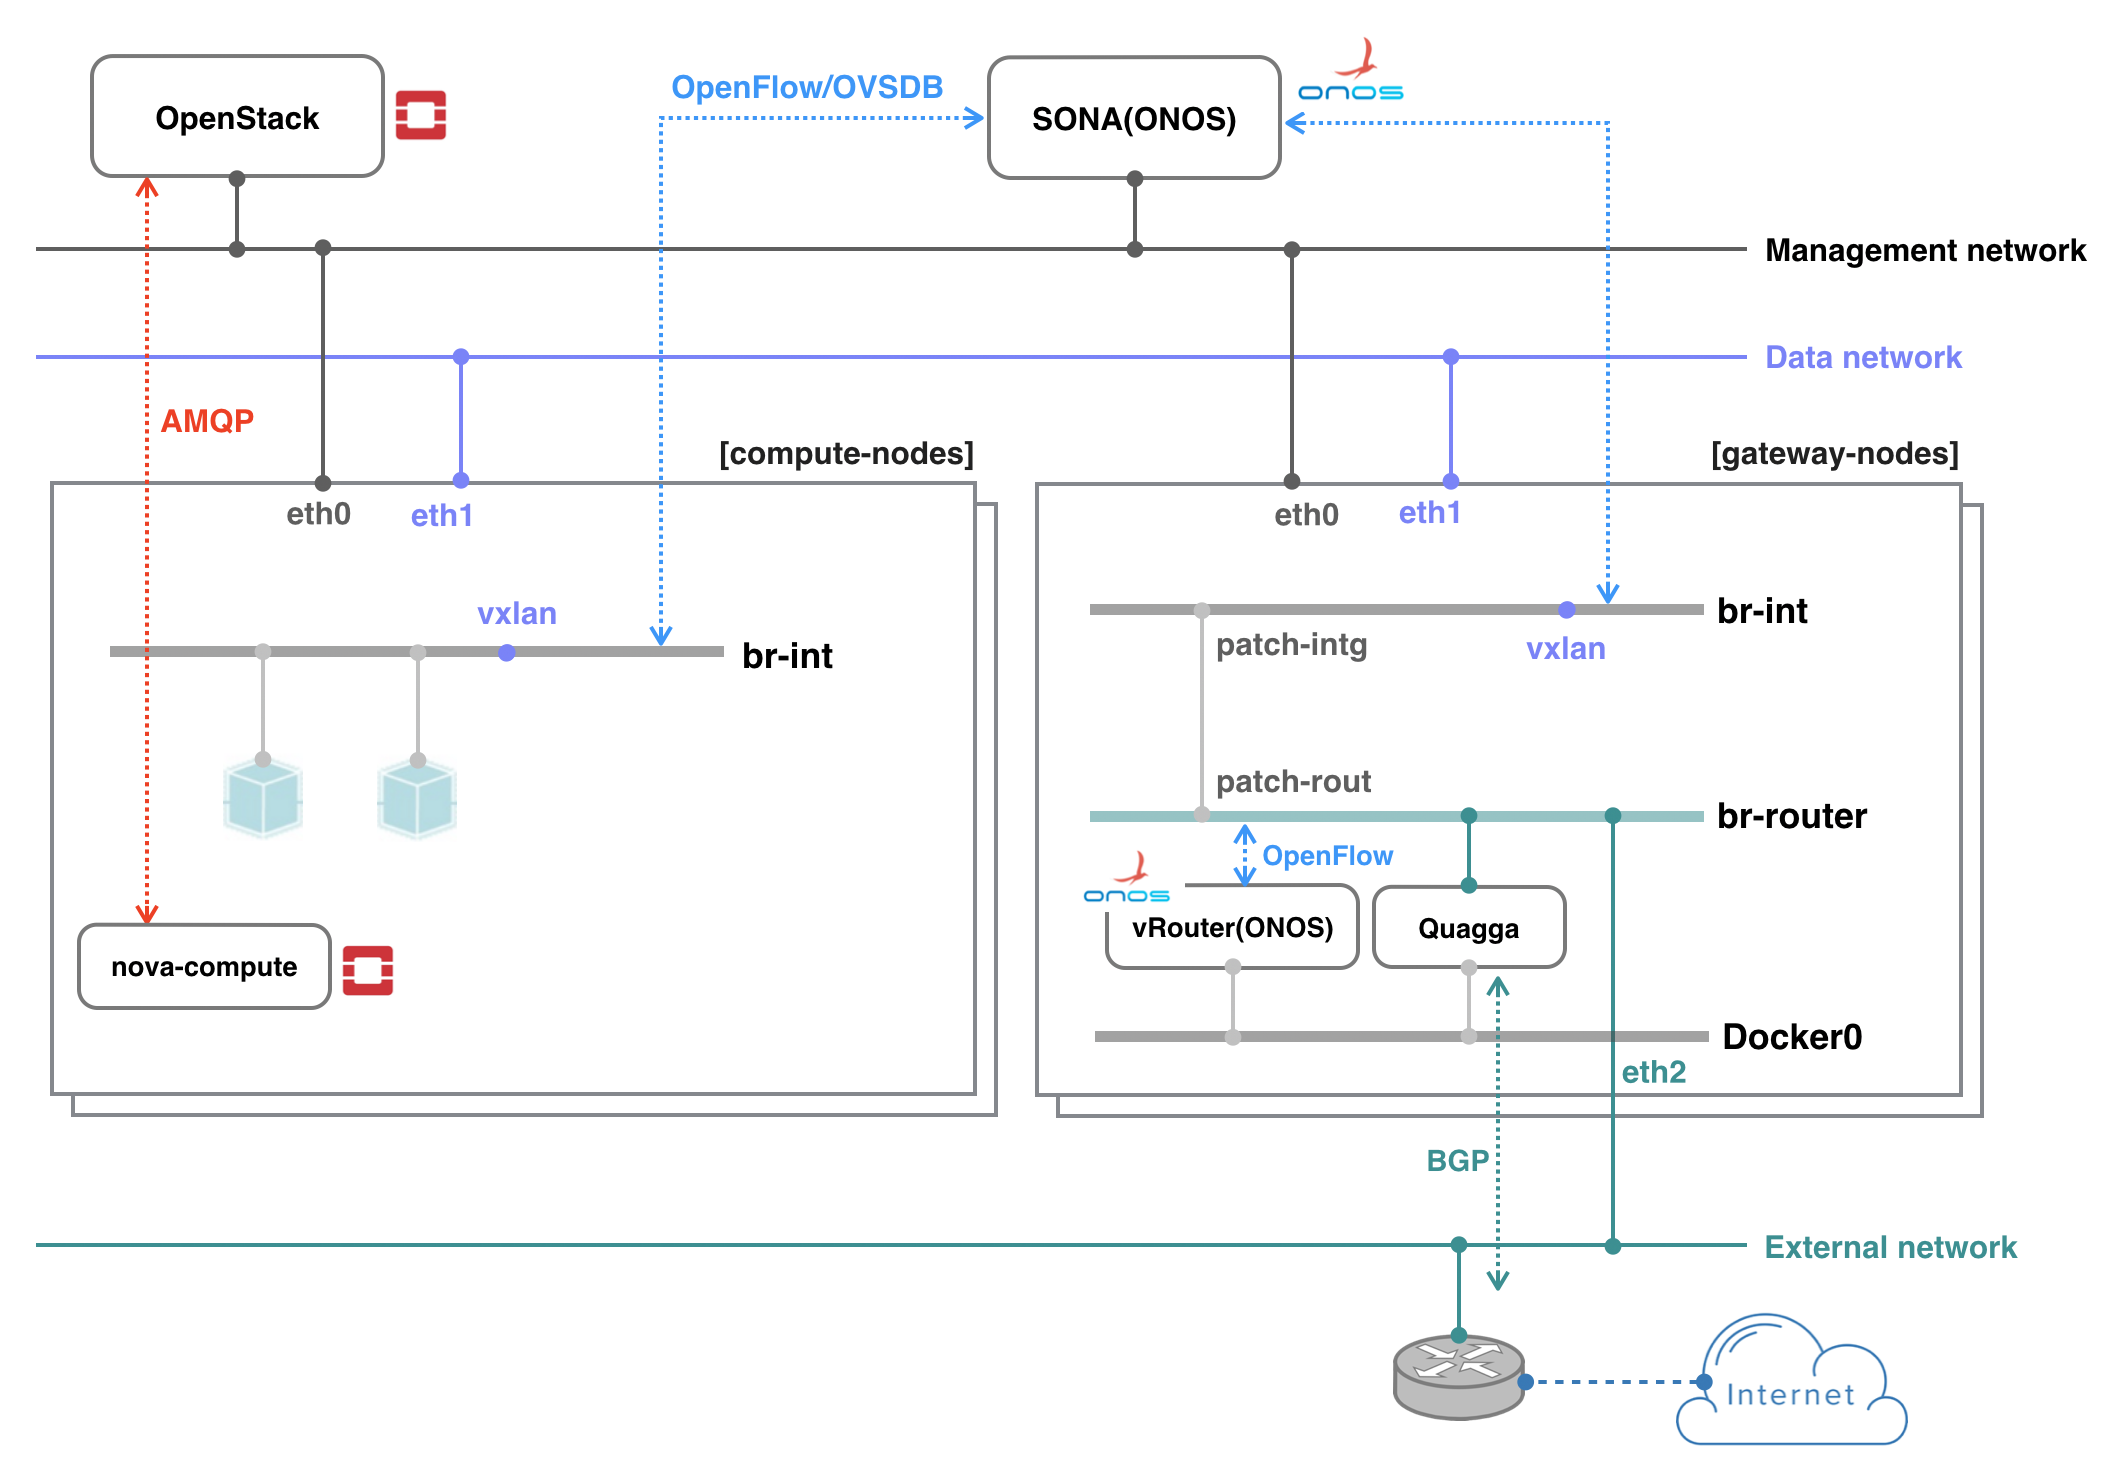
The example deployment depicted in the above figure uses three networks with an external router.
- Management network: used for ONOS to control virtual switches, and OpenStack to communicate with nova-compute agent running on the compute node
- Data network: used for East-West traffic via VXLAN, GRE or GENEVE tunnel
- External network: used for North-South traffic, normally only gateway nodes have an access to this network
All networks can share a network interface in case your test machine does not have enough interfaces. You can also emulate external router. The figure below shows an example test environment used in the rest of this guide with emulated external router and two network interfaces, one for sharing management and external, and the other for data.


Prerequisite
1. Install OVS to all nodes including compute and gateway. Make sure your OVS version is 2.3.0 or later (later than 2.5.0 is recommended). Refer to this guide for updating OVS (don't forget to change the version in the guide).
...
| Code Block | ||
|---|---|---|
| ||
$ sudo ovs-vsctl show
cedbbc0a-f9a4-4d30-a3ff-ef9afa813efb
ovs_version: "2.58.02" |
OpenStack Setup
How to deploy OpenStack is out of scope of this documentation. Here, it only describes configurations related to use SONA. All other settings are completely up to your environment.
...
| Note |
|---|
The guide is based on OpenStack Ocata/Pike version. If you want to install Newton version of OpenStack, please refer to here <TBA>. |
...
| Code Block |
|---|
/opt/stack$ git clone --branch [stable/ocata or stable/pike] https://github.com/sonaprojectopenstack/networking-onos.git |
Next, please create a file /opt/stack/networking-onos/etc/conf_onos.ini using the following template. Please set the IP_ADDRESS_OF_ONOS to host IP address of ONOS controller.
...
| Code Block | ||||
|---|---|---|---|---|
| ||||
$ git clone -b [stable/ocata or stable/pike] https://git.openstack.org/openstack-dev/devstack |
The following is the example of local.conf. Please set the IP addresses correctly, and the network setting should be set properly as below.(Branches can be modified to stable/queens or stable/rocky for your wish)
| Code Block | ||
|---|---|---|
| ||
[[local|localrc]] HOST_IP=10.134.231.28 SERVICE_HOST=10.134.231.28 RABBIT_HOST=10.134.231.28 DATABASE_HOST=10.134.231.28 Q_HOST=10.134.231.28 ADMIN_PASSWORD=nova DATABASE_PASSWORD=$ADMIN_PASSWORD RABBIT_PASSWORD=$ADMIN_PASSWORD SERVICE_PASSWORD=$ADMIN_PASSWORD SERVICE_TOKEN=$ADMIN_PASSWORD DATABASE_TYPE=mysql # Log USE_SCREEN=True SCREEN_LOGDIR=/opt/stack/logs/screen LOGFILE=/opt/stack/logs/xstack.sh.log LOGDAYS=1 # ImagesForce config drive FORCE_CONFIG_DRIVE=True # Networks Q_ML2_TENANT_NETWORK_TYPE=vxlan Q_ML2_PLUGIN_MECHANISM_DRIVERS=onos_ml2 Q_ML2_PLUGIN_TYPE_DRIVERS=flat,vlan,vxlan ML2_L3_PLUGIN=onos_router NEUTRON_CREATE_INITIAL_NETWORKS=False enable_plugin networking-onos https://github.com/sonaprojectopenstack/networking-onos.git stable/ocatapike ONOS_MODE=controller_only # Services ENABLED_SERVICES=key,nova,n-api,n-cond,n-sch,n-novnc,n-cauth,placement-api,g-api,g-reg,q-svc,horizon,rabbit,mysql # Branches GLANCE_BRANCH=stable/ocatapike HORIZON_BRANCH=stable/ocatapike KEYSTONE_BRANCH=stable/ocatapike NEUTRON_BRANCH=stable/ocatapike NOVA_BRANCH=stable/ocatapike |
If you use other deployment tool or build OpenStack manually, refer to the following Nova and Neutron configurations.
...
| Code Block | ||
|---|---|---|
| ||
[ml2] tenant_network_types = vxlan type_drivers = flat,vlan,vxlan mechanism_drivers = onos_ml2 [ml2_type_flat] flat_networks = public1, public2 #Whatever physical networks you want to create [securitygroup] enable_security_group = True |
...
| Code Block | ||
|---|---|---|
| ||
[[local|localrc]] HOST_IP=10.134.231.30 SERVICE_HOST=10.134.231.28 RABBIT_HOST=10.134.231.28 DATABASE_HOST=10.134.231.28 ADMIN_PASSWORD=nova DATABASE_PASSWORD=$ADMIN_PASSWORD RABBIT_PASSWORD=$ADMIN_PASSWORD SERVICE_PASSWORD=$ADMIN_PASSWORD SERVICE_TOKEN=$ADMIN_PASSWORD DATABASE_TYPE=mysql NOVA_VNC_ENABLED=True VNCSERVER_PROXYCLIENT_ADDRESS=$HOST_IP VNCSERVER_LISTEN=$HOST_IP LIBVIRT_TYPE=kvm # Log # Force config drive FORCE_CONFIG_DRIVE=True LIBVIRT_TYPE=kvm # should be qemu if your compute node is a vm # Log USE_SCREEN=True SCREEN_LOGDIR=/opt/stack/logs/screen LOGFILE=/opt/stack/logs/xstack.sh.log LOGDAYS=1 # Services ENABLED_SERVICES=n-cpu,placement-client,neutron enable_plugin networking-onos https://github.com/sonaprojectopenstack/networking-onos.git stable/ocatapike ONOS_MODE=compute # Branches NOVA_BRANCH=stable/ocatapike KEYSTONE_BRANCH=stable/ocatapike NEUTRON_BRANCH=stable/ocatapike |
| Note |
|---|
If your compute node is a VM, try http://docs.openstack.org/developer/devstack/guides/devstack-with-nested-kvm.html this first or set |
...
1. Refer to SONA Network Configuration Guide and write a network configuration file, typically named network-cfg.json. Place the configuration file under tools/package/config/, build, create package, and then install ONOS. Please
| Note |
|---|
...
Note that following tutorial is relevant only for building SONA apps against BUCK tool, and this only works from ONOS 1.13.0. So we strongly recommend the user to use ONOS 1.13.0 or above, if you would like to use BUCK to build SONA apps. For some reasons, if you have to use ONOS below 1.12.0, please use MAVEN to build the ONOS. |
| Code Block |
|---|
# |
| Code Block |
# SONA cluster (1-node) export OC1=onos-01 export ONOS_APPS="drivers,openflow-base,openstacknetworking" |
In case you are using cell, here's example cell file for 3-node cluster
...
3. Check all nodes are registered and all COMPUTE type node's states are COMPLETE with openstack-nodes command. Use openstack-node-check command for more detailed states if the state is INCOMPLETE. If you want to reinitialize only a particular compute node, use openstack-node-init command with hostname. For If you have no physical peer switch, for GATEWAY type node, leave it in the state of the node would be DEVICE_CREATED state. You'll need additional configurations explained later for gateway nodes.
| Code Block |
|---|
onos> openstack-nodes Hostname Type Integration Bridge Router Bridge Management IP Data IP VLAN Intf State sona-compute-01 COMPUTE of:00000000000000a1 10.1.1.162 10.1.1.162 COMPLETE sona-compute-02 COMPUTE of:00000000000000a2 10.1.1.163 10.1.1.163 COMPLETE sona-gateway-02 GATEWAY of:00000000000000a4 of:00000000000000b4 10.1.1.165 10.1.1.165 DEVICE_CREATEDCOMPLETE Total 3 nodes |
Switch Setup
...
1. Let's download and install Docker first.
| Code Block | ||
|---|---|---|
| ||
$ wget -qO- https://get.docker.com/ | sudo sh |
first.
| Code Block | ||
|---|---|---|
| ||
$ wget -qO- https://get.docker.com/ | sudo sh |
2. Install and configure OVS
OVS version depends on the SONA features you want to enable. If you want staful NAT features, you have to install OVS 2.6 or higher. Otherwise, you can install OVS 2.5.
Then, set the OVSDB listener port as 6640 so that ONOS can intiated OVSDB connection.
| Code Block |
|---|
$ sudo ovs-vsctl set-manager ptcp:6640 |
Confgiure br-int bridge using openstack-node-init command.
| Code Block |
|---|
onos> openstack-node-init gateway-01
Initializing gateway-01
Done. |
You can check if br-int bridge is configured correctly using ovs-vsctl command, as follows.
| Code Block |
|---|
$ sudo ovs-vsctl show
427d7ee0-218f-4d68-b503-a5639a367357
    Manager "ptcp:6640"
    Bridge br-int
        Controller "tcp:10.1.1.30:6653"
            is_connected: true
        fail_mode: secure
        Port br-int
            Interface br-int
        Port vxlan
            Interface vxlan
                type: vxlan
                options: {key=flow, remote_ip=flow}
ovs_version: "2.5.2" |
32. Download sona-setup scripts as well.
| Code Block | ||
|---|---|---|
| ||
$ git clone -b 1.13 https://github.com/sonaproject/sona-setup.git
$ cd sona-setup |
34. Write externalRouterConfig.ini and place it under sona-setup directory.
...
- line 1, floatingCidr: Floating IP address ranges. It can be comma separated list.
- line 2, externalPeerMac: Remote peer router's MAC address.
45. Run createExternalRouter.sh. It will create emulated external peer router.
...
*Note that we don't use quagga app. We just use quagga container for convenience.
56. When every work is done, you create router with appropriate extenal network that floating IP range is assigned. Then you execute below CLI to check MAC learning for external peer rotuer is working well,
...