Due to a ransomware attack, the wiki was reverted to a July 2022 version. . We apologize for the lack of a more recent valid backup.
Table of Contents
Introduction
You will need:
- ONOS clusters installed and running, one for SONA and the others for vRouter. ONOS for vRouter runs on every gateway node.
- An OpenStack service installed and running ("stable/mitaka" version is used here)
Note that this instructions assume you’re familiar with ONOS and OpenStack, and do not provide a guide to how to install or trouble shooting these services. However, If you aren’t, please find a guide from ONOS(http://wiki.onosproject.org) and OpenStack(http://docs.openstack.org), respectively.

The example deployment depicted in the above figure uses three networks.
- Management network: used for ONOS to control virtual switches, and OpenStack to communicate with nova-compute agent running on the compute node
- Data network: used for East-West traffic via VXLAN tunnel
- External network: used for North-South traffic, normally only the gateway node has a connectivity to this network
If you don't have enough network interfaces in your test environment, you can share the networks. You can also emulate the external router. The figure below shows one possible test environment used in the rest of this guide, where no actual external router exists but emulated one with Docker container.

Prerequisite
1. Make sure your OVS version is 2.3.0 or later. This guide works very well for me (don't forget to change the version in the guide to 2.3.0 or later).
2. Set OVSDB listening mode in your compute nodes. There are two ways. "compute_node_ip" below should be accessible address from the ONOS instance.
$ ovs-appctl -t ovsdb-server ovsdb-server/add-remote ptcp:6640:compute_node_ip
Or you can make the setting permanent by adding the following line to /usr/share/openvswitch/scripts/ovs-ctl, right after "set ovsdb-server "$DB_FILE" line. You need to restart the openvswitch-switch service.
set "$@" --remote=ptcp:6640
Either way, you should be able to see port "6640" is in listening state.
$ netstat -ntl
Active Internet connections (only servers)
Proto Recv-Q Send-Q Local Address           Foreign Address         State
tcp        0      0 0.0.0.0:22              0.0.0.0:*               LISTEN
tcp        0      0 0.0.0.0:6640            0.0.0.0:*               LISTEN
tcp6       0      0 :::22
3. Check your OVSDB. It is okay If there's a bridge with name br-int, but note that SONA will add or update its controller, DPID, and fail mode.
$ sudo ovs-vsctl show
cedbbc0a-f9a4-4d30-a3ff-ef9afa813efb
    ovs_version: "2.5.0"
ONOS-SONA Setup
1. Refer to the guide(SONA Network Configuration Guide) and write a network configuration for SONA. Place the network-cfg.json under tools/package/config/, build package, and then install ONOS. Here's an example cell configuration and commands.
onos$ cell
ONOS_CELL=sona
OCI=10.134.231.29
OC1=10.134.231.29
ONOS_APPS=drivers,openflow-base,openstackswitching,openstackrouting
ONOS_GROUP=sdn
ONOS_SCENARIOS=/Users/hyunsun/onos/tools/test/scenarios
ONOS_TOPO=default
ONOS_USER=sdn
ONOS_WEB_PASS=rocks
ONOS_WEB_USER=onos

onos$ buck build onos
onos$ cp ~/network-cfg.json ~/onos/tools/package/config/
onos$ buck build package
onos$ stc setup
Make sure to activate "only" the following ONOS applications.
ONOS_APPS=drivers,openflow-base,openstackswitching
If you want Neutron L3 service, enable openstackrouting, too.
ONOS_APPS=drivers,openflow-base,openstackswitching,openstackrouting
2. Check all the applications are activated successfully.
onos> apps -s -a
*   4 org.onosproject.dhcp                 1.7.0.SNAPSHOT DHCP Server App
*   6 org.onosproject.optical-model        1.7.0.SNAPSHOT Optical information model
*  12 org.onosproject.openflow-base        1.7.0.SNAPSHOT OpenFlow Provider
*  19 org.onosproject.ovsdb-base           1.7.0.SNAPSHOT OVSDB Provider
*  22 org.onosproject.drivers.ovsdb        1.7.0.SNAPSHOT OVSDB Device Drivers
*  27 org.onosproject.openstackinterface   1.7.0.SNAPSHOT OpenStack Interface App
*  28 org.onosproject.openstacknode        1.7.0.SNAPSHOT OpenStack Node Bootstrap App
*  29 org.onosproject.scalablegateway      1.7.0.SNAPSHOT Scalable GW App
*  30 org.onosproject.openstackrouting     1.7.0.SNAPSHOT OpenStack Routing App
*  44 org.onosproject.openstackswitching   1.7.0.SNAPSHOT OpenStack Switching App
*  50 org.onosproject.drivers              1.7.0.SNAPSHOT Default device drivers
OpenStack Setup
How to deploy OpenStack is out of scope of this documentation. Here, it only describes some configurations related to use SONA. All other settings are completely up to your environment.
Controller Node
1. Install networking-onos (Neutron ML2 plugin for ONOS) first.
$ git clone https://github.com/openstack/networking-onos.git
$ cd networking-onos
$ sudo python setup.py install
2. Specify ONOS access information. You may want to copy the config file to /etc/neutron/plugins/ml2/ where the other Neutron configuration files are.
networking-onos/etc/conf_onos.ini
# Configuration options for ONOS ML2 Mechanism driver
[onos]
# (StrOpt) ONOS ReST interface URL. This is a mandatory field.
url_path = http://10.134.231.29:8181/onos/openstackswitching
# (StrOpt) Username for authentication. This is a mandatory field.
username = onos
# (StrOpt) Password for authentication. This is a mandatory field.
password = rocks
3. Next step is to install and run OpenStack services. For DevStack users, use this sample DevStack local.conf to build OpenStack controller node. Make sure your DevStack branch is consistent with the OpenStack branches, "stable/mitaka" in this example.
local.conf of Controller Node
[[local|localrc]]
HOST_IP=10.134.231.28
SERVICE_HOST=10.134.231.28
RABBIT_HOST=10.134.231.28
DATABASE_HOST=10.134.231.28
Q_HOST=10.134.231.28

ADMIN_PASSWORD=nova
DATABASE_PASSWORD=$ADMIN_PASSWORD
RABBIT_PASSWORD=$ADMIN_PASSWORD
SERVICE_PASSWORD=$ADMIN_PASSWORD
SERVICE_TOKEN=$ADMIN_PASSWORD

DATABASE_TYPE=mysql

# Log
SCREEN_LOGDIR=/opt/stack/logs/screen

# Images
IMAGE_URLS="http://cloud-images.ubuntu.com/releases/14.04/release/ubuntu-14.04-server-cloudimg-amd64.tar.gz,http://www.planet-lab.org/cord/trusty-server-multi-nic.img"
FORCE_CONFIG_DRIVE=True

# Networks
Q_ML2_TENANT_NETWORK_TYPE=vxlan
Q_ML2_PLUGIN_MECHANISM_DRIVERS=onos_ml2
Q_PLUGIN_EXTRA_CONF_PATH=/opt/stack/networking-onos/etc
Q_PLUGIN_EXTRA_CONF_FILES=(conf_onos.ini)
ML2_L3_PLUGIN=networking_onos.plugins.l3.driver.ONOSL3Plugin
NEUTRON_CREATE_INITIAL_NETWORKS=False

# Services
enable_service q-svc
disable_service n-net
disable_service n-cpu
disable_service tempest
disable_service c-sch
disable_service c-api
disable_service c-vol

# Branches
GLANCE_BRANCH=stable/mitaka
HORIZON_BRANCH=stable/mitaka
KEYSTONE_BRANCH=stable/mitaka
NEUTRON_BRANCH=stable/mitaka
NOVA_BRANCH=stable/mitaka
If you use other deploy tools or build the controller node manually, please set the following configurations to Nova and Neutron configuration files. Set Neutron to use ONOS ML2 plugin and ONOS L3 service plugin.
/etc/neutron/neutron.conf
core_plugin = neutron.plugins.ml2.plugin.Ml2Plugin
service_plugins = networking_onos.plugins.l3.driver.ONOSL3Plugin
dhcp_agent_notification = False
/etc/neutron/plugins/ml2/ml2_conf.ini
[ml2]
tenant_network_types = vxlan
type_drivers = vxlan
mechanism_drivers = onos_ml2

[securitygroup]
enable_security_group = True
Set Nova to use config drive for metadata service, so that we don't need to launch Neutron metadata-agent. And of course, set to use Neutron for network service.
/etc/nova/nova.conf
[DEFAULT]
force_config_drive = True
network_api_class = nova.network.neutronv2.api.API
security_group_api = neutron

[neutron]
url = http://10.134.231.28:9696
auth_strategy = keystone
admin_auth_url = http://10.134.231.28:35357/v2.0
admin_tenant_name = service
admin_username = neutron
admin_password = [admin passwd]
Don't forget to specify conf_onos.ini when you start Neutron service.
/usr/bin/python /usr/local/bin/neutron-server --config-file /etc/neutron/neutron.conf --config-file /etc/neutron/plugins/ml2/ml2_conf.ini --config-file /opt/stack/networking-onos/etc/conf_onos.ini
Compute node
No special configurations are required for compute node other than setting network api to Neutron. For DevStack users, here's sample DevStack local.conf.
local.conf for Compute Node
[[local|localrc]]
HOST_IP=10.134.231.30
SERVICE_HOST=10.134.231.30
RABBIT_HOST=10.134.231.28
DATABASE_HOST=10.134.231.28

ADMIN_PASSWORD=nova
DATABASE_PASSWORD=$ADMIN_PASSWORD
RABBIT_PASSWORD=$ADMIN_PASSWORD
SERVICE_PASSWORD=$ADMIN_PASSWORD
SERVICE_TOKEN=$ADMIN_PASSWORD

DATABASE_TYPE=mysql

NOVA_VNC_ENABLED=True
VNCSERVER_PROXYCLIENT_ADDRESS=$HOST_IP
VNCSERVER_LISTEN=$HOST_IP

LIBVIRT_TYPE=kvm
# Log
SCREEN_LOGDIR=/opt/stack/logs/screen

# Services
ENABLED_SERVICES=n-cpu,neutron

# Branches
NOVA_BRANCH=stable/mitaka
KEYSTONE_BRANCH=stable/mitaka
NEUTRON_BRANCH=stable/mitaka
If your compute node is a VM, try http://docs.openstack.org/developer/devstack/guides/devstack-with-nested-kvm.html this first or set LIBVIRT_TYPE=qemu. Nested KVM is much faster than qemu, if possible.
For manual set ups, set Nova to use Neutron as a network API.
/etc/nova/nova.conf
[DEFAULT]
force_config_drive = always
network_api_class = nova.network.neutronv2.api.API
security_group_api = neutron

[neutron]
url = http://10.134.231.28:9696
auth_strategy = keystone
admin_auth_url = http://10.134.231.28:35357/v2.0
admin_tenant_name = service
admin_username = neutron
admin_password = [admin passwd]
Gateway node
No OpenStack service needs to be running on gateway nodes.
Node and ONOS-vRouter Setup
1. Push network-cfg.json after ONOS-SONA and OpenStack are ready, and check all COMPUTE type node state is COMPLETE with openstack-nodes command. Use openstack-node-check command for more detailed states of the node if it's INCOMPLETE. For GATEWAY type node, leave it in DEVICE_CREATED state. You'll need additional configurations explained later.
how to push network config
$ curl --user onos:rocks -X POST -H "Content-Type: application/json" http://10.134.231.29:8181/onos/v1/network/configuration/ -d @network-cfg.json
onos> openstack-nodes
hostname=compute-01, type=COMPUTE, managementIp=10.134.231.30, dataIp=10.134.34.222, intBridge=of:00000000000000a1, routerBridge=Optional.empty init=COMPLETE
hostname=compute-02, type=COMPUTE, managementIp=10.134.231.31, dataIp=10.134.34.223, intBridge=of:00000000000000a2, routerBridge=Optional.empty init=COMPLETE
hostname=gateway-01, type=GATEWAY, managementIp=10.134.231.32, dataIp=10.134.33.224, intBridge=of:00000000000000a3, routerBridge=Optional[of:00000000000000b1] init=DEVICE_CREATED
hostname=gateway-02, type=GATEWAY, managementIp=10.134.231.33, dataIp=10.134.33.225, intBridge=of:00000000000000a4, routerBridge=Optional[of:00000000000000b2] init=DEVICE_CREATED
Total 4 nodes
For your information, pushing network config file triggers reinitialization of all nodes at once. It's no harm to reinitialize COMPLETE state node. If you want to reinitialize only a particular compute node, use openstack-node-init command with hostname.
2. In GATEWAY type nodes, Quagga and additional ONOS instance for vRouter is required. Download and install Docker first.
$ curl -s https://get.docker.io/ubuntu/ | sudo sh
3. Download script to help setup gateway node.
$ git clone https://github.com/hyunsun/sona-setup.git
$ cd sona-setup
4. The first container is ONOS-vRouter. Refer to the guide(SONA Network Configuration Guide) and write a network configuration for vRouter. Name it to vrouter.json, place under sona-setup and run vrouter.sh script, which brings up ONOS container with vRouter application activated. There's a sample named "vrouter.json" under "sona-setup", and note that you don't need to put correct port numbers in the "Ports" section now (just leave it as it is in the sample file). We're going to fix the port numbers later in Step 7.
# modify vrouter.json
sona-setup$ vrouter.sh
sona-setup$ sudo docker ps
CONTAINER ID        IMAGE                  COMMAND                  CREATED             STATUS              PORTS                                    NAMES
e5ac67e62bbb        onosproject/onos:1.6   "./bin/onos-service"     9 days ago          Up 9 days           6653/tcp, 8101/tcp, 8181/tcp, 9876/tcp   onos-vrouter
5. Modify volumes/gateway/zebra.conf and volumes/gateway/bgpd.conf as you want. Here are samples of the config files. Note that fpm connection ip in zebra.conf should be the eth0 interface IP address of onos-vrouter container, assigned by Docker. Run Quagga container with those config files. The IP address comes with the command would be equals to router-id in bgpd.conf. Note that the MAC address passed together must be unique if you have multiple gateway nodes.
volumes/gateway/bgpd.conf
! -*- bgp -*-
!
! BGPd sample configuration file
!
!
hostname gateway-01
password zebra
!
router bgp 65101
  bgp router-id 172.18.0.254
  timers bgp 3 9
  neighbor 172.18.0.1 remote-as 65100
  neighbor 172.18.0.1 ebgp-multihop
  neighbor 172.18.0.1 timers connect 5
  neighbor 172.18.0.1 advertisement-interval 5
  network 172.27.0.0/24
!
log file /var/log/quagga/bgpd.log
volumes/gateway/zebra.conf
!
hostname gateway-01
password zebra
!
fpm connection ip 172.17.0.2 port 2620
$ ./quagga.sh --name=gateway-01 --ip=172.18.0.254/24 --mac=fe:00:00:00:00:01
If you check the result of ovs-vsctl show, there should be a new port named quagga on br-router bridge.
6. If there's no external router or emulation of it in your setup, add another Quagga container which acts as an external router. First, modify volumes/router/zebra.conf and volumes/router/bgpd.conf to make this Quagga an external router neighboring with the one created right before, and use the same command above but with additional argument --external-router option to bring up the router container. You can put any MAC address this time.
volumes/router/bgpd.conf
! -*- bgp -*-
!
! BGPd sample configuration file
!
!
hostname router-01
password zebra
!
router bgp 65100
  bgp router-id 172.18.0.1
  timers bgp 3 9
  neighbor 172.18.0.254 remote-as 65101
  neighbor 172.18.0.254 ebgp-multihop
  neighbor 172.18.0.254 timers connect 5
  neighbor 172.18.0.254 advertisement-interval 5
  neighbor 172.18.0.254 default-originate
!
log file /var/log/quagga/bgpd.log
volumes/router/zebra.conf
!
hostname router-01
password zebra
!
$ ./quagga.sh --name=router-01 --ip=172.18.0.1/24 --mac=fa:00:00:00:00:01 --external-router
If you check the result of ovs-vsctl show, there should be a new port named quagga-router on br-router bridge.
7. Once all the containers are up and running, check ports result from the ONOS-vRouter. If any port number does not match to the ones in vrouter.json, modify the config file with the correct port numbers, and just re-run the vrouter.sh. It actually happens often since you may re-create Quagga containers multiple times to fix the Quagga config files or for some other reasons, and OVS increases port number whenever a new port is added to a bridge.
$ ssh -p 8101 karaf@172.17.0.2
# password is karaf

onos> ports
id=of:00000000000000b1, available=true, role=MASTER, type=SWITCH, mfr=Nicira, Inc., hw=Open vSwitch, sw=2.5.0, serial=None, driver=softrouter, channelId=172.17.0.1:58292, managementAddress=172.17.0.1, name=of:00000000000000b1, protocol=OF_13
  port=local, state=disabled, type=copper, speed=0 , portName=br-router, portMac=e6:a0:79:f9:d1:4a
  port=1, state=enabled, type=copper, speed=0 , portName=patch-rout, portMac=fe:da:85:15:b1:bf
  port=24, state=enabled, type=copper, speed=10000 , portName=quagga, portMac=06:96:1b:36:32:77
  port=25, state=enabled, type=copper, speed=10000 , portName=quagga-router, portMac=ea:1e:71:d1:fd:81
    "apps" : {
        "org.onosproject.router" : {
            "router" : {
                "controlPlaneConnectPoint" : "of:00000000000000b1/24",
                "ospfEnabled" : "true",
                "interfaces" : [ "b1-1", "b1-2" ]
            }
        }
    },
    "ports" : {
        "of:00000000000000b1/25" : {
            "interfaces" : [
                {
                    "name" : "b1-1",
                    "ips"  : [ "172.18.0.254/24" ],
                    "mac"  : "fe:00:00:00:00:01"
                }
            ]
        },
        "of:00000000000000b1/1" : {
            "interfaces" : [
                {
                    "name" : "b1-2",
                    "ips"  : [ "172.27.0.254/24" ],
                    "mac"  : "fe:00:00:00:00:01"
                }
            ]
        }
    },
    "hosts" : {
        "fe:00:00:00:00:02/-1" : {
            "basic": {
                "ips": ["172.27.0.1"],
                "location": "of:00000000000000b1/1"
            }
        }
    }
Line 4: Device ID and port number of the port with portName=quagga -> controlPlaneConnectPoint
Line 11: Device ID and port number of the port with portName=quagga-router or other actual uplink port
If you have a floating range, 172.27.0.0/24 in this example, check the following configurations also.
Line 20: (optional interface config for floating IP address range) Device ID and port number of the port with portName=patch-rout
Line 34: (optional interface config for floating IP gateway) Device ID and port number of the port with portName=patch-rout
Once you fix the vrouter.json file, re-create onos-vrouter container with the updated configuration. vrouter.sh script will take care of removing the existing container.
sona-setup$ vrouter.sh
8. If everything's right, check fpm-connections, hosts and routes. 172.18.0.1 is the external default gateway in this example. If you added interface and host for floating IP range, you should be able to see the host in the list.
onos> hosts
id=FA:00:00:00:00:01/None, mac=FA:00:00:00:00:01, location=of:00000000000000b1/25, vlan=None, ip(s)=[172.18.0.1]
id=FE:00:00:00:00:01/None, mac=FE:00:00:00:00:01, location=of:00000000000000b1/24, vlan=None, ip(s)=[172.18.0.254]
id=FE:00:00:00:00:02/None, mac=FE:00:00:00:00:02, location=of:00000000000000b1/1, vlan=None, ip(s)=[172.27.0.1], name=FE:00:00:00:00:02/None

onos> fpm-connections
172.17.0.2:52332 connected since 6m ago

onos> next-hops
ip=172.18.0.1, mac=FA:00:00:00:00:01, numRoutes=1

onos> routes
Table: ipv4
   Network            Next Hop
   0.0.0.0/0          172.18.0.1
   Total: 1

Table: ipv6
   Network            Next Hop
   Total: 0
9. Add route for floating IP range manually and check the route is added.
onos> route-add 172.27.0.0/24 172.27.0.1
onos> routes
Table: ipv4
   Network            Next Hop
   0.0.0.0/0          172.18.0.1
   172.27.0.0/24      172.27.0.1
   Total: 2

Table: ipv6
   Network            Next Hop
   Total: 0

onos> next-hops
ip=172.18.0.1, mac=FA:00:00:00:00:01, numRoutes=1
ip=172.27.0.1, mac=FE:00:00:00:00:02, numRoutes=1
10. Now you should be able to see the gateway node is in COMPLETE state when you re-trigger node initialization. You can either run command openstack-node-init gateway-01 or push the network configuration file again.
onos> openstack-node-init gateway-01
onos> openstack-node-init gateway-02
Or
how to push network config
$ curl --user onos:rocks -X POST -H "Content-Type: application/json" http://10.134.231.29:8181/onos/v1/network/configuration/ -d @network-cfg.json
onos> openstack-nodes
hostname=compute-01, type=COMPUTE, managementIp=10.134.231.30, dataIp=10.134.34.222, intBridge=of:00000000000000a1, routerBridge=Optional.empty init=COMPLETE
hostname=compute-02, type=COMPUTE, managementIp=10.134.231.31, dataIp=10.134.34.223, intBridge=of:00000000000000a2, routerBridge=Optional.empty init=COMPLETE
hostname=gateway-01, type=GATEWAY, managementIp=10.134.231.32, dataIp=10.134.33.224, intBridge=of:00000000000000a3, routerBridge=Optional[of:00000000000000b1] init=COMPLETE
hostname=gateway-02, type=GATEWAY, managementIp=10.134.231.33, dataIp=10.134.33.225, intBridge=of:00000000000000a4, routerBridge=Optional[of:00000000000000b2] init=COMPLETE
Total 4 nodes
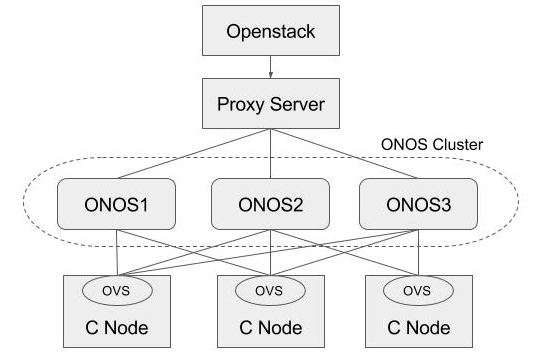
HA Setup
Basically, ONOS itself provides HA by default when there are multiple instances in the cluster. This section describes how to add a proxy server beyond the ONOS cluster, and make use of it in Neutron as a single access point of the cluster. For the proxy server, we used the HA proxy server (http://www.haproxy.org) here.
Install HA proxy
$ sudo add-apt-repository -y ppa:vbernat/haproxy-1.5
$ sudo add-apt-repository -y ppa:vbernat/haproxy-1.5
$ sudo apt-get update
$ sudo apt-get install -y haproxy
Configure HA proxy
/etc/haproxy/haproxy.cfg
global
    log /dev/log    local0
    log /dev/log    local1 notice
    chroot /var/lib/haproxy
    stats socket /run/haproxy/admin.sock mode 660 level admin
    stats timeout 30s
    user haproxy
    group haproxy
    daemon

    # Default SSL material locations
    ca-base /etc/ssl/certs
    crt-base /etc/ssl/private

    # Default ciphers to use on SSL-enabled listening sockets.
    # For more information, see ciphers(1SSL). This list is from:
    #  https://hynek.me/articles/hardening-your-web-servers-ssl-ciphers/
    ssl-default-bind-ciphers ECDH+AESGCM:DH+AESGCM:ECDH+AES256:DH+AES256:ECDH+AES128:DH+AES:ECDH+3DES:DH+3DES:RSA+AESGCM:RSA+AES:RSA+3DES:!aNULL:!MD5:!DSS
    ssl-default-bind-options no-sslv3

defaults
    log global
    mode    http
    option  httplog
    option  dontlognull
        timeout connect 5000
        timeout client  50000
        timeout server  50000

    errorfile 400 /etc/haproxy/errors/400.http
    errorfile 403 /etc/haproxy/errors/403.http
    errorfile 408 /etc/haproxy/errors/408.http
    errorfile 500 /etc/haproxy/errors/500.http
    errorfile 502 /etc/haproxy/errors/502.http
    errorfile 503 /etc/haproxy/errors/503.http
    errorfile 504 /etc/haproxy/errors/504.http

frontend localnodes
        bind *:8181
        mode http
        default_backend nodes

backend nodes
        mode http
        balance roundrobin
        option forwardfor
        http-request set-header X-Forwarded-Port %[dst_port]
        http-request add-header X-Forwarded-Proto https if { ssl_fc }
        option httpchk GET /onos/ui/login.html
        server web01 [onos-01 IP address]:8181 check
        server web02 [onos-02 IP address]:8181 check
        server web03 [onos-03 IP address]:8181 check

listen stats *:1936
    stats enable
    stats uri /
    stats hide-version
    stats auth someuser:password
Configure Neutron
Set url_path to point to the proxy server in Neutron ML2 ONOS mechanism driver configuration and restart Neutron.
networking-onos/etc/conf_onos.ini
# Configuration options for ONOS ML2 Mechanism driver
[onos]
# (StrOpt) ONOS ReST interface URL. This is a mandatory field.
url_path = http://[proxy-server IP]:8181/onos/openstackswitching
# (StrOpt) Username for authentication. This is a mandatory field.
username = onos
# (StrOpt) Password for authentication. This is a mandatory field.
password = rocks
Test HA
Stop one of the ONOS instance and check everything works fine.
$ onos-service $OC1 stop
Scale Out Nodes
Scale out compute or gateway node is easy. Just add the new node to the SONA network config and update the config to the ONOS-SONA.
CLI Commands
| Command | Usage | Description |
|---|---|---|
| openstack-nodes | openstack-nodes | Shows the list of compute and gateway nodes that registered to openstack node service |
| openstack-node-check | openstack-node-check [hosthame] | Shows the state of each node bootstrap steps |
| openstack-node-init | openstack-node-init [hostname] | Try to re-initialize a given node. It's no harm to re-initialize already in COMPLETE state. |