Due to a ransomware attack, the wiki was reverted to a July 2022 version. . We apologize for the lack of a more recent valid backup.
Welcome to the Packet-Optical ONOS tutorial!!!
In this tutorial, you’ll complete a set of exercises designed to explain the main concepts of packet-Optical use case of ONOS. We hope that with this tutorial, you’ll be able to create, configure and start multi-layer networks on your environment, which can potentially represent close to a real environment for your application performance studies.
To get you started quickly, this tutorial is distributed as a preconfigured virtual machine with the needed software. Just run the VM in VirtualBox using the instructions in the next section.
- 2Introduction
- 3Setup Your Environment
- 4Learning to Fly (Examples)
- 2Introduction
- 3Setup Your Environment
- 4Learning to Fly (Examples)
Introduction
Prerequisite
You will need a computer with at least 8GB of RAM such that you can dedicate 4 Gig to your packet-optical VM and at least 5GB of free hard disk space. A faster processor or solid-state drive will speed up the virtual machine boot time, and a larger screen will help to manage multiple terminal windows.
The computer can run Windows, Mac OS X, or Linux – all work fine with VirtualBox, the only software requirement.
To install VirtualBox, you will need administrative access to the machine.
The tutorial instructions requires some prior knowledge of SDN in general, and OpenFlow and Mininet in particular. So please first complete the OpenFlow tutorial and the Mininet walkthrough.
Since Packet-Optical use case of ONOS we highly recommend to complete ONOS tutorial too.
OOPs? Found a bug? Questions?
Email us (onos-discuss@onosproject.org) if you’re stuck, think you’ve found a bug, or just want to send some feedback.
Please have a look at the guidelines to learn how to efficiently submit a bug report.
Setup Your Environment
Install required software
You will need to acquire two files: a VirtualBox installer and the Tutorial VM (Link TBD) .
After you have downloaded VirtualBox, install it, then go to the next section to verify that the VM is working on your system.
Import pre-configured Virtual Machine
Start up VirtualBox, then select Machine>New, give it a name, and select Linux as type and Ubuntu (64 bit) as version. Press Continue.
Next, configure the VM with 2 GB (2048 MB) of memory. ( If you are going to run the bigger topology, Configure the VM with 4 GM ( 4096) of memory, Press Continue.
Select ‘Use an existing virtual hard drive file’, and point it to the vmdk file you downloaded Select Create. Note you can also import .OVA instead.
Now you can start the VM by double clicking it; once it starts you can login with user "sdn" and password "rocks".
After some time you should see the desktop view for Ubuntu. You can open a terminal by double clicking Terminal.
Packet-Optical Topology Spin-Off (via Python-Script)
cd ~/mininet/examples
You should have a file that contain the packet-optical topology sample " opticalTest.py ". This file is a python script which automatically creates the following topology:
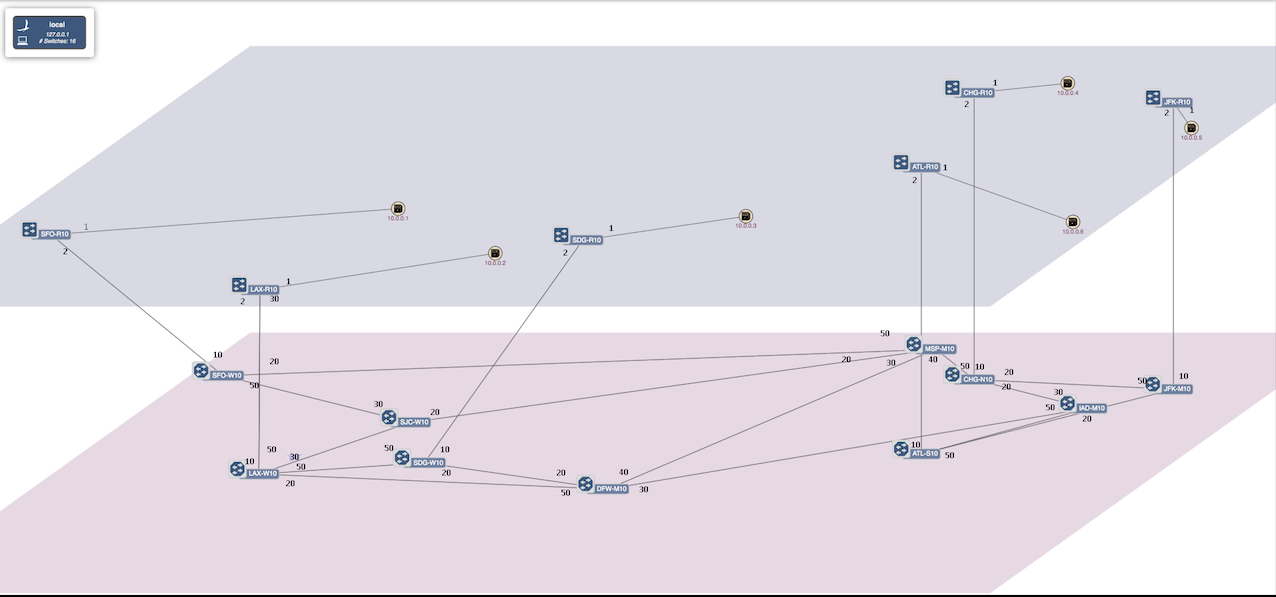
As shown the topology contains 6 packet nodes and 10 optical nodes. Each packet node is attached to a host designated as data center.
Start Mininet
Start ONOS
Learning to Fly (Examples)
Network Topology Manipulation & Updates (How you can modify the Python and Explain the Topology, Interfaces, Hosts)
Hosts / Data Centers attached to Packet Networks
Packet nodes interconnected with Optical nodes
Traffic between the data centers
Setting up Connection between data centers
GUI , CLI Options
Causing Failure at Optical Layer
Causing Failures at Packet Layer
Changing to a much bigger Topology