Due to a ransomware attack, the wiki was reverted to a July 2022 version. . We apologize for the lack of a more recent valid backup.
...
| Code Block | ||
|---|---|---|
| ||
$ netstat -ntl Active Internet connections (only servers) Proto Recv-Q Send-Q Local Address Foreign Address State tcp 0 0 0.0.0.0:22 0.0.0.0:* LISTEN tcp 0 0 0.0.0.0:6640 0.0.0.0:* LISTEN tcp6 0 0 :::22 |
2. Check your OVSDB is cleanOVSDB. It is okay If there's a bridge with name "br-int", but note that CORD-VTN will add or update its controller, DPID, and fail mode.
| Code Block |
|---|
$ sudo ovs-vsctl show
cedbbc0a-f9a4-4d30-a3ff-ef9afa813efb
ovs_version: "2.3.0" |
...
| Code Block | ||
|---|---|---|
| ||
{
    "apps" : {
        "org.onosproject.cordvtn" : {
            "cordvtn" : {
                "privateGatewayMac" : "00:00:00:00:00:01",
                "publicGateways" : [
                    {
                        "gatewayIp" : "207.141.192.158",
                        "gatewayMac" : "a4:23:05:34:56:78"
                    }
                ],
                "localManagementIp" : "172.27.0.1/24",
                "ovsdbPort" : "6640",
                "sshPort" : "22",
                "sshUser" : "hyunsun",
                "sshKeyFile" : "/home/hyunsun/.ssh/id_rsa",
                "nodes" : [
                    {
                        "hostname" : "compute-01",
                        "hostManagementIp" : "10.55.25.244/24",
                        "dataPlaneIp" : "10.134.34.222/16",
                        "dataPlaneIntf" : "eth1",
                        "bridgeId" : "of:0000000000000001"
                     },
                     {
                        "hostname" : "compute-02",
                        "hostManagementIp" : "10.241.229.42/24",
                        "dataPlaneIp" : "10.134.34.223/16",
                        "dataPlaneIntf" : "eth1",
                        "bridgeId" : "of:0000000000000002"
                     }
                ]
            }
        },
       "org.onosproject.openstackinterface" : {
            "openstackinterface" : {
                 "do_not_push_flows" : "true",
                 "neutron_server" : "http://10.243.139.46:9696/v2.0/",
                 "keystone_server" : "http://10.243.139.46:5000/v2.0/",
                 "user_name" : "admin",
                 "password" : "nova"
            }
        }
    }
} |
...
First, create a network through OpenStack Horizon or OpenStack CLI. Network name should include one of the following five network types. You may choose anyone right now, except for the management network, it has special purpose.
- private : network for VM to VM communication
- public : network for VM to external network communication, note that the gateway IP and MAC address of this network should be specified in "publicGateways" field in network-cfg.json
- management : network for VM to compute node communication, where the VM is running. Note that subnet for this network should be the same specified in "localManagementIp" field in network-cfg.json
- private
- private_direct
- private_indirect
- public_direct
- public_indirect
- management
| Code Block | ||||
|---|---|---|---|---|
| ||||
$ neutron net-create net-A-private $ neutron subnet-create net-A-private 10.0.0.0/24 |
...
You can access VM through Horizon Web Console, virsh console with some tricks(https://github.com/hyunsun/documentations/wiki/Access-OpenStack-VM-through-virsh-console) or if you setup "Local Management Network" part, you can SSH to VM from the a compute node where the VM is running.
Now, test VMs can ping to each other.
...
| Widget Connector | ||
|---|---|---|
|
With XOS
[TODO]
Local Management Network
If you need to SSH to VM directly from compute node, just create and attach the management network to a VM as a second network interface. Management network name should include "management".
...
Internet Access from VM (only for test)
If you want to access a VM through SSH or access the Internet from VM without fabric controller and vRouter, you need to do setup the followings in your compute node. Basically, this settings mimics fabric switch and vRouter inside a compute node, that is, "fabric" bridge corresponds to fabric switch and Linux routing tables corresponds to vRouter. You'll need at least two physical interface for this test setup.
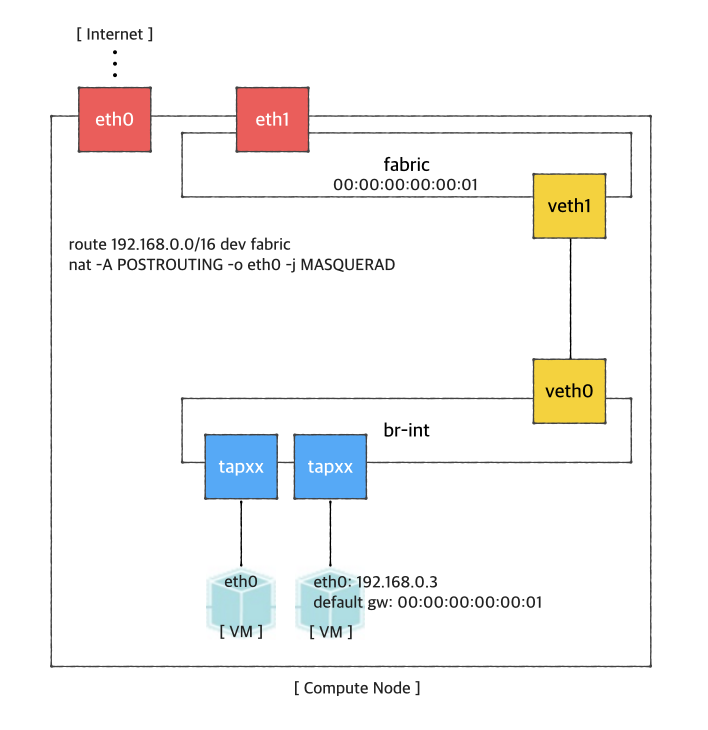
First, you'd create a bridge named "fabric" (it doesn't have to be fabric).
| Code Block | ||
|---|---|---|
| ||
$ sudo brctl addbr fabric |
And create Create a veth pair . and set veth0 will be used as a a "dataPlaneIntf" in in network-cfccfg.json now.
| Code Block |
|---|
| ||
$ ip link add veth0 type veth peer name veth1 |
Now, add veth1 and the actual physical interface
for VM data, eth1 here in example,
toto the fabric bridge.
| Code Block | ||
|---|---|---|
| ||
$ sudo brctl addif fabric veth1
$ sudo brctl addif fabric eth1
$ sudo brctl show
bridge name bridge id       STP enabled interfaces
fabric      8000.000000000001   no      eth1
|
|
veth1 |
Set fabric bridge MAC address to the virtual gateway MAC address, which is "privateGatewayMac" in network-cfg.json.
Check the physical interface MAC address and set the address to br-int. And br-int also have to have "dataPlaneIp" address specified in network-cfg.json.
| Code Block | ||
|---|---|---|
| ||
$ sudo ip link set address 04:01:6b:50:75:02 dev br-int
$ sudo ip addr add 10.134.34.222/16 dev br-int |
Set fabric bridge MAC address to the virtual gateway MAC address. Since you don't have vRouter, set any MAC address and just put the same address to "gatewayMac" field of network-cfg.json described in "ONOS Settings" part.
| Code Block | ||
|---|---|---|
| ||
$ sudo ip link set address 00:00:00:00:00:01 dev fabric
$ sudo ip link set address 00:00:00:00:00:01 dev eth1 |
Now, add routes of your virtual network IP ranges and NAT rules.
| Code Block | ||
|---|---|---|
| ||
$ sudo route add -net 192.168.0.0/16 dev fabric $ sudo netstat -rn Kernel IP routing table Destination Gateway Genmask Flags MSS Window irtt Iface 0.0.0.0 45.55.0.1 0.0.0.0 UG 0 0 0 eth0 45.55.0.0 0.0.0.0 255.255.224.0 U 0 0 0 eth0 192.168.0.0 0.0.0.0 255.255.0.0 U 0 0 0 fabric $ sudo iptables -A FORWARD -d 192.168.0.0/16 -j ACCEPT $ sudo iptables -A FORWARD -s 192.168.0.0/16 -j ACCEPT $ sudo iptables -t nat -A POSTROUTING -o eth0 -j MASQUERADE |
And You should enable ip_forward, of course.
| Code Block | ||
|---|---|---|
| ||
$ sudo sysctl net.ipv4.ip_forward=1 |
It's ready. Make sure all
interface isinterfaces are activated and able to ping to
"localIP" ofthe other compute nodes with "hostManagementIp".
| Code Block |
|---|
$ sudo ip link set br-int up
$ sudo ip link set veth0 up
$ sudo ip link set veth1 up
$ sudo ip link set fabric up |