Due to a ransomware attack, the wiki was reverted to a July 2022 version. . We apologize for the lack of a more recent valid backup.
| Warning | ||
|---|---|---|
| ||
This page is obsolete and will be removed soon, please see https://wiki.opencord.org/display/CORD/VTN+Developer+Information instead. |
You will
| Note |
|---|
This page explains how to set up and use the CORD-VTN service manually. It is possible to test CORD-VTN without XOS, but it is recommended to set up CORD-VTN with XOS. This link https://github.com/open-cloud/xos/blob/master/xos/configurations/cord-pod/README.md would be helpful if you're going to build whole CORD test environment. |
You will need:
- An ONOS cluster installed and running (see ONOS documentation to get to this point)running
- An OpenStack OpenStack service installed and running (detailed OpenStack configurations are described "stable/mitaka" version is used here)
- An XOS installed and running (optional if you need to test CORD VTN functionalities only, not the other CORD services)
...
...
Note that CORD reference implementation assumes that all control services including ONOS, OpenStack and XOS run on the one single "head node".
Architecture
The high level architecture of the system is shown in the following figure.
...
- Bootstraps OVS and "br-int" interface in a compute node to be controlled by ONOS and CORD-VTN properly
- Provides a basic connectivity among all VMs in the same service(i.e. same Neutron network).
- Provides an external connectivity to a VM with public type of service network.
- Provides a local management connectivity, which is a limited connection between a VM and compute node.
- Provides a service dependency between two services. It guarantees forwarding all traffics from 'service A', which is tenant service, to one of the VM of 'service B', which is provider service.
- Provides WAN and LAN connectivities for vSG container.
- Provides APR ARP and DHCP proxy for the virtual networks.
...
Let's install networking-onos (Neutron ML2 plugin for ONOS) first.
| Code Block | ||
|---|---|---|
| ||
$ gitmkdir clone-p https://github.com/opt/stack && cd /opt/stack $ git clone https://github.com/openstack/networking-onos.git $ cd networking-onos $ sudo python setup.py install |
...
Specify ONOS access information. You may want to copy the config file to /etc/neutron/plugins/ml2/ where the other Neutron configuration files are.
| Code Block | ||||
|---|---|---|---|---|
| ||||
# Configuration options for ONOS ML2 Mechanism driver [onos] # (StrOpt) ONOS ReST interface URL. This is a mandatory field. url_path = http://onos.instance.ip.addr:8181/onos/cordvtn # (StrOpt) Username for authentication. This is a mandatory field. username = onos # (StrOpt) Password for authentication. This is a mandatory field. password = rocks |
...
For DevStack users, use this sample DevStack local.conf to build OpenStack controller node. Make sure your DevStack branch is consistent with the OpenStack branches, "stable/mitaka" in this example.
| Code Block | ||
|---|---|---|
| ||
[[local|localrc]] HOST_IP=10.134.231.28 SERVICE_HOST=10.134.231.28 RABBIT_HOST=10.134.231.28 DATABASE_HOST=10.134.231.28 Q_HOST=10.134.231.28 ADMIN_PASSWORD=nova DATABASE_PASSWORD=$ADMIN_PASSWORD RABBIT_PASSWORD=$ADMIN_PASSWORD SERVICE_PASSWORD=$ADMIN_PASSWORD SERVICE_TOKEN=$ADMIN_PASSWORD DATABASE_TYPE=mysql # Log SCREEN_LOGDIR=/opt/stack/logs/screen # Images IMAGE_URLS="http://cloud-images.ubuntu.com/releases/precise14.04/release/ubuntu-1214.04-server-cloudimg-amd64.tar.gz" FORCE_CONFIG_DRIVE=always NEUTRON_CREATE_INITIAL_NETWORKS=False ,http://www.planet-lab.org/cord/trusty-server-multi-nic.img" FORCE_CONFIG_DRIVE=True # Networks Q_ML2_TENANT_NETWORK_TYPE=vxlan Q_ML2_PLUGIN_MECHANISM_DRIVERS=onos_ml2 Q_PLUGIN_EXTRA_CONF_PATH=/opt/stack/networking-onos/etc Q_PLUGIN_EXTRA_CONF_FILES=(conf_onos.ini) NEUTRON_CREATE_INITIAL_NETWORKS=False # Services enable_service q-svc disable_service n-net disable_service n-cpu disable_service tempest disable_service c-sch disable_service c-api disable_service c-vol # Branches GLANCE_BRANCH=stable/mitaka HORIZON_BRANCH=stable/mitaka KEYSTONE_BRANCH=stable/mitaka NEUTRON_BRANCH=stable/mitaka NOVA_BRANCH=stable/mitaka |
If you use other deploy tools or build the controller node manually, please set the following configurations to Nova and Neutron configuration files.
...
| Code Block | ||||
|---|---|---|---|---|
| ||||
core_plugin = neutron.plugins.ml2.plugin.Ml2Plugin dhcp_agent_notification = falseFalse |
| Code Block | ||
|---|---|---|
| ||
[ml2] tenant_network_types = vxlan type_drivers = vxlan mechanism_drivers = onos_ml2 [securitygroup] enable_security_group = True |
...
| Code Block | ||
|---|---|---|
| ||
[DEFAULT] force_config_drive = alwaysTrue network_api_class = nova.network.neutronv2.api.API security_group_api = neutron [neutron] url = http://[controller_ip]:9696 auth_strategy = keystone admin_auth_url = http://[controller_ip]:35357/v2.0 admin_tenant_name = service admin_username = neutron admin_password = [admin passwd] |
...
| Code Block | ||
|---|---|---|
| ||
[[local|localrc]] HOST_IP=10.134.231.30 <-- local IP SERVICE_HOST=162.243.x.x <-- controller IP, must be reachable from your test browser for console access from Horizon RABBIT_HOST=10.134.231.28 DATABASE_HOST=10.134.231.28 ADMIN_PASSWORD=nova DATABASE_PASSWORD=$ADMIN_PASSWORD RABBIT_PASSWORD=$ADMIN_PASSWORD SERVICE_PASSWORD=$ADMIN_PASSWORD SERVICE_TOKEN=$ADMIN_PASSWORD DATABASE_TYPE=mysql NOVA_VNC_ENABLED=True VNCSERVER_PROXYCLIENT_ADDRESS=$HOST_IP VNCSERVER_LISTEN=$HOST_IP LIBVIRT_TYPE=kvm # Log SCREEN_LOGDIR=/opt/stack/logs/screen # ImagesServices IMAGEENABLED_URLS="http://cloud-images.ubuntu.com/releases/precise/release/ubuntu-12.04-server-cloudimg-amd64.tar.gz" LIBVIRT_TYPE=kvm # Services ENABLED_SERVICES=n-cpu,neutronSERVICES=n-cpu,neutron # Branches NOVA_BRANCH=stable/mitaka KEYSTONE_BRANCH=stable/mitaka NEUTRON_BRANCH=stable/mitaka |
| Note |
|---|
If your compute node is a VM, try http://docs.openstack.org/developer/devstack/guides/devstack-with-nested-kvm.html this first or set |
...
Additional compute node setup
1. Set OVSDB Make sure your OVS version is 2.3.0 or later.
2. Set OVSDB listening mode in your compute nodes. There are two ways.
| Code Block |
|---|
$ ovs-appctl -t ovsdb-server ovsdb-server/add-remote ptcp:6640:host_ip |
...
| Code Block |
|---|
$ sudo ovs-vsctl show
cedbbc0a-f9a4-4d30-a3ff-ef9afa813efb
ovs_version: "2.3.0" |
3. Make sure that ONOS user(sdn by default) can Should be able to SSH from ONOS instance to compute nodes with key.
...
Add the following configurations to your ONOS network-cfg.json. If you don't have fabric controller and vRouter setups, you may want to read "SSH to VM/Internet Access Internet from VM" part also before creating network-cfg.json file. One assumption here is that all compute nodes have the same configurations for OVSDB port, SSH port, and account for SSH.
...
| Code Block | ||
|---|---|---|
| ||
{
    "apps" : {
        "org.onosproject.cordvtn" : {
            "cordvtn" : {
                "privateGatewayMac" : "00:00:00:00:00:01",
                "publicGateways" : [
                    {
                        "gatewayIp" : "20710.141.192.158",
                        "gatewayMac" : "a4:23:05:34:56:78"
                    }
                ],
                "localManagementIp" : "172.27.0.1/24",
                "ovsdbPort" : "6640",
                "ssh" : {
                    "sshPort" : "22",
                    "sshUser" : "hyunsunroot",
                    "sshKeyFile" : "~/.ssh/id_rsa"
                },
                "openstack" : {
                    "endpoint" : "http://10.243.139.46:5000/v2.0/",
                    "tenant" : "admin",
                    "user" : "admin",
                    "password" : "nova"
                },
                "nodesxos" : [{
                    {
"endpoint"   : "http://10.55.30.16:80",
                     "hostnameuser" : "compute-01padmin@vicci.org",
                        "hostManagementIppassword" : "10.55.25.244/24",
letmein"
                },
          "dataPlaneIp" : "10.134.34.222/16",
    "nodes" : [
                  "dataPlaneIntf" : "eth1",{
                        "bridgeIdhostname" : "of:0000000000000001"compute-01",
                     }   "hostManagementIp" : "10.55.25.244/24",
                       { "dataPlaneIp" : "10.134.34.222/16",
                        "hostnamedataPlaneIntf" : "compute-02"veth0",
                        "hostManagementIpbridgeId" : "10.241.229.42/24",of:0000000000000001"
                        "dataPlaneIp" : "10.134.34.223/16"},
                        "dataPlaneIntf" : "eth1",{
                        "bridgeIdhostname" : "of:0000000000000002"compute-02",
                     }
   "hostManagementIp" : "10.241.229.42/24",
           ]
            }
 "dataPlaneIp"       }
    }
}: "10.134.34.223/16",
                        "dataPlaneIntf" : "veth0",
                        "bridgeId" : "of:0000000000000002"
                     }
                ]
            }
        }
    }
} |
Set your ONOS to activate the following applications.
...
You can skip this part if you want to test CORD VTN features only and manually by creating network and VM via OpenStack CLI or dashboard.
1. Install Docker, httpie, and OpenStack CLIs
Make sure your OpenStack has "trusty-server-multi-nic" image(http://www.planet-lab.org/cord/trusty-server-multi-nic.img) before you start.
1. Install Docker, httpie, and OpenStack CLIs
| Code Block |
|---|
root@xos # curl -s https://get.docker. |
| Code Block |
root@xos # curl -s https://get.docker.io/ubuntu/ | sudo sh

root@xos # apt-get install -y httpie
root@xos # pip install --upgrade httpie

root@xos # apt-get install -y python-keystoneclient python-novaclient python-glanceclient python-neutronclient |
2. Download XOS
| Code Block |
|---|
root@xos # git clone https://github.com/open-cloud/xos.git |
3. Set correct OpenStack information to xos/xos/configurations/cord-pod/admin-openrc.sh. Note that you should set all OpenStack controller IP not hostname since inside the XOS container, the hostname is not configured.
| Code Block | ||||
|---|---|---|---|---|
| ||||
export OS_TENANT_NAME=admin export OS_USERNAME=admin export OS_PASSWORD=nova export OS_AUTH_URL=http://controller10.243.139.46:35357/v2.0 |
4. Change "onos-cord" in xosin xos/xos/configurations/cord-pod/vtn-external.yaml to ONOS instance IP address for the same reason in step 3.
| Code Block | ||||
|---|---|---|---|---|
| ||||
    service_ONOS_VTN:
      type: tosca.nodes.ONOSService
      requirements:
      properties:
          kind: onos
          view_url: /admin/onos/onosservice/$id$/
          no_container: true
rest_hostname: 10.203.255.221 --> change this line |
5. Copy the SSH keys under xos/xos/configurations/cord-pod/
- id_rsa[.pub]: A keypair that will be used by the various services
- node_key: A private key that allows root login to the compute nodes
6. Run make
Second make command will re-configure ONOS and you have to post network-cfg.json again. You should be able to see ONOS is reconfigured by XOS when it's done with the second make command.
| Code Block |
|---|
root@xos ~/xos/xos/configurations/cord-pod # make root@xos ~/xos/xos/configurations/cord-pod # make vtn |
How To Test
Before you start
Once OpenStack and ONOS with CORD VTN app are started successfully, you'd better check the compute nodes are ready.
1. Check your ONOS instance IPs are correctly set to the management IP. It should be accessible from compute nodes.
| Code Block |
|---|
onos> nodes
id=10.203.255.221, address=159.203.255.221:9876, state=ACTIVE, updated=21h ago *
id=10.243.151.127, address=162.243.151.127:9876, state=ACTIVE, updated=21h ago
id=10.199.96.13, address=198.199.96.13:9876, state=ACTIVE, updated=21h ago |
2. Check your compute nodes are registered to CordVtn service and in init COMPLETE state.
| Code Block | ||||
|---|---|---|---|---|
| ||||
onos> cordvtn-nodes
hostname=compute-01, hostMgmtIp=10.55.25.244/24, dpIp=10.134.34.222/16, br-int=of:0000000000000001, dpIntf=eth1, init=COMPLETE
hostname=compute-02, hostMgmtIp=10.241.229.42/24, dpIp=10.134.34.223/16, br-int=of:0000000000000002, dpIntf=eth1, init=INCOMPLETE
Total 2 nodes |
If the nodes listed in your network-cfgf.json do not show in the result, try to push network-cfg.json to ONOS with REST API.
| Code Block |
|---|
curl --user onos:rocks -X POST -H "Content-Type: application/json" http://onos-01:8181/onos/v1/network/configuration/ -d @network-cfg.json |
If all the nodes are listed but some of them are in "INCOMPLETE" state, check what is the problem with it and fix it.
Once you fix the problem, push the network-cfg.json again to trigger init for all nodes(it is no harm to init COMPLETE state nodes again) or use "cordvtn-node-init" command.
| Code Block | ||||
|---|---|---|---|---|
| ||||
onos> cordvtn-node-check compute-01
Integration bridge created/connected : OK (br-int)
VXLAN interface created : OK
Data plane interface added : OK (eth1)
IP flushed from eth1 : OK
Data plane IP added to br-int : NO (10.134.34.222/16)
Local management IP added to br-int : NO (172.27.0.1/24)

(fix the problem if there's any)

onos> cordvtn-node-init compute-01

onos> cordvtn-node-check compute-01
Integration bridge created/connected : OK (br-int)
VXLAN interface created : OK
Data plane interface added : OK (eth1)
IP flushed from eth1 : OK
Data plane IP added to br-int : OK (10.134.34.222/16)
Local management IP added to br-int : OK (172.27.0.1/24) |
3. Make sure all virtual switches on compute nodes are added and available in ONOS.
| Code Block |
|---|
onos> devices
id=of:0000000000000001, available=true, role=MASTER, type=SWITCH, mfr=Nicira, Inc., hw=Open vSwitch, sw=2.0.2, serial=None, managementAddress=compute.01.ip.addr, protocol=OF_13, channelId=compute.01.ip.addr:39031
id=of:0000000000000002, available=true, role=STANDBY, type=SWITCH, mfr=Nicira, Inc., hw=Open vSwitch, sw=2.0.2, serial=None, managementAddress=compute.02.ip.addr, protocol=OF_13, channelId=compute.02.ip.addr:44920 |
| Note |
|---|
During the initialization process, OVSDB devices can be shown, for example ovsdb:10.241.229.42, when you list devices in your ONOS. Once it's done with node initialization, these OVSDB devices are removed and only OpenFlow devices are shown. |
Now, it's ready.
Without XOS
You can test creating service networks and service chaining manually, that is, without XOS.
1. Test VMs in a same network can talk to each other
First, create a network through OpenStack Horizon or OpenStack CLI. Network name should include one of the following five network types.
...
| Code Block | ||||
|---|---|---|---|---|
| ||||
$ neutron net-create net-A-private
$ neutron subnet-create net-A-private 10.0.0.0/24 |
To access VM through SSH, you may want to create SSH key first and pass the --key-name when you create a VM, or the following script as a --user-data, which sets password of "ubuntu" account to "ubuntu" so that you can login to VM through console. Anyway, creating and accessing a VM is the same with usual OpenStack usage.
| Code Block |
|---|
#cloud-config
password: ubuntu
chpasswd: { expire: False }
ssh_pwauth: True |
Now create VMs with the network you created. (don't forget to add --key-name or --user-data if you want to login to VM)
| Code Block | ||||
|---|---|---|---|---|
| ||||
$ nova boot --image f04ed5f1-3784-4f80-aee0-6bf83912c4d0 --flavor 1 --nic net-id=aaaf70a4-f2b2-488e-bffe-63654f7b8a82 net-A-vm-01 |
You can access VM through Horizon Web Console, virsh console with some tricks(https://github.com/hyunsun/documentations/wiki/Access-OpenStack-VM-through-virsh-console) or if you setup "Local Management Network" part, you can SSH to VM from a compute node where the VM is running.
Now, test VMs can ping to each other.
2. Test VMs in a different network cannot talk to each other
Create another network, for example net-B-private, and create another VM with the network. Now, test the VM cannot ping to the network net-A-private.
3. Test service chaining
Enable ip_forward in your VMs.
| Code Block | ||
|---|---|---|
| ||
$ sudo sysctl net.ipv4.ip_forward=1 |
Create service dependency with the following REST API.
| Code Block | ||
|---|---|---|
| ||
$ curl -X POST -u onos:rocks -H "Content-Type:application/json" http://[onos_ip]:8181/onos/cordvtn/service-dependency/[net-A-UUID]/[net-B-UUID]/b |
Now, ping from net-A-private VM to gateway IP address of net-B. There will not be a reply but if you tcpdump in net-B-private VMs, you can see one of the VMs in net-B-private gets the packets from net-A-private VM. To remove the service dependency, send another REST call with DELETE.
| Code Block |
|---|
$ curl -X DELETE -u onos:rocks -H "Content-Type:application/json" http://[onos_ip]:8181/onos/cordvtn/service-dependency/[net-A-UUID]/[net-B-UUID] |
Check the following video how service chaining works (service chaining demo starts from 42:00)
| Widget Connector | ||
|---|---|---|
|
With XOS
[TODO]
Local Management Network
If you need to SSH to VM directly from compute node, just create and attach the management network to a VM. Management network name should include "management".
1. Create a management network and subnet which you specified as the "localManagementIp" in your network-cfg.json and make sure that the gateway IP of the subnet should be the same with "localManagementIp".
| Code Block | ||||
|---|---|---|---|---|
| ||||
$ neutron net-create management
$ neutron subnet-create management 172.27.0.0/24 --gateway 172.27.0.1 |
2. Create a VM with management network. I added the management network as a second interface in the following example but it is not necessarily to be a second NIC.
| Code Block | ||||
|---|---|---|---|---|
| ||||
$ nova boot --image f04ed5f1-3784-4f80-aee0-6bf83912c4d0 --flavor 1 --nic net-id=aaaf70a4-f2b2-488e-bffe-63654f7b8a82 --nic net-id=0cd5a64f-99a3-45a3-9a78-7656e9f4873a net-A-vm-01 |
All done. Now you can access the VM from the host machine. If the management network is not the primary interface, there's a possibility that the VM does not bring up the interface automatically. In that case, log in to the VM and bring up the interface manually.
| Code Block | ||||
|---|---|---|---|---|
| ||||
$ sudo dhclient eth1 |
VLAN for connectivity between VM and underlay network
You can use VLAN for the connectivity between a VM and a server in the underlay network. It's very limited but can be useful if you need a connectivity between a VM and a physical machine or any other virtual machine which is not controlled by CORD-VTN and OpenStack. R-CORD uses this feature for vSG LAN connectivity.
The figure below is the part of the CORD-VTN pipeline, which shows how VLAN tagged packet is handled.
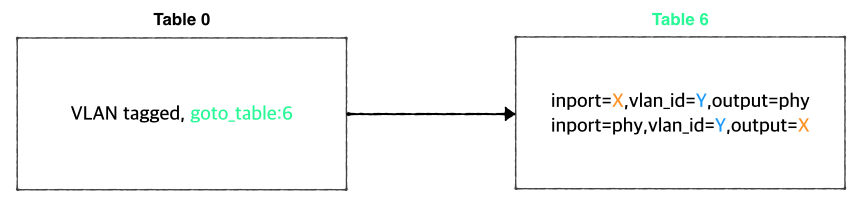
Basically, VLAN tagged packet from a VM is forwarded to the data plane without any modifications and any VLAN tagged packet from data plane is forwarded to a VM based on its VLAN ID. So, assigning the same VLAN ID to multiple VMs in the same virtual switch can break the logic. Anyway, if you want this limited VLAN feature, try the following steps.
1. Create Neutron port with port name "stag-[vid]"
| Code Block |
|---|
$ neutron port-create net-A-private --name stag-100 |
2. Create a VM with the port
| Code Block |
|---|
$ nova boot --image 6ba954df-063f-4379-9e2a-920050879918 --flavor 2 --nic port-id=2c7a397f-949e-4502-aa61-2c9cefe96c74 --user-data passwd.data vsg-01 |
3. Once the VM is up, create a VLAN interface inside the VM with the VID and assign any IP address you want to use with the VLAN. And do the same thing on the server in the underlay.
| Code Block |
|---|
$ sudo vconfig add eth0 100
$ sudo ifconfig eth0.100 10.0.0.2/24 |
Floating IP with VLAN ID 500
CORD-VTN handles VID 500 a little differently. It strips the VLAN before forwarding the packet to the data plane.
[TO DO]
Internet Access from VM (only for test)
If you want to access a VM through SSH or access the Internet from VM without fabric controller and vRouter, you need to do setup the followings in your compute node. Basically, this settings mimics fabric switch and vRouter inside a compute node, that is, "fabric" bridge corresponds to fabric switch and Linux routing tables corresponds to vRouter. You'll need at least two physical interface for this test setup.
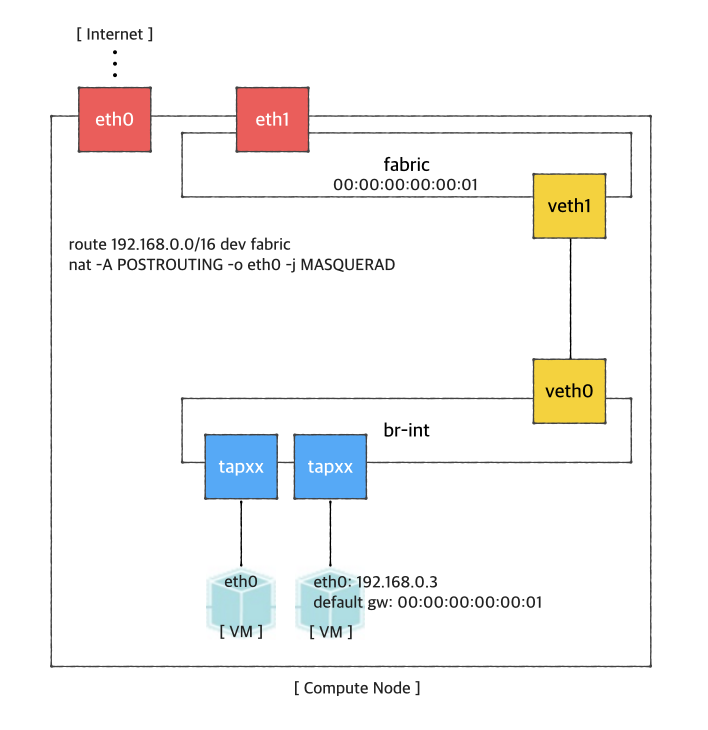
First, you'd create a bridge named "fabric" (it doesn't have to be fabric).
| Code Block | ||
|---|---|---|
| ||
$ sudo brctl addbr fabric |
Create a veth pair and set veth0 as a "dataPlaneIntf" in network-cfg.json
| Code Block | ||
|---|---|---|
| ||
$ ip link add veth0 type veth peer name veth1 |
Now, add veth1 and the actual physical interface, eth1 here in example, to the fabric bridge.
| Code Block | ||
|---|---|---|
| ||
$ sudo brctl addif fabric veth1
$ sudo brctl addif fabric eth1
$ sudo brctl show
bridge name bridge id       STP enabled interfaces
fabric      8000.000000000001   no      eth1
veth1 |
Set fabric bridge MAC address to the virtual gateway MAC address, which is "privateGatewayMac" in network-cfg.json.
| Code Block | ||
|---|---|---|
| ||
$ sudo ip link set address 00:00:00:00:00:01 dev fabric |
Now, add routes of your virtual network IP ranges and NAT rules.
| Code Block | ||
|---|---|---|
| ||
$ sudo route add -net 192.168.0.0/16 dev fabric
$ sudo netstat -rn
Kernel IP routing table
Destination     Gateway         Genmask         Flags   MSS Window  irtt Iface
0.0.0.0         45.55.0.1       0.0.0.0         UG        0 0          0 eth0
45.55.0.0       0.0.0.0         255.255.224.0   U         0 0          0 eth0
192.168.0.0     0.0.0.0         255.255.0.0     U         0 0          0 fabric

$ sudo iptables -A FORWARD -d 192.168.0.0/16 -j ACCEPT
$ sudo iptables -A FORWARD -s 192.168.0.0/16 -j ACCEPT
$ sudo iptables -t nat -A POSTROUTING -o eth0 -j MASQUERADE |
You should enable ip_forward, of course.
| Code Block | ||
|---|---|---|
| ||
$ sudo sysctl net.ipv4.ip_forward=1 |
It's ready. Make sure all interfaces are activated and able to ping to the other compute nodes with "hostManagementIp".
...
| language | bash |
|---|
...
root@xos ~/xos/xos/configurations/cord-pod # make cord |
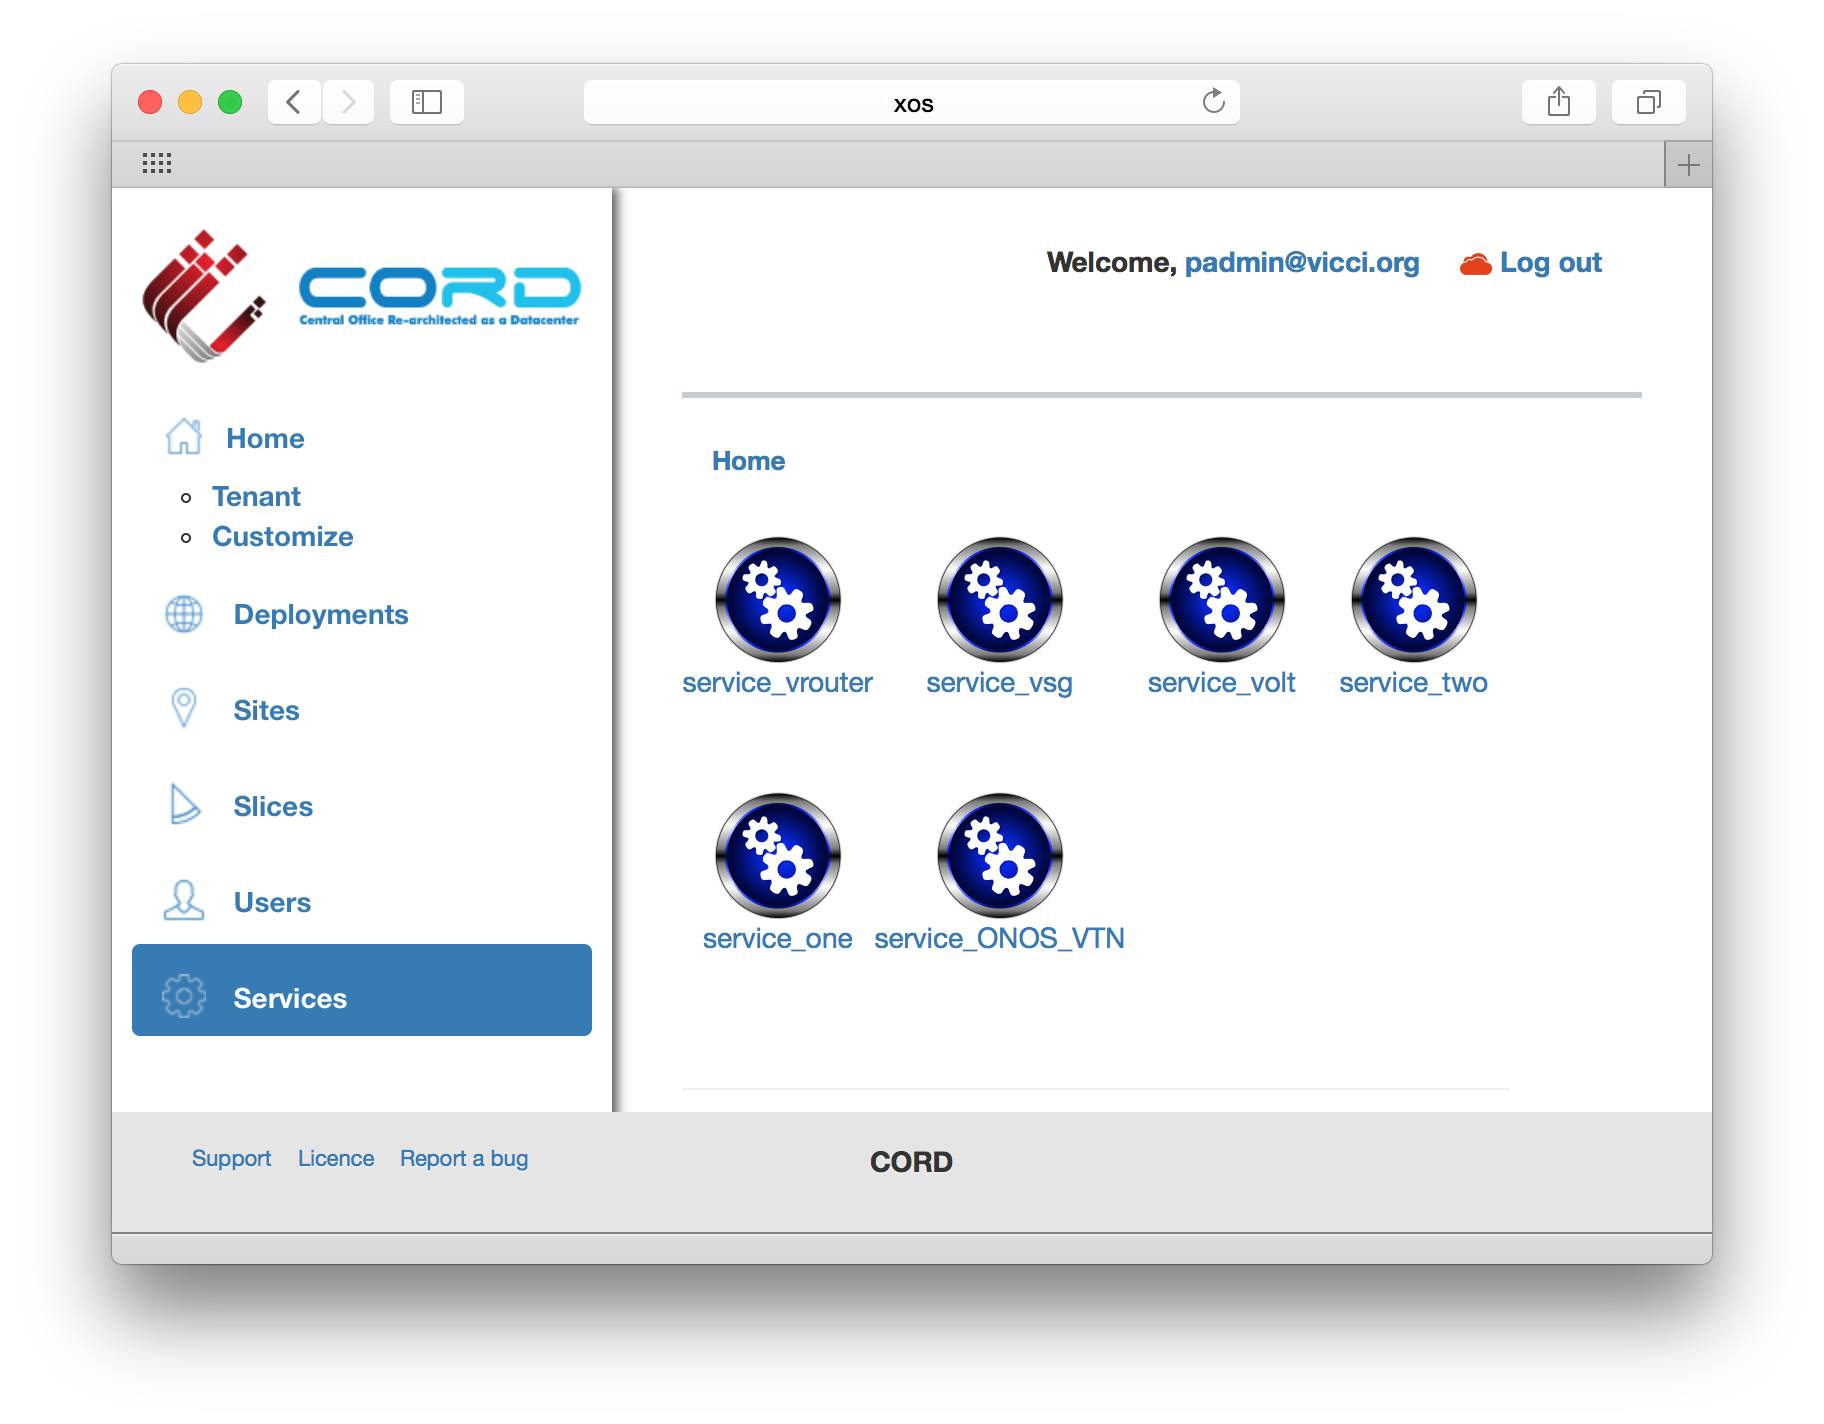
If you log-in to XOS GUI(http://xos, login with "padmin@vicci.org" and "letmein"), you can see some services.
You should also be able to see new networks are created in Neutron.
| Code Block |
|---|
hyunsun@openstack-controller master ~/devstack
$ neutron net-list
+--------------------------------------+-------------------+----------------------------------------------------+
| id                                   | name              | subnets                                            |
+--------------------------------------+-------------------+----------------------------------------------------+
| 6ce70c87-7b9f-4866-9bba-2f7646781576 | mysite_vsg-access | f362b166-c382-4c5e-94c7-e5f8b4822ac3 10.0.2.0/24   |
| 9ababe18-d0b3-41a7-9f81-e56b58aa0182 | management        | 141ce1a6-6407-4385-83ec-1b490bd6be0d 172.27.0.0/24 |
+--------------------------------------+-------------------+----------------------------------------------------+ |
Internet Access from VM (only for test)
If you want to access a VM through SSH or access the Internet from VM without fabric controller and vRouter, you need to do setup the followings in your compute node. Basically, this settings mimics fabric switch and vRouter inside a compute node, that is, "fabric" bridge corresponds to fabric switch and Linux routing tables corresponds to vRouter. You'll need at least two physical interface for this test setup.
First, you'd create a bridge named "fabric" (it doesn't have to be fabric).
| Code Block | ||
|---|---|---|
| ||
$ sudo brctl addbr fabric |
Create a veth pair and set veth0 as a "dataPlaneIntf" in network-cfg.json
| Code Block | ||
|---|---|---|
| ||
$ ip link add veth0 type veth peer name veth1 |
Now, add veth1 and the actual physical interface, eth1 here in example, to the fabric bridge.
| Code Block | ||
|---|---|---|
| ||
$ sudo brctl addif fabric veth1
$ sudo brctl addif fabric eth1
$ sudo brctl show
bridge name bridge id       STP enabled interfaces
fabric      8000.000000000001   no      eth1
veth1 |
Set fabric bridge MAC address to the virtual gateway MAC address, which is "privateGatewayMac" in network-cfg.json.
| Code Block | ||
|---|---|---|
| ||
$ sudo ip link set address 00:00:00:00:00:01 dev fabric |
Now, add routes of your virtual network IP ranges and NAT rules.
| Code Block | ||
|---|---|---|
| ||
$ sudo route add -net 192.168.0.0/16 dev fabric
$ sudo netstat -rn
Kernel IP routing table
Destination     Gateway         Genmask         Flags   MSS Window  irtt Iface
0.0.0.0         45.55.0.1       0.0.0.0         UG        0 0          0 eth0
45.55.0.0       0.0.0.0         255.255.224.0   U         0 0          0 eth0
192.168.0.0     0.0.0.0         255.255.0.0     U         0 0          0 fabric

$ sudo iptables -A FORWARD -d 192.168.0.0/16 -j ACCEPT
$ sudo iptables -A FORWARD -s 192.168.0.0/16 -j ACCEPT
$ sudo iptables -t nat -A POSTROUTING -o eth0 -j MASQUERADE |
You should enable ip_forward, of course.
| Code Block | ||
|---|---|---|
| ||
$ sudo sysctl net.ipv4.ip_forward=1 |
It's ready. Make sure all interfaces are activated and able to ping to the other compute nodes with "hostManagementIp".
| Code Block | ||
|---|---|---|
| ||
$ sudo ip link set br-int up
$ sudo ip link set veth0 up
$ sudo ip link set veth1 up
$ sudo ip link set fabric up |
How To Test: Basic Service Composition
Before you start
Once OpenStack and ONOS with CORD VTN app are started successfully, you'd better check the compute nodes are ready.
1. Check your ONOS instance IPs are correctly set to the management IP. It should be accessible from compute nodes.
| Code Block |
|---|
onos> nodes
id=10.203.255.221, address=159.203.255.221:9876, state=ACTIVE, updated=21h ago *
id=10.243.151.127, address=162.243.151.127:9876, state=ACTIVE, updated=21h ago
id=10.199.96.13, address=198.199.96.13:9876, state=ACTIVE, updated=21h ago |
2. Check your compute nodes are registered to CordVtn service and in init COMPLETE state.
| Code Block | ||||
|---|---|---|---|---|
| ||||
onos> cordvtn-nodes
hostname=compute-01, hostMgmtIp=10.55.25.244/24, dpIp=10.134.34.222/16, br-int=of:0000000000000001, dpIntf=veth1, init=COMPLETE
hostname=compute-02, hostMgmtIp=10.241.229.42/24, dpIp=10.134.34.223/16, br-int=of:0000000000000002, dpIntf=veth1, init=INCOMPLETE
Total 2 nodes |
If the nodes listed in your network-cfgf.json do not show in the result, try to push network-cfg.json to ONOS with REST API.
| Code Block |
|---|
curl --user onos:rocks -X POST -H "Content-Type: application/json" http://onos-01:8181/onos/v1/network/configuration/ -d @network-cfg.json |
If all the nodes are listed but some of them are in "INCOMPLETE" state, check what is the problem with it and fix it.
Once you fix the problem, push the network-cfg.json again to trigger init for all nodes(it is no harm to init COMPLETE state nodes again) or use "cordvtn-node-init" command.
| Code Block | ||||
|---|---|---|---|---|
| ||||
onos> cordvtn-node-check compute-01
Integration bridge created/connected : OK (br-int)
VXLAN interface created : OK
Data plane interface added : OK (veth1)
IP flushed from veth1 : OK
Data plane IP added to br-int : NO (10.134.34.222/16)
Local management IP added to br-int : NO (172.27.0.1/24)

(fix the problem if there's any)

onos> cordvtn-node-init compute-01

onos> cordvtn-node-check compute-01
Integration bridge created/connected : OK (br-int)
VXLAN interface created : OK
Data plane interface added : OK (veth1)
IP flushed from veth1 : OK
Data plane IP added to br-int : OK (10.134.34.222/16)
Local management IP added to br-int : OK (172.27.0.1/24) |
3. Make sure all virtual switches on compute nodes are added and available in ONOS.
| Code Block |
|---|
onos> devices
id=of:0000000000000001, available=true, role=MASTER, type=SWITCH, mfr=Nicira, Inc., hw=Open vSwitch, sw=2.3.2, serial=None, managementAddress=compute.01.ip.addr, protocol=OF_13, channelId=compute.01.ip.addr:39031
id=of:0000000000000002, available=true, role=STANDBY, type=SWITCH, mfr=Nicira, Inc., hw=Open vSwitch, sw=2.3.2, serial=None, managementAddress=compute.02.ip.addr, protocol=OF_13, channelId=compute.02.ip.addr:44920 |
| Note |
|---|
During the initialization process, OVSDB devices can be shown, for example ovsdb:10.241.229.42, when you list devices in your ONOS. Once it's done with node initialization, these OVSDB devices are removed and only OpenFlow devices are shown. |
Now, it's ready.
Without XOS
You can test creating service networks and service chaining manually, that is, without XOS.
1. Test VMs in a same network can talk to each other
First, create a network through OpenStack Horizon or OpenStack CLI. Network name should include one of the following five network types.
- private : network for VM to VM communication
- public : network for VM to external network communication, note that the gateway IP and MAC address of this network should be specified in "publicGateways" field in network-cfg.json
- management : network for VM to compute node communication, where the VM is running. Note that subnet for this network should be the same specified in "localManagementIp" field in network-cfg.json
| Code Block | ||||
|---|---|---|---|---|
| ||||
$ neutron net-create net-A-private
$ neutron subnet-create net-A-private 10.0.0.0/24 |
To access VM through SSH, you may want to create SSH key first and pass the --key-name when you create a VM, or the following script as a --user-data, which sets password of "ubuntu" account to "ubuntu" so that you can login to VM through console. Anyway, creating and accessing a VM is the same with usual OpenStack usage.
| Code Block |
|---|
#cloud-config
password: ubuntu
chpasswd: { expire: False }
ssh_pwauth: True |
Now create VMs with the network you created. (don't forget to add --key-name or --user-data if you want to login to VM)
| Code Block | ||||
|---|---|---|---|---|
| ||||
$ nova boot --image f04ed5f1-3784-4f80-aee0-6bf83912c4d0 --flavor 1 --nic net-id=aaaf70a4-f2b2-488e-bffe-63654f7b8a82 net-A-vm-01 |
You can access VM through Horizon Web Console, virsh console with some tricks(https://github.com/hyunsun/documentations/wiki/Access-OpenStack-VM-through-virsh-console) or if you setup "Local Management Network" part, you can SSH to VM from a compute node where the VM is running.
Now, test VMs can ping to each other.
2. Test VMs in a different network cannot talk to each other
Create another network, for example net-B-private, and create another VM with the network. Now, test the VM cannot ping to the network net-A-private.
3. Test service chaining
Enable ip_forward in your VMs.
| Code Block | ||
|---|---|---|
| ||
$ sudo sysctl net.ipv4.ip_forward=1 |
Create service dependency with the following REST API.
| Code Block | ||
|---|---|---|
| ||
$ curl -X POST -u onos:rocks http://[onos_ip]:8181/onos/cordvtn/service-dependency/[net-A-UUID]/[net-B-UUID]/b |
Now, ping from net-A-private VM to gateway IP address of net-B. There will not be a reply but if you tcpdump in net-B-private VMs, you can see one of the VMs in net-B-private gets the packets from net-A-private VM. To remove the service dependency, send another REST call with DELETE.
| Code Block |
|---|
$ curl -X DELETE -u onos:rocks http://[onos_ip]:8181/onos/cordvtn/service-dependency/[net-A-UUID]/[net-B-UUID] |
Check the following video how service chaining works (service chaining demo starts from 42:00)
| Widget Connector | ||
|---|---|---|
|
With XOS
Running the following command on XOS machine will create VTN services and service dependency.
| Code Block |
|---|
root@xos master ~/xos/xos/configurations/cord-pod
# docker-compose run xos python /opt/xos/tosca/run.py padmin@vicci.org /opt/xos/tosca/samples/vtn-service-chain.yaml |
How To Test: Additional Features
Local Management Network
If you need to SSH to VM directly from compute node, just create and attach the management network to a VM. Management network name should include "management".
1. Create a management network and subnet which you specified as the "localManagementIp" in your network-cfg.json and make sure that the gateway IP of the subnet should be the same with "localManagementIp".
| Code Block | ||||
|---|---|---|---|---|
| ||||
$ neutron net-create management
$ neutron subnet-create management 172.27.0.0/24 --gateway 172.27.0.1 |
2. Create a VM with management network. I added the management network as a second interface in the following example but it is not necessarily to be a second NIC.
| Code Block | ||||
|---|---|---|---|---|
| ||||
$ nova boot --image f04ed5f1-3784-4f80-aee0-6bf83912c4d0 --flavor 1 --nic net-id=aaaf70a4-f2b2-488e-bffe-63654f7b8a82 --nic net-id=0cd5a64f-99a3-45a3-9a78-7656e9f4873a net-A-vm-01 |
All done. Now you can access the VM from the host machine. If the management network is not the primary interface, there's a possibility that the VM does not bring up the interface automatically. In that case, log in to the VM and bring up the interface manually.
| Code Block | ||||
|---|---|---|---|---|
| ||||
$ sudo dhclient eth1 |
VLAN for connectivity between VM and underlay network
You can use VLAN for the connectivity between a VM and a server in the underlay network. It's very limited but can be useful if you need a connectivity between a VM and a physical machine or any other virtual machine which is not controlled by CORD-VTN and OpenStack. R-CORD uses this feature for vSG LAN connectivity.
The figure below is the part of the CORD-VTN pipeline, which shows how VLAN tagged packet is handled.
Basically, VLAN tagged packet from a VM is forwarded to the data plane without any modifications and any VLAN tagged packet from data plane is forwarded to a VM based on its VLAN ID. So, assigning the same VLAN ID to multiple VMs in the same virtual switch can break the logic. Anyway, if you want this limited VLAN feature, try the following steps.
1. Create Neutron port with port name "stag-[vid]"
| Code Block |
|---|
$ neutron port-create net-A-private --name stag-100 |
2. Create a VM with the port
| Code Block |
|---|
$ nova boot --image 6ba954df-063f-4379-9e2a-920050879918 --flavor 2 --nic port-id=2c7a397f-949e-4502-aa61-2c9cefe96c74 --user-data passwd.data vsg-01 |
3. Once the VM is up, create a VLAN interface inside the VM with the VID and assign any IP address you want to use with the VLAN. And do the same thing on the server in the underlay.
| Code Block |
|---|
$ sudo vconfig add eth0 100
$ sudo ifconfig eth0.100 10.0.0.2/24 |
Floating IP with VLAN ID 500
CORD-VTN handles VID 500 a little differently. It strips the VLAN before forwarding the packet to the data plane.
[TO DO]
REST APIs
Here's the list of REST APIs that CORD-VTN provides.
...